> For the complete documentation index, see [llms.txt](https://docs.geopard.tech/geopard-tutorials/llms.txt). Markdown versions of documentation pages are available by appending `.md` to page URLs; this page is available as [Markdown](https://docs.geopard.tech/geopard-tutorials/tr/urun-turu-web-uygulamasi/john-deere-operations-center-integration/8.-export-rx-maps-to-john-deere-operations-center-as-work-plans.md).

# Bir reçeteyi İş Planı olarak John Deere ekranına gönderme

GeoPard reçetesini tarla, ürün ve doz bilgilerini içeren bir Operations Center İş Planına dönüştürün, ardından Gen 4 veya G5 ekranda açın. Adımlar ve sorun giderme.

İş Planı; reçeteyi, tarlayı, uygulama işlemini ve ürünü birlikte kabine aktarır. Böylece operatör, dosya yüklemek yerine Gen 4 veya G5 ekranda tek bir iş açar. Uygulama oranlarını GeoPard'da oluşturun, bölgeler haritasını İş Planı olarak Operations Center'a aktarın; plan, bağlı makinelere gönderilmeye hazır şekilde İş Planlayıcı'da görünür. Önce tarlanın Operations Center ile eşitlenmiş olması gerekir; değilse dışa aktarma durur.

{% hint style="success" %}
Reçeteyi kendi tarlanızda oluşturup Operations Center'a gönderin: [Ücretsiz başlayın](https://app.geopard.tech/auth/sign-up?utm_source=docs\&utm_medium=cta\&utm_campaign=8.-export-rx-maps-to-john-deere-operations-center-as-work-plans)
{% endhint %}

## Erişim haklarını kontrol edin

### GeoPard'da doğrulama

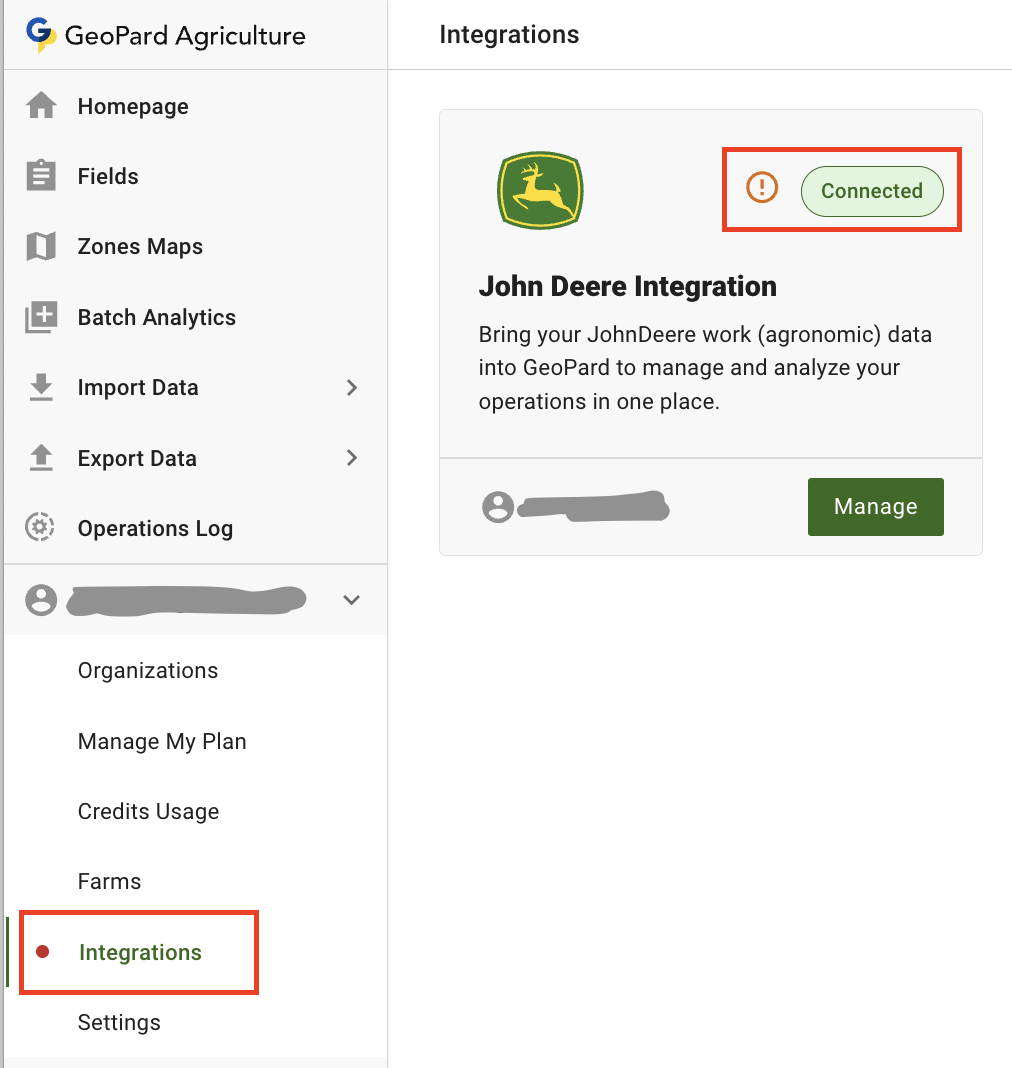
GeoPard'ın John Deere Operations Center'da İş Planı oluşturmak için yeterli erişim haklarına sahip olduğunu kontrol edin. [Oturum açın](https://app.geopard.tech/auth/sign-in), kullanıcı menüsünden (Entegrasyonlar) John Deere entegrasyon sayfasını açın ve mesajı kontrol edin.\
Mesaj görünüyorsa GeoPard <> John Deere bağlantısı güncellenmelidir.

<figure><img src="https://4027984477-files.gitbook.io/~/files/v0/b/gitbook-x-prod.appspot.com/o/spaces%2FYICBELdyAXXebKAzfLOR%2Fuploads%2F0Jp6Csi60DSuUjYmnqjj%2Fimage.png?alt=media&amp;token=8e346192-731e-421c-910f-00676fd864be" alt="" width="375"><figcaption><p>Kontrol: Ek erişim hakları gerekiyor</p></figcaption></figure>

<figure><img src="https://4027984477-files.gitbook.io/~/files/v0/b/gitbook-x-prod.appspot.com/o/spaces%2FYICBELdyAXXebKAzfLOR%2Fuploads%2F1yU6IXMeIly8hWnXnZyn%2Fimage.png?alt=media&amp;token=38488f7c-8724-4eba-932d-b10fec2aac11" alt=""><figcaption><p>Kontrol: Ek erişim hakları gerekiyor</p></figcaption></figure>

{% hint style="warning" %}
Değişikliklerin yalnızca John Deere Operations Center'da (1) ve GeoPard'da (2) oturum yeniden açıldıktan sonra uygulandığını gözlemledik.
{% endhint %}

### John Deere Operations Center'da doğrulama

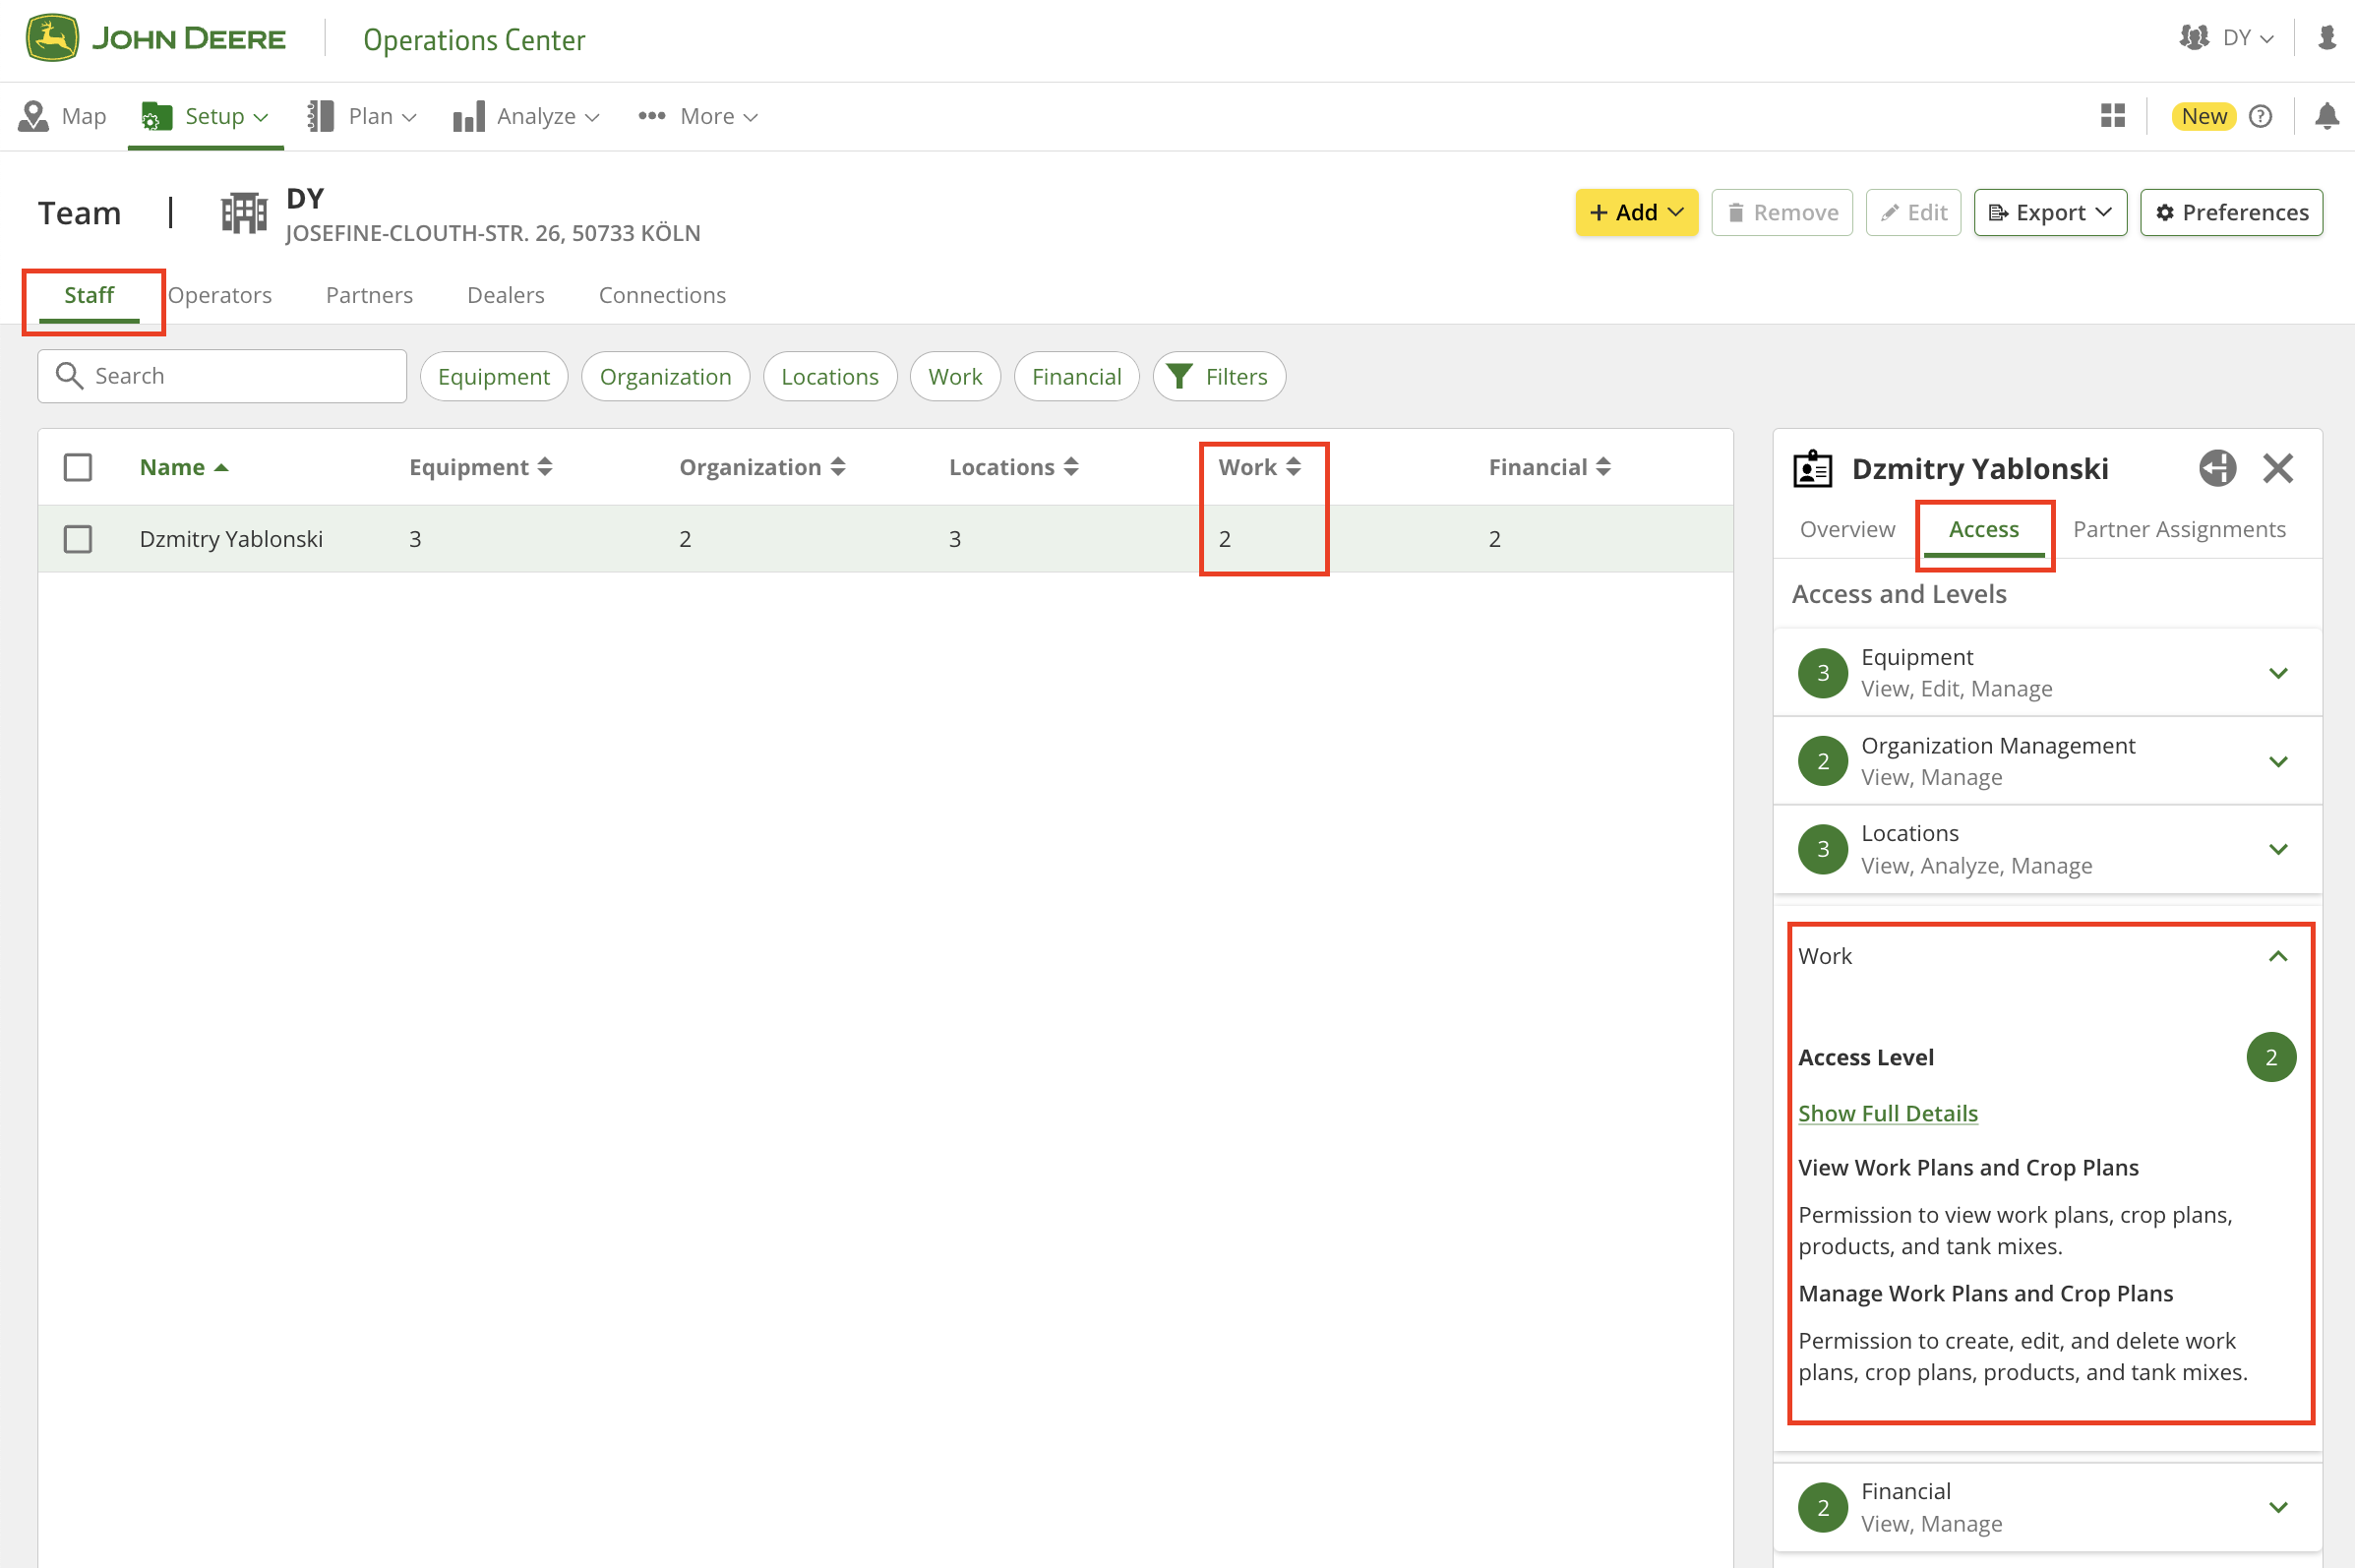
GeoPard'ın yeterli erişim haklarına sahip olduğunu doğrulamak için lütfen "Setup" > "Team" sayfasına (veya <https://team.deere.com/>) gidin ve <mark style="background-color:green;">"Work" erişim düzeyinin 2 olarak ayarlandığından emin olun</mark>.

<figure><img src="https://4027984477-files.gitbook.io/~/files/v0/b/gitbook-x-prod.appspot.com/o/spaces%2FYICBELdyAXXebKAzfLOR%2Fuploads%2FSfssJ9D987PMbGKmgDHF%2Fimage.png?alt=media&amp;token=fbca8ca8-b688-4089-bb5d-512a951b7bfb" alt=""><figcaption><p>Kontrol: John Deere erişim hakları</p></figcaption></figure>

<figure><img src="https://4027984477-files.gitbook.io/~/files/v0/b/gitbook-x-prod.appspot.com/o/spaces%2FYICBELdyAXXebKAzfLOR%2Fuploads%2F3JdS4p7UnmDAja41XUhP%2Fimage.png?alt=media&amp;token=0a5dad44-fd46-40eb-bc44-c38edf32b320" alt=""><figcaption><p>Kontrol: John Deere erişim hakları</p></figcaption></figure>

## Video Eğitimi

Bu eğitimde, GeoPard'ın John Deere İş Planlayıcı ile entegrasyonunun temel özellikleri ayrıntılı olarak açıklanıyor.

{% embed url="<https://youtu.be/op1o-Y3r6bg?si=cUQHzVwVvt-eFzFm>" %}
İş Planı özelliklerine genel bakış
{% endembed %}

Sürecin her adımına ilişkin ayrıntılı bir genel bakış aşağıdaki paragraflarda sunulmuştur.

## İlk İş Planı

### Reçete haritasını hazırlama

Reçete haritasını (atanmış oranlara sahip ZonesMap) dışa aktarmak için ZonesMap aşağıdaki koşulları karşılamalıdır:

1. ZonesMap'e [oranlar atanmış olmalıdır](https://docs.geopard.tech/geopard-tutorials/tr/urun-turu-web-uygulamasi/zones-maps-and-analytics/assign-variable-rates-in-zones-ag-input-rates-distribution-tool.md).
2. Tarla John Deere Operations Center ile eşitlenmiş olmalıdır:[ John Deere Operations Center'dan içe aktarılmış](https://docs.geopard.tech/geopard-tutorials/tr/urun-turu-web-uygulamasi/john-deere-operations-center-integration/4.-import-into-geopard-from-john-deere-operations-center.md) veya [oraya aktarılmış](https://docs.geopard.tech/geopard-tutorials/tr/urun-turu-web-uygulamasi/john-deere-operations-center-integration/7.-export-field-boundaries-to-john-deere-operations-center.md).

### İş Planı oluşturmaya başlayın

Açılır menüye tıklayarak reçete haritasını İş Planı olarak John Deere Operations Center'a aktarın.

<figure><img src="https://4027984477-files.gitbook.io/~/files/v0/b/gitbook-x-prod.appspot.com/o/spaces%2FYICBELdyAXXebKAzfLOR%2Fuploads%2FctGSCyhsBOOfmzfRhfXc%2Fimage.png?alt=media&amp;token=6415bc85-e8a6-4461-8626-10e5381f4504" alt=""><figcaption><p>İş Planı oluşturmaya başlayın</p></figcaption></figure>

Ardından İş Planı Yapılandırma moduna geçersiniz. Burada oluşturulacak İş Planı türünü tanımlayabilir (1), plana eklenecek GeoPard haritalarını seçebilir (2) ve ürün atayabilirsiniz (3).

<figure><img src="https://4027984477-files.gitbook.io/~/files/v0/b/gitbook-x-prod.appspot.com/o/spaces%2FYICBELdyAXXebKAzfLOR%2Fuploads%2FKNEkHb0ykbBJ4de80H0z%2Fimage.png?alt=media&amp;token=20a5175b-35da-45ed-85ba-7a1f2bbadd5a" alt="" width="375"><figcaption><p>İş Planı yapılandırma ekranı</p></figcaption></figure>

### İş Planında birden fazla reçete haritası

İki tür İş Planı vardır: **Ekim** ve **Uygulama**. Farklı reçete haritaları kullanarak ekim ve gübreleme işlemlerini birleştirmek istiyorsanız, **Ekim** türüne birden fazla harita ekleyebilirsiniz.

<figure><img src="https://4027984477-files.gitbook.io/~/files/v0/b/gitbook-x-prod.appspot.com/o/spaces%2FYICBELdyAXXebKAzfLOR%2Fuploads%2Fi0f0hDobJpSWhIKhnp7S%2Fimage.png?alt=media&amp;token=332ed239-6288-4a64-b016-e41a8da7286b" alt="" width="375"><figcaption><p>2. Uygulamayı ekleme (ADIM 1)</p></figcaption></figure>

<figure><img src="https://4027984477-files.gitbook.io/~/files/v0/b/gitbook-x-prod.appspot.com/o/spaces%2FYICBELdyAXXebKAzfLOR%2Fuploads%2FkIuo7xQ1mruga7YeA1KH%2Fimage.png?alt=media&amp;token=aa4f81b8-2762-4e79-9fa8-31fdb26b312c" alt="" width="375"><figcaption><p>2. Uygulamayı ekleme (ADIM 2)</p></figcaption></figure>

<figure><img src="https://4027984477-files.gitbook.io/~/files/v0/b/gitbook-x-prod.appspot.com/o/spaces%2FYICBELdyAXXebKAzfLOR%2Fuploads%2FaRXQcNAWQtHmKLkcqfvy%2Fimage.png?alt=media&amp;token=cf733b58-68aa-46b2-aace-bd9f6e293ee1" alt="" width="375"><figcaption><p>2. Uygulamayı ekleme (ADIM 3)</p></figcaption></figure>

### Ürünleri atayın

{% hint style="warning" %}
Ürün listesi John Deere Operations Center'dan alınır. Bu nedenle Mahsul Çeşitleri, Gübreler, Kimyasallar (Tank Karışımı dâhil) ve Karışım Ürünleri önceden burada yapılandırılmalıdır.
{% endhint %}

İlgili açılır listelerden ürünleri ve birimleri seçin.

<figure><img src="https://4027984477-files.gitbook.io/~/files/v0/b/gitbook-x-prod.appspot.com/o/spaces%2FYICBELdyAXXebKAzfLOR%2Fuploads%2FWGDa7kpcN60lNAu7zmL3%2Fimage.png?alt=media&amp;token=1596274c-d68a-41b5-b33f-4eacd59a6385" alt="" width="375"><figcaption><p>Ürünleri ve birimleri seçin</p></figcaption></figure>

Seçilen uygulama türünde ürün yoksa GeoPard, bunları John Deere Operations Center'a eklemenizi ister.

<figure><img src="https://4027984477-files.gitbook.io/~/files/v0/b/gitbook-x-prod.appspot.com/o/spaces%2FYICBELdyAXXebKAzfLOR%2Fuploads%2FH4vkHkc3MNvR7g3TW2Q4%2Fimage.png?alt=media&amp;token=de989efb-82fd-438e-b4cc-59ec88cd713d" alt="" width="375"><figcaption><p>Ürün ekleme isteği</p></figcaption></figure>

### John Deere'a aktarın

Yapılandırılmış İş Planını John Deere Operations Center'a göndermek için Dışa Aktar düğmesine tıklayın.

<figure><img src="https://4027984477-files.gitbook.io/~/files/v0/b/gitbook-x-prod.appspot.com/o/spaces%2FYICBELdyAXXebKAzfLOR%2Fuploads%2FhG3ZVzzY1rYBtLb2YYv6%2Fimage.png?alt=media&amp;token=aa951ae7-d62c-4862-b3ef-2f8e8443e7ed" alt="" width="375"><figcaption><p>İş Planını Dışa Aktar</p></figcaption></figure>

İş Planına Git düğmesine tıkladığınızda, John Deere Operations Center'da yeni oluşturulan İş Planına doğrudan yönlendirilirsiniz.

<figure><img src="https://4027984477-files.gitbook.io/~/files/v0/b/gitbook-x-prod.appspot.com/o/spaces%2FYICBELdyAXXebKAzfLOR%2Fuploads%2Ff0TGoZkx33xkNFL2xLrh%2Fimage.png?alt=media&amp;token=deb06487-40d4-4d71-9a4b-0377347e0edb" alt="" width="252"><figcaption><p>Yeni Dışa Aktarılan İş Planına Git</p></figcaption></figure>

<figure><img src="https://4027984477-files.gitbook.io/~/files/v0/b/gitbook-x-prod.appspot.com/o/spaces%2FYICBELdyAXXebKAzfLOR%2Fuploads%2FW0kKxn2n6W8wvoTQk1MI%2Fimage.png?alt=media&amp;token=4ef3e173-d00c-4591-a595-7fe8ca69bd9a" alt=""><figcaption><p>John Deere Operations Center'da Yeni Dışa Aktarılan İş Planı</p></figcaption></figure>

Yeni dışa aktarılan İş Planı ayrıca [John Deere Operations Center'daki İş Planlayıcı sayfasında bulunabilir](https://work-planner.deere.com/).

<figure><img src="https://4027984477-files.gitbook.io/~/files/v0/b/gitbook-x-prod.appspot.com/o/spaces%2FYICBELdyAXXebKAzfLOR%2Fuploads%2F32uhEKFVQ35SIGi9WS0W%2Fimage.png?alt=media&amp;token=f60da8f7-0f71-4b65-aea9-073e8d036518" alt=""><figcaption><p>John Deere Operations Center'da Yeni Dışa Aktarılan İş Planlayıcı</p></figcaption></figure>

## Birden Fazla Ürün İçeren Gelişmiş İş Planı

Birden fazla işlemde, örneğin çeşitli ürünleri uygularken, tek bir ZonesMap kullanmak sık karşılaşılan bir taleptir. GeoPard ile John Deere Operations Center arasındaki entegrasyon bu işlevi destekler. Ayrıntılı adım adım yönergeler aşağıdaki bölümlerde verilmiştir.

### Reçete haritasını hazırlama

Herhangi bir Rx Map'i (atanmış dozlara sahip ZonesMap) dışa aktarmak için ZonesMap'in aşağıdaki koşulları karşılaması gerekir:

1. Bir ZonesMap'e [dozlar atanmış olmalı](https://docs.geopard.tech/geopard-tutorials/tr/urun-turu-web-uygulamasi/zones-maps-and-analytics/assign-variable-rates-in-zones-ag-input-rates-distribution-tool.md), <mark style="background-color:green;">ve bizim örneğimizde birden fazla ürün bulunmalıdır.</mark>
2. Tarla John Deere Operations Center ile eşitlenmiş olmalıdır:[ John Deere Operations Center'dan içe aktarılmış](https://docs.geopard.tech/geopard-tutorials/tr/urun-turu-web-uygulamasi/john-deere-operations-center-integration/4.-import-into-geopard-from-john-deere-operations-center.md) veya [oraya aktarılmış](https://docs.geopard.tech/geopard-tutorials/tr/urun-turu-web-uygulamasi/john-deere-operations-center-integration/7.-export-field-boundaries-to-john-deere-operations-center.md).

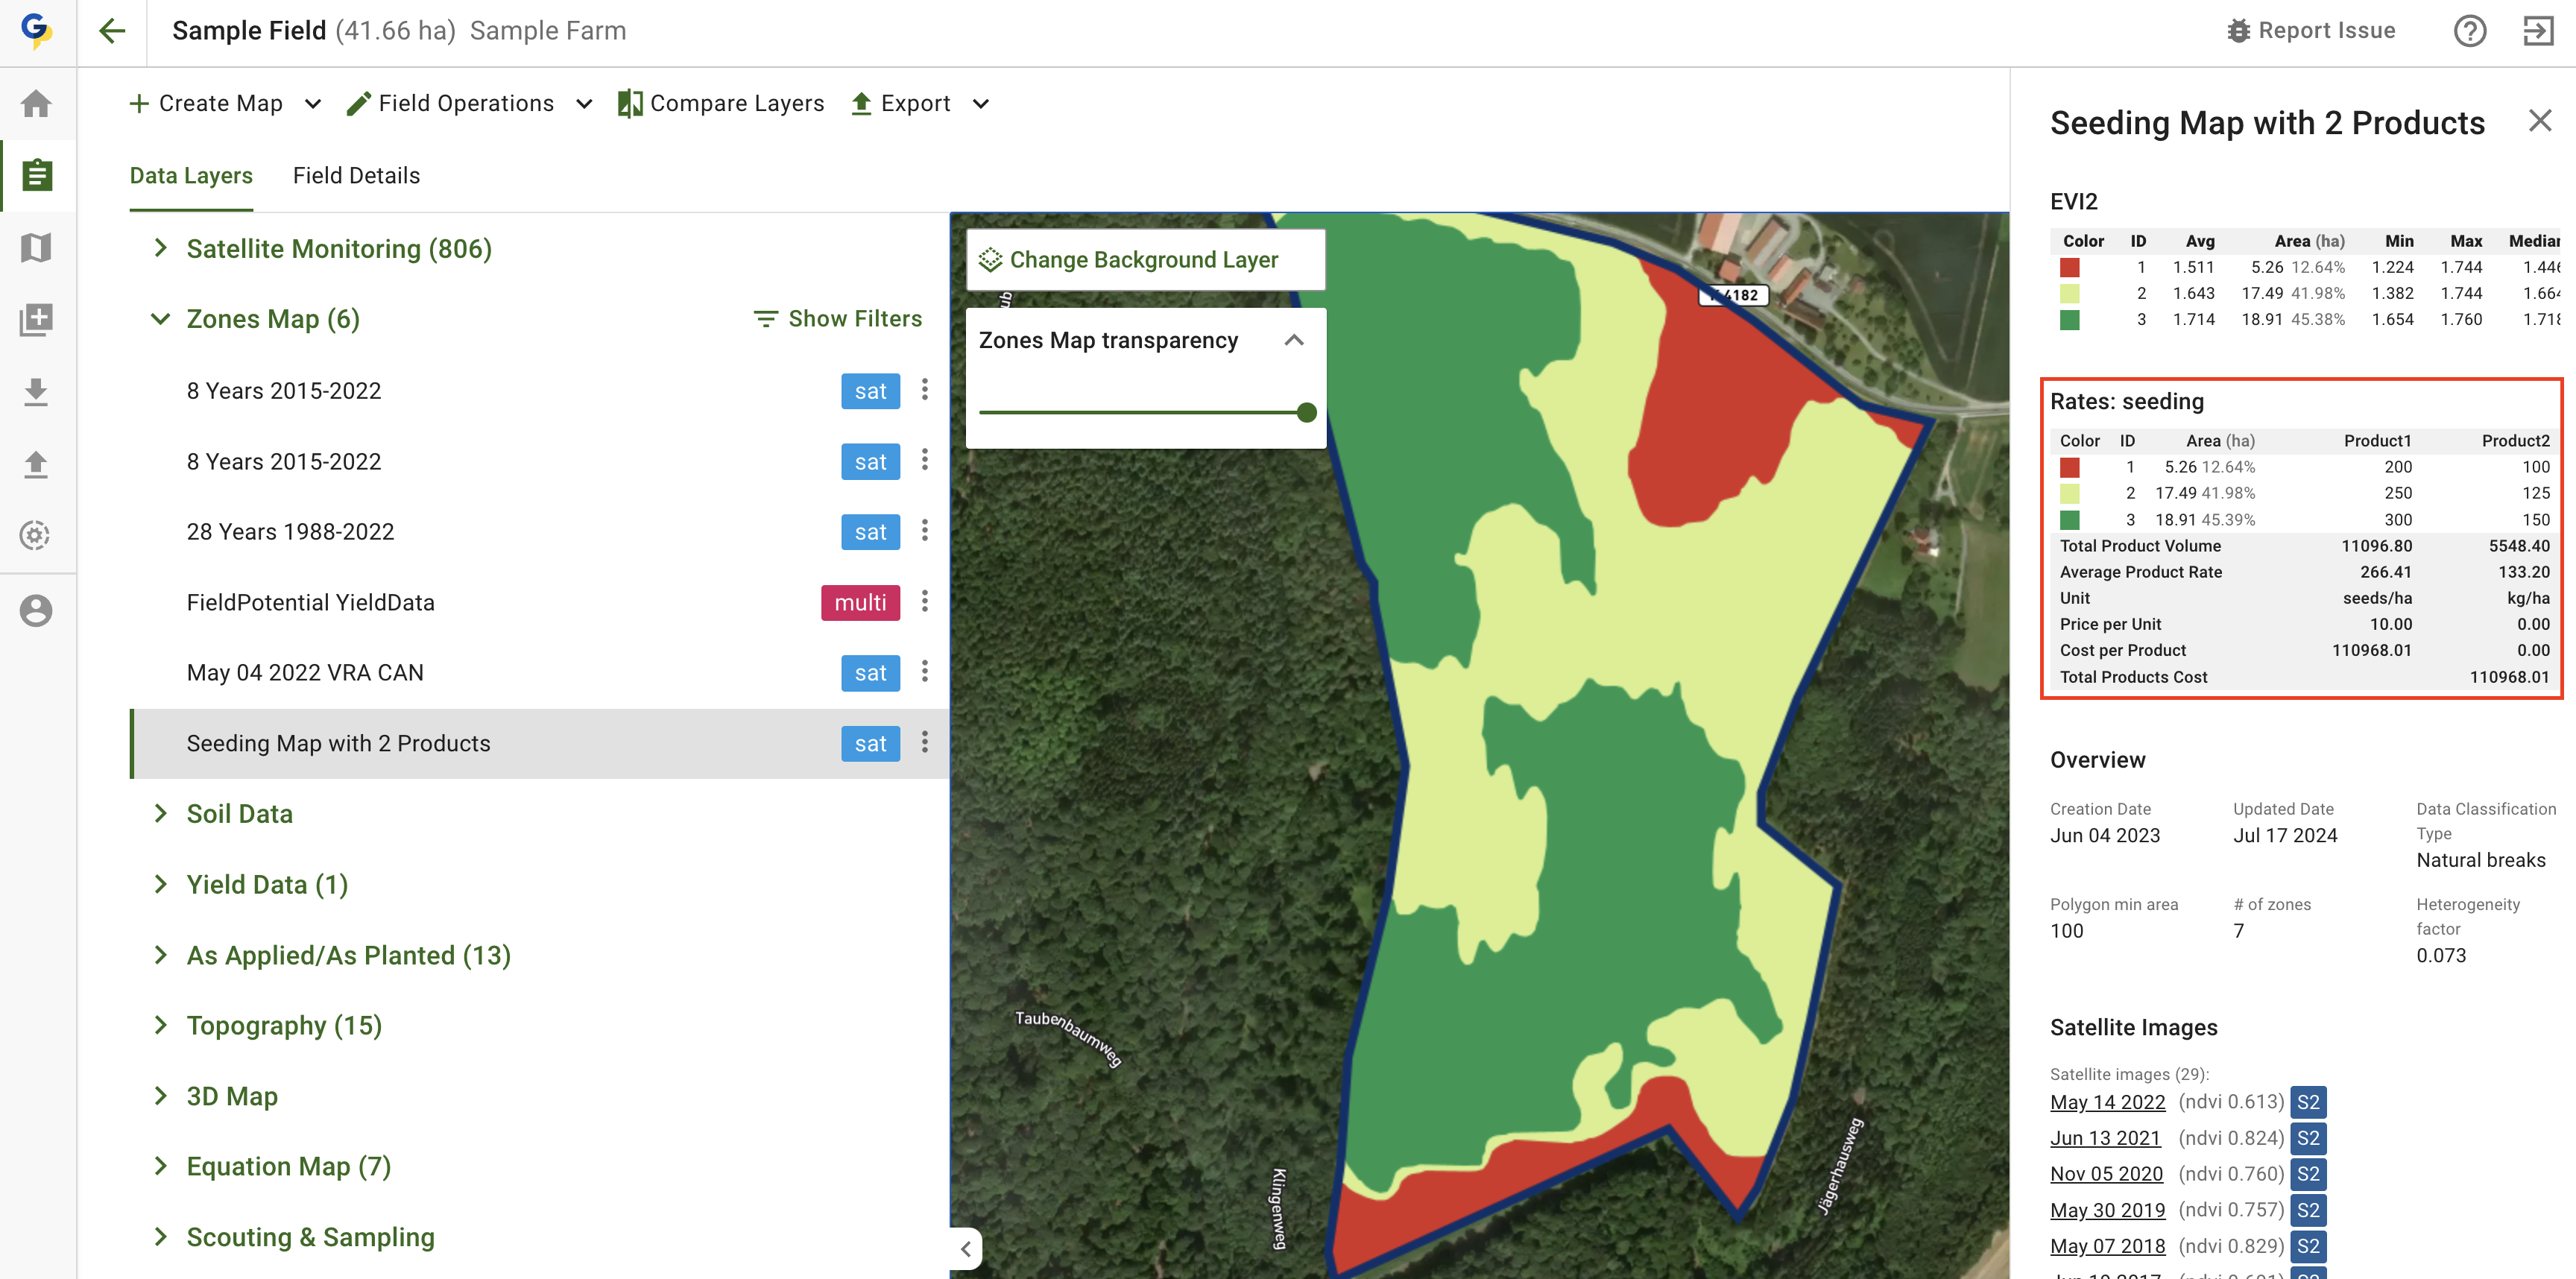
İşte hem <mark style="background-color:green;">Product1</mark> hem de <mark style="background-color:green;">Product2</mark> atanmış bir Rx Map: ZonesMap.

<figure><img src="https://4027984477-files.gitbook.io/~/files/v0/b/gitbook-x-prod.appspot.com/o/spaces%2FYICBELdyAXXebKAzfLOR%2Fuploads%2FOfdPnmexx8lTPg5kHDAM%2Fimage.png?alt=media&amp;token=a7eda779-2276-4bc5-9f78-a55efe26d058" alt=""><figcaption><p>Rx Map: 2 Ürünlü ZonesMap</p></figcaption></figure>

### İş Planı Oluştur

ZonesMap'i İş Planı olarak MyJohnDeere'e dışa aktararak başlayalım. <mark style="background-color:green;">En önemli adım, aynı ZonesMap'i her seferinde farklı bir ürün atanmış olacak şekilde iki kez seçmektir.</mark> Daha önce belirtildiği gibi, <mark style="background-color:green;">Product1</mark> ve <mark style="background-color:green;">Product2</mark> önceki adımda atanmıştı.

<figure><img src="https://4027984477-files.gitbook.io/~/files/v0/b/gitbook-x-prod.appspot.com/o/spaces%2FYICBELdyAXXebKAzfLOR%2Fuploads%2F1loYqjZ0hETaJHiIKMr1%2Fimage.png?alt=media&amp;token=0136c6c9-e3c3-4d35-a258-f3bf9e1d5f49" alt="" width="375"><figcaption></figcaption></figure>

Dışa Aktar'a tıkladıktan sonra İş Planı oluşturulup MyJohnDeere'e gönderilir. Doğrudan bağlantı verilir. <mark style="background-color:green;">Bu bağlantıya tıklayıp MyJohnDeere'de ürün atamalarını tamamlamanız gerekir.</mark>

<figure><img src="https://4027984477-files.gitbook.io/~/files/v0/b/gitbook-x-prod.appspot.com/o/spaces%2FYICBELdyAXXebKAzfLOR%2Fuploads%2FQY0kTrVqGDGkp86xEkHd%2Fimage.png?alt=media&amp;token=222f83c2-4a5d-420a-89e9-a0ca88e11310" alt=""><figcaption><p>MyJohnDeere'de 2 Ürünlü İş Planı oluşturuldu</p></figcaption></figure>

İş Planı sayfasında, John Deere ürününü RxMap ürününe bağlamak için mevcut seçeneklerden uygun özniteliği seçmeniz gerekir. Aşağıdaki örnekte, t<mark style="background-color:green;">ohum ekim dozları Product1 sütununda yer alır</mark>.

<figure><img src="https://4027984477-files.gitbook.io/~/files/v0/b/gitbook-x-prod.appspot.com/o/spaces%2FYICBELdyAXXebKAzfLOR%2Fuploads%2FMgxSuArrBvSKfY56lFzf%2Fimage.png?alt=media&amp;token=b78e609a-c75a-4aaa-a13a-3bcdd43a2d81" alt=""><figcaption></figcaption></figure>

Ardından, <mark style="background-color:green;">Product2 için seçim işlemini tekrarlayın</mark>.

Sonuçlar aşağıda gösterildiği gibi görünür. Lütfen <mark style="background-color:green;">sonrasında Kaydet düğmesine tıklamayı unutmayın</mark>.

<figure><img src="https://4027984477-files.gitbook.io/~/files/v0/b/gitbook-x-prod.appspot.com/o/spaces%2FYICBELdyAXXebKAzfLOR%2Fuploads%2FiiMPea869VGShvPKqUeo%2Fimage.png?alt=media&amp;token=5bf306eb-555c-479c-8a86-06ab2860c1ca" alt=""><figcaption><p>MyJohnDeere'deki İş Planını İnceleme</p></figcaption></figure>

{% hint style="success" %}
Reçeteyi kendi tarlanızda oluşturup Operations Center'a gönderin: [Ücretsiz başlayın](https://app.geopard.tech/auth/sign-up?utm_source=docs\&utm_medium=cta\&utm_campaign=8.-export-rx-maps-to-john-deere-operations-center-as-work-plans)
{% endhint %}


---

# Agent Instructions
This documentation is published with GitBook. GitBook is the documentation platform designed so that both humans and AI agents can read, navigate, and reason over technical content effectively. Learn more at gitbook.com.

## Querying This Documentation
If you need additional information that is not directly available in this page, you can query the documentation by asking a question.

Perform an HTTP GET request on the following URL with the `ask` and `goal` query parameters:

```
GET https://docs.geopard.tech/geopard-tutorials/tr/urun-turu-web-uygulamasi/john-deere-operations-center-integration/8.-export-rx-maps-to-john-deere-operations-center-as-work-plans.md?ask=<question>&goal=<user_goal>
```

`ask` is the immediate question: it should be specific, self-contained, and written in natural language.
`goal` is what the user is ultimately trying to achieve, the reason they need the answer. Sharing it helps GitBook give you a better, more relevant answer. A goal is most helpful when it describes the outcome the user wants rather than restating the question. For example, with `ask=how do I create an API token`, a goal like `automate deployments from our CI pipeline` lets GitBook tailor the answer to that use case.

The response will contain a direct answer to the question and relevant excerpts and sources from the documentation.

Use this mechanism when the answer is not explicitly present in the current page, you need clarification or additional context, or you want to retrieve related documentation sections.