> For the complete documentation index, see [llms.txt](https://docs.geopard.tech/geopard-tutorials/llms.txt). Markdown versions of documentation pages are available by appending `.md` to page URLs; this page is available as [Markdown](https://docs.geopard.tech/geopard-tutorials/tr/gis-kisa-ipuclari/qgis-calculate-ndvi-for-the-drone-geotiff-file.md).
# QGIS: Drone GeoTIFF Dosyası için NDVI Hesaplama
Bazen tarla içindeki bir poligonun ortalama NDVI değerini hesaplamanız gerekir. Bunu QGIS programında şu şekilde yapabilirsiniz.
#### 1 - Başlangıç Drone NDVI GeoTIFF dosyasını görselleştirin
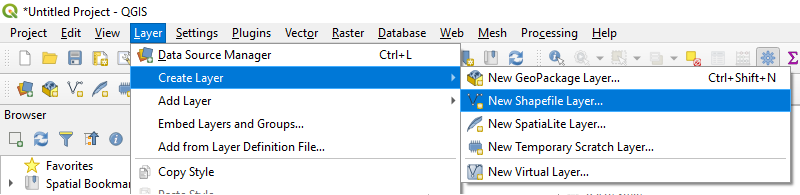
#### 2 - Yeni bir katman oluşturun
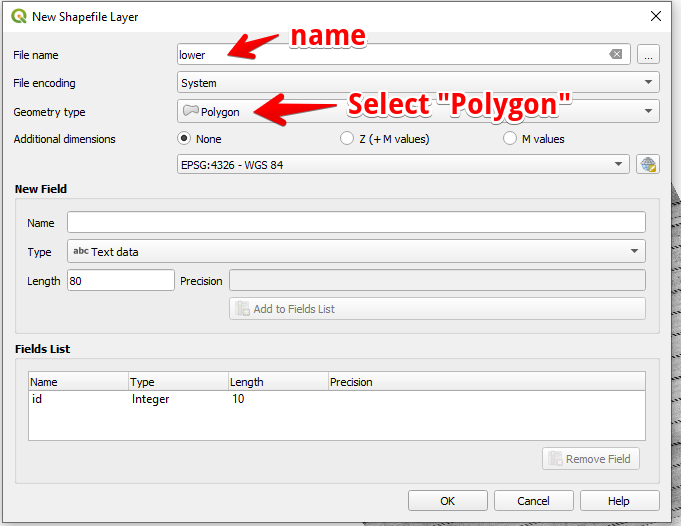
#### 3 - Katman adını ve geometri türünü ayarlayın, ardından Tamam'a basın
#### 4 - Katmanlar panelinde katmanı seçin
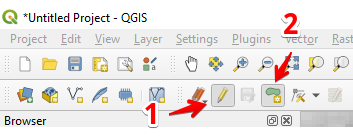
1. “Düzenlemeyi Aç/Kapat”ı seçin (1)
2. “Poligon Detayı Ekle”yi seçin (2)
#### 5 - Bir poligon çizin. Çizimi bitirmek için farenin sağ tuşuna basın ve açılır pencerede “id” değerini ayarlayın.
“Düzenlemeyi Aç/Kapat”a tekrar basarak katmanı düzenlemeyi bitirin ve “Kaydet”e basın.
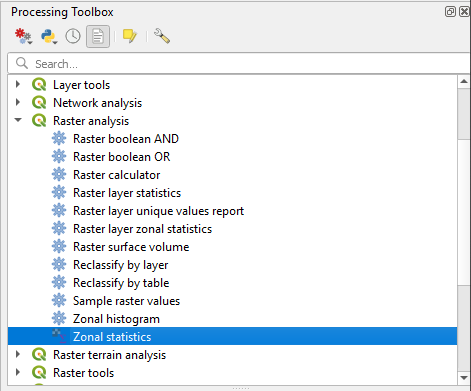
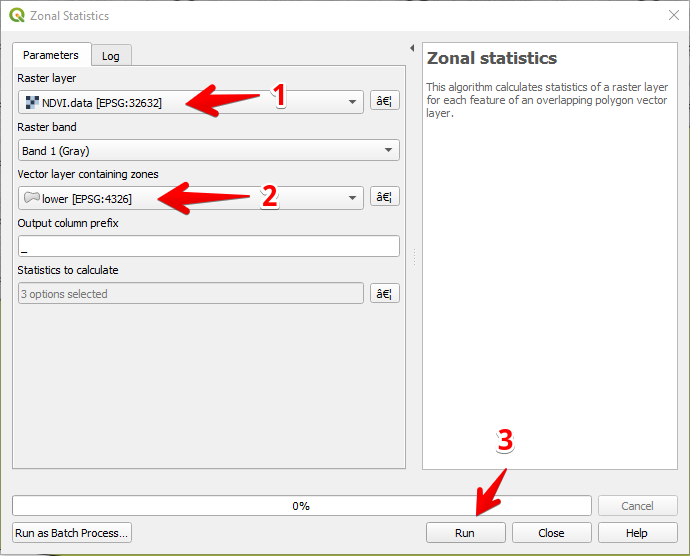
#### 6 - “İşleme Araç Kutusu” panelinde Bölgesel istatistikler'i seçin.
#### 7 - Raster katmanını seçin (1),
poligon katmanını seçin (2),
“Çalıştır”a basın (3).
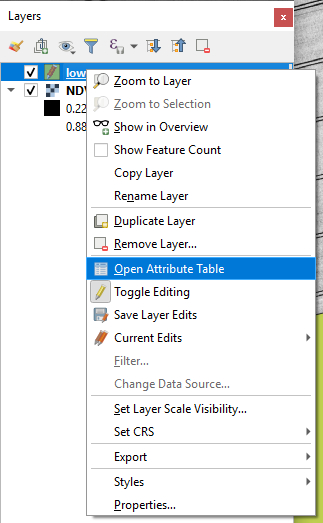
#### 8 - Katmanlar panelinde katmanı seçip farenin sağ tuşuna basın; bağlam menüsünden Öznitelik Tablosunu Aç'ı seçin.
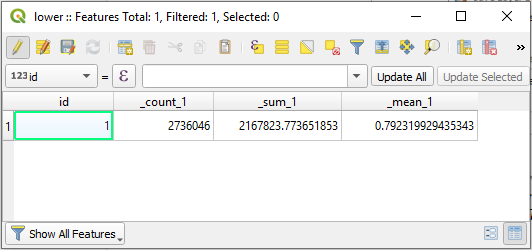
#### 9 - Hesaplanan istatistikler tabloda gösterilir.
---
# Agent Instructions
This documentation is published with GitBook. GitBook is the documentation platform designed so that both humans and AI agents can read, navigate, and reason over technical content effectively. Learn more at gitbook.com.
## Querying This Documentation
If you need additional information that is not directly available in this page, you can query the documentation by asking a question.
Perform an HTTP GET request on the following URL with the `ask` and `goal` query parameters:
```
GET https://docs.geopard.tech/geopard-tutorials/tr/gis-kisa-ipuclari/qgis-calculate-ndvi-for-the-drone-geotiff-file.md?ask=&goal=
```
`ask` is the immediate question: it should be specific, self-contained, and written in natural language.
`goal` is what the user is ultimately trying to achieve, the reason they need the answer. Sharing it helps GitBook give you a better, more relevant answer. A goal is most helpful when it describes the outcome the user wants rather than restating the question. For example, with `ask=how do I create an API token`, a goal like `automate deployments from our CI pipeline` lets GitBook tailor the answer to that use case.
The response will contain a direct answer to the question and relevant excerpts and sources from the documentation.
Use this mechanism when the answer is not explicitly present in the current page, you need clarification or additional context, or you want to retrieve related documentation sections.