> For the complete documentation index, see [llms.txt](https://docs.geopard.tech/geopard-tutorials/llms.txt). Markdown versions of documentation pages are available by appending `.md` to page URLs; this page is available as [Markdown](https://docs.geopard.tech/geopard-tutorials/pl/przewodnik-po-produkcie-aplikacja-webowa/zones-maps-and-analytics/create-a-zones-map-using-soil-yield-or-as-applied-data.md).
# Utwórz mapę stref z wykorzystaniem danych glebowych, plonowych lub z aplikacji
Twórz strefy zarządzania na podstawie danych glebowych, plonowych lub maszynowych, aby odzwierciedlić rzeczywistą zmienność pola.
Jeśli chcesz utworzyć mapę stref na podstawie zbioru danych, najpierw prześlij dane na pole.
1. Wybierz pole z listy i kliknij przycisk **Utwórz mapę stref** , a następnie wybierz **Jedna warstwa**, po czym kliknij **Dalej**.
2. Wybierz **Dane o glebie** typ danych, aby kontynuować. Możesz też użyć danych o plonach lub danych o wykonanych zabiegach.
3. W kolejnym kroku wybierz konkretny zbiór danych o glebie, którego chcesz użyć, i kliknij **Dalej**.
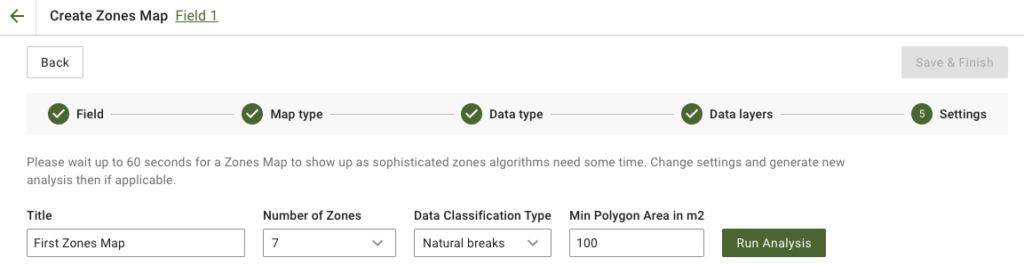
4. W kolejnym kroku możesz edytować tytuł, zmienić liczbę stref, [wybrać typ klasyfikacji danych](https://docs.geopard.tech/geopard-tutorials/pl/przewodnik-po-produkcie-aplikacja-webowa/zones-maps-and-analytics/using-data-classification.md), a także określić minimalną powierzchnię poligonu w metrach kwadratowych. Kliknij **Uruchom analizę** aby kontynuować.
Analiza może potrwać do 60 sekund, w zależności od określonych parametrów.
5. Po jej zakończeniu kliknij **Zapisz i zakończ**.
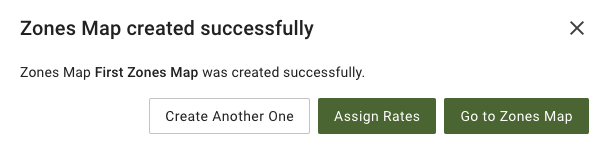
Po zapisaniu zobaczysz następujący komunikat:
Możesz utworzyć kolejną mapę stref, przypisać dawki lub otworzyć właśnie utworzoną mapę stref. Po jej otwarciu zobaczysz podobny widok.
---
# Agent Instructions
This documentation is published with GitBook. GitBook is the documentation platform designed so that both humans and AI agents can read, navigate, and reason over technical content effectively. Learn more at gitbook.com.
## Querying This Documentation
If you need additional information that is not directly available in this page, you can query the documentation by asking a question.
Perform an HTTP GET request on the following URL with the `ask` and `goal` query parameters:
```
GET https://docs.geopard.tech/geopard-tutorials/pl/przewodnik-po-produkcie-aplikacja-webowa/zones-maps-and-analytics/create-a-zones-map-using-soil-yield-or-as-applied-data.md?ask=&goal=
```
`ask` is the immediate question: it should be specific, self-contained, and written in natural language.
`goal` is what the user is ultimately trying to achieve, the reason they need the answer. Sharing it helps GitBook give you a better, more relevant answer. A goal is most helpful when it describes the outcome the user wants rather than restating the question. For example, with `ask=how do I create an API token`, a goal like `automate deployments from our CI pipeline` lets GitBook tailor the answer to that use case.
The response will contain a direct answer to the question and relevant excerpts and sources from the documentation.
Use this mechanism when the answer is not explicitly present in the current page, you need clarification or additional context, or you want to retrieve related documentation sections.