> For the complete documentation index, see [llms.txt](https://docs.geopard.tech/geopard-tutorials/llms.txt). Markdown versions of documentation pages are available by appending `.md` to page URLs; this page is available as [Markdown](https://docs.geopard.tech/geopard-tutorials/jpn/tsu-webapuri/john-deere-operations-center-integration/8.-export-rx-maps-to-john-deere-operations-center-as-work-plans.md).

# 処方箋を作業計画としてJohn Deereディスプレイに送信する

GeoPardの処方箋を、圃場、資材、散布量を含むOperations Centerの作業計画に変換し、Gen 4またはG5ディスプレイで開きます。手順とトラブルシューティングを紹介します。

作業計画では、圃場、作業、製品とともに処方を運転席に送信できるため、オペレーターはファイルを読み込む代わりに、Gen 4またはG5ディスプレイで1つの作業を開けます。GeoPardで散布量を設定し、ゾーンマップを作業計画としてOperations Centerにエクスポートすると、Work Plannerに表示され、接続済みの機械に送信できる状態になります。事前に圃場をOperations Centerと同期しておく必要があります。同期されていない場合、エクスポートは停止します。

{% hint style="success" %}
自分の圃場で処方を作成し、Operations Centerに送信しましょう。 [無料で始める](https://app.geopard.tech/auth/sign-up?utm_source=docs\&utm_medium=cta\&utm_campaign=8.-export-rx-maps-to-john-deere-operations-center-as-work-plans)
{% endhint %}

## アクセス権を確認する

### GeoPardでの確認

GeoPardに、John Deere Operations Centerで作業計画を作成するための十分なアクセス権があることを確認してください。 [サインイン](https://app.geopard.tech/auth/sign-in)し、ユーザーメニューの［Integrations］からJohn Deere連携ページを開いて、メッセージを確認します。\
このメッセージが表示される場合は、GeoPardとJohn Deereの接続を更新する必要があります。

<figure><img src="https://1993076779-files.gitbook.io/~/files/v0/b/gitbook-x-prod.appspot.com/o/spaces%2FYICBELdyAXXebKAzfLOR%2Fuploads%2F0Jp6Csi60DSuUjYmnqjj%2Fimage.png?alt=media&amp;token=8e346192-731e-421c-910f-00676fd864be" alt="" width="375"><figcaption><p>確認：追加のアクセス権が必要です</p></figcaption></figure>

<figure><img src="https://1993076779-files.gitbook.io/~/files/v0/b/gitbook-x-prod.appspot.com/o/spaces%2FYICBELdyAXXebKAzfLOR%2Fuploads%2F1yU6IXMeIly8hWnXnZyn%2Fimage.png?alt=media&amp;token=38488f7c-8724-4eba-932d-b10fec2aac11" alt=""><figcaption><p>確認：追加のアクセス権が必要です</p></figcaption></figure>

{% hint style="warning" %}
John Deere Operations Center（1）とGeoPard（2）に再度ログインした後にのみ、変更が適用されることを確認しています。
{% endhint %}

### John Deere Operations Centerでの確認

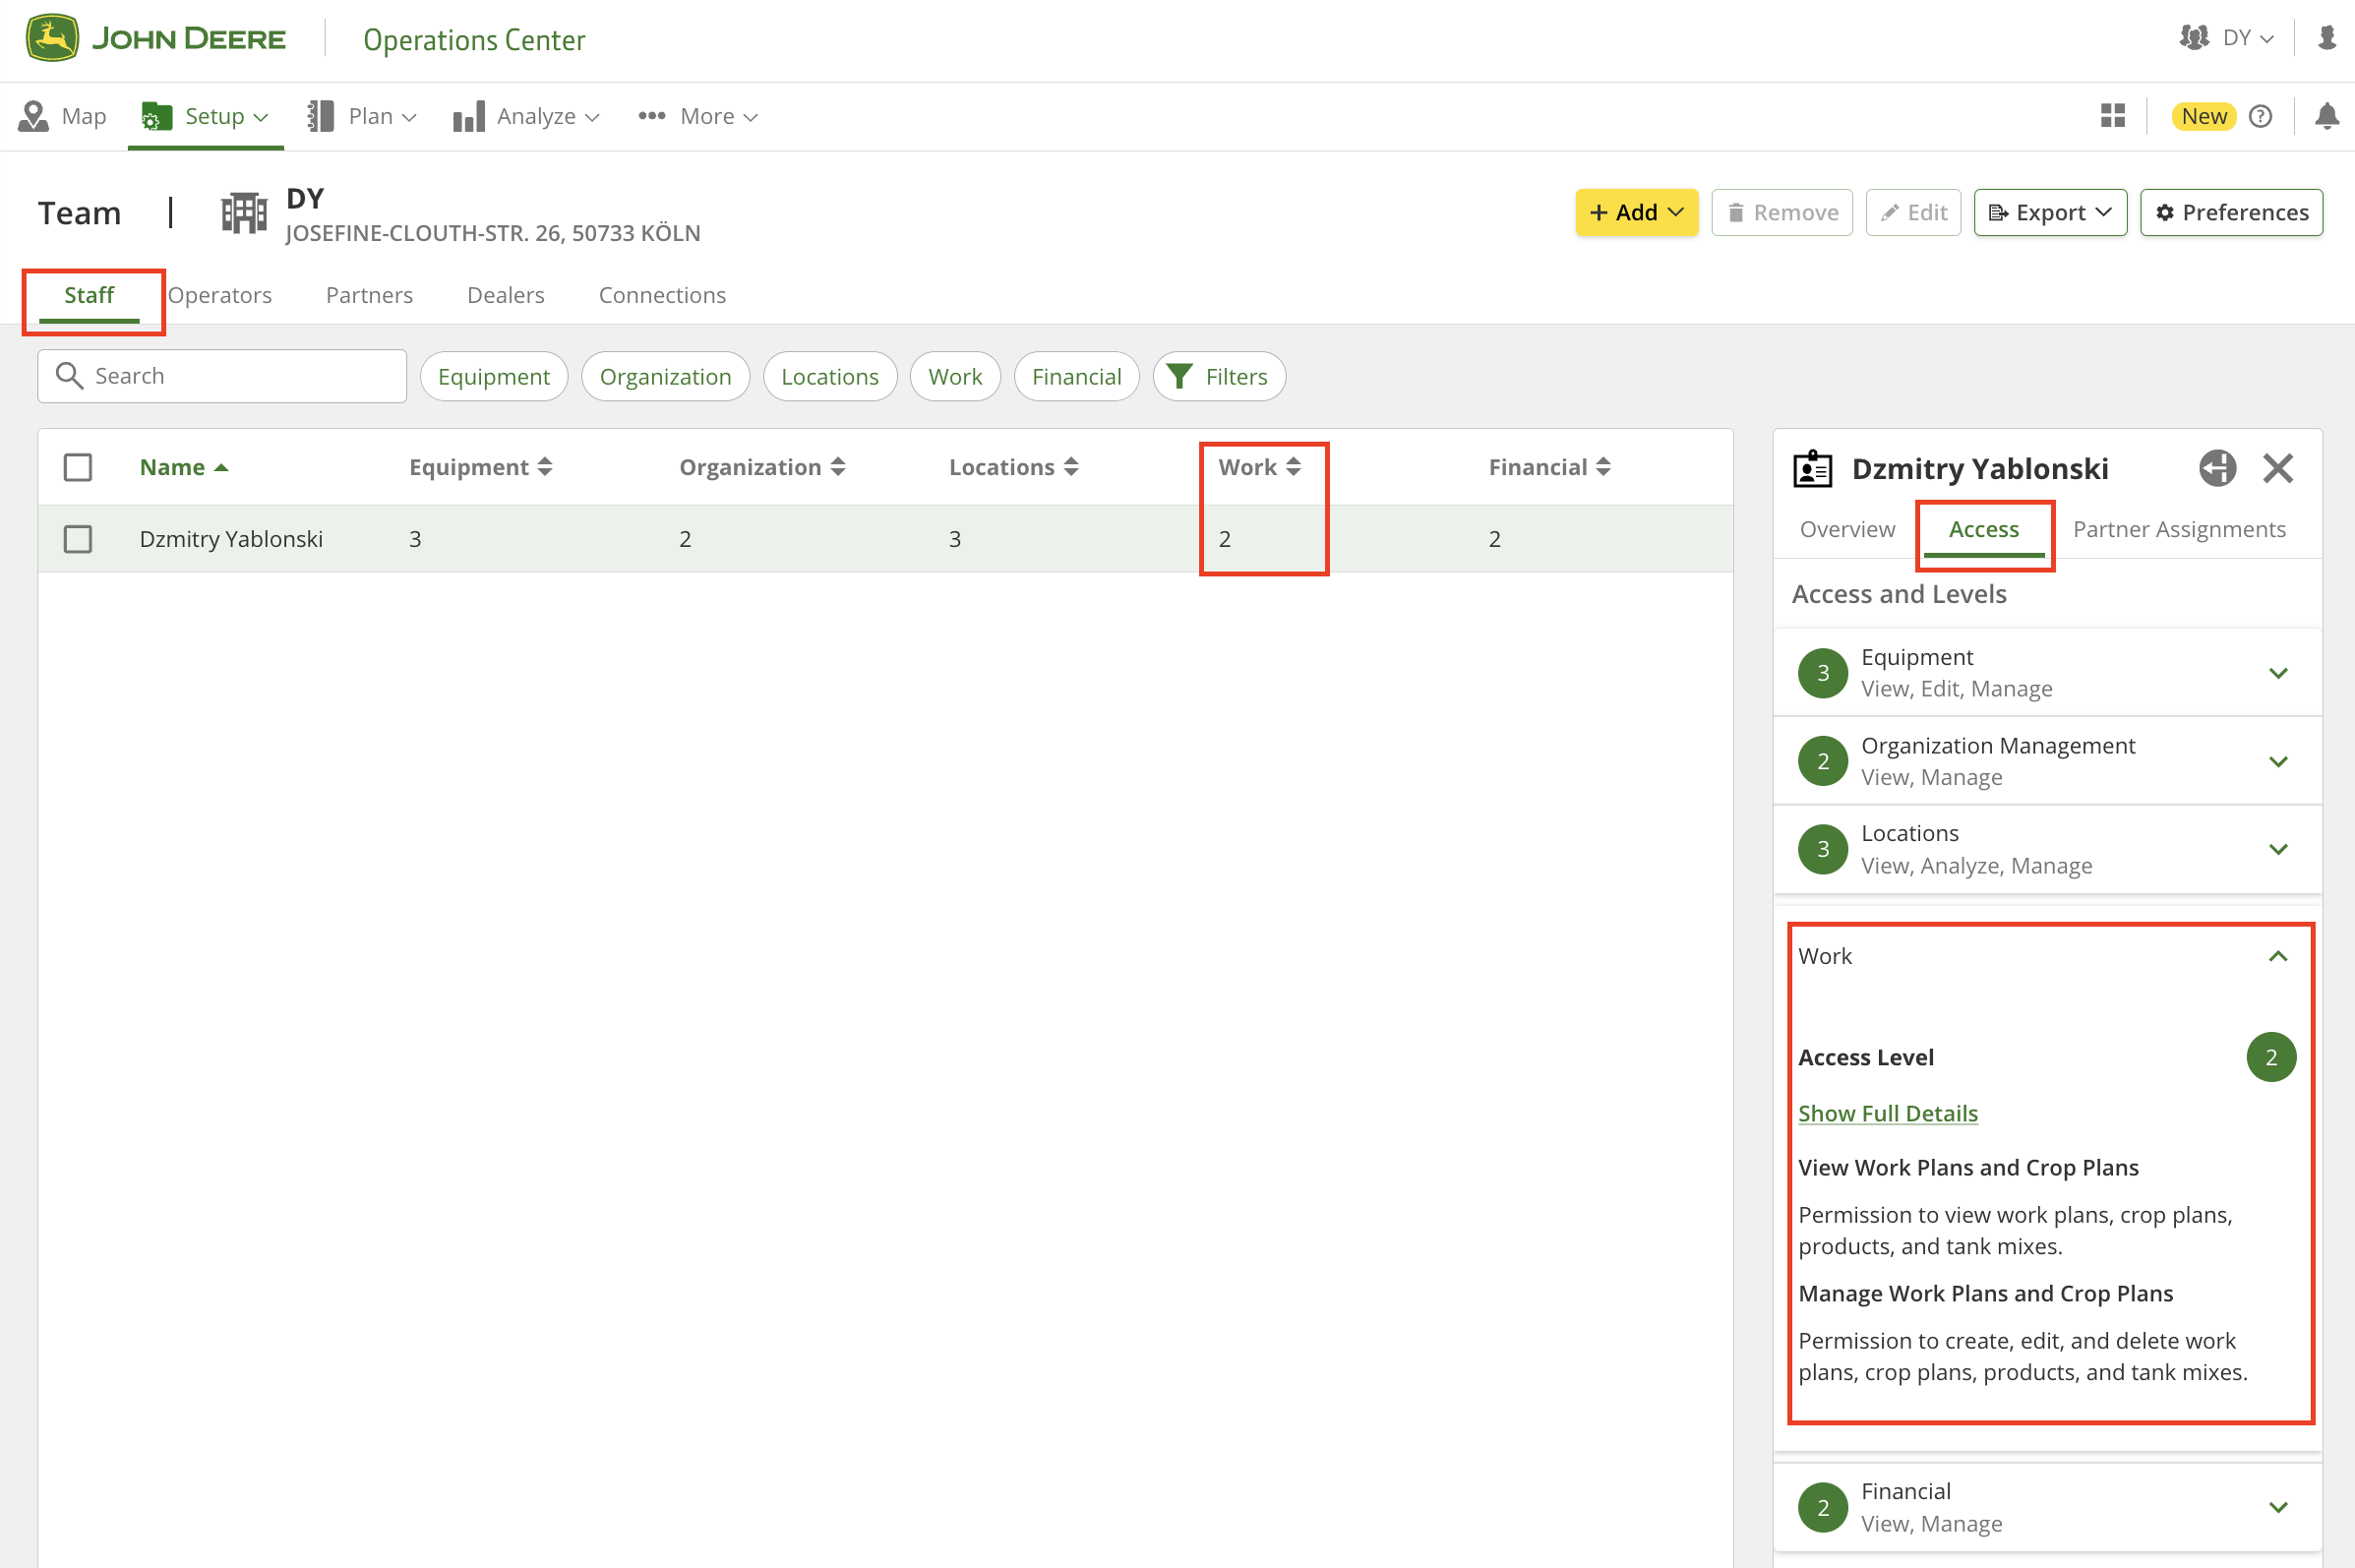
GeoPardに十分なアクセス権があることを再確認するには、［Setup］>［Team］ページ（または <https://team.deere.com/>）に移動し、 <mark style="background-color:green;">「Work」のアクセスレベルが2に設定されていることを確認してください</mark>.

<figure><img src="https://1993076779-files.gitbook.io/~/files/v0/b/gitbook-x-prod.appspot.com/o/spaces%2FYICBELdyAXXebKAzfLOR%2Fuploads%2FSfssJ9D987PMbGKmgDHF%2Fimage.png?alt=media&amp;token=fbca8ca8-b688-4089-bb5d-512a951b7bfb" alt=""><figcaption><p>確認：John Deereのアクセス権</p></figcaption></figure>

<figure><img src="https://1993076779-files.gitbook.io/~/files/v0/b/gitbook-x-prod.appspot.com/o/spaces%2FYICBELdyAXXebKAzfLOR%2Fuploads%2F3JdS4p7UnmDAja41XUhP%2Fimage.png?alt=media&amp;token=0a5dad44-fd46-40eb-bc44-c38edf32b320" alt=""><figcaption><p>確認：John Deereのアクセス権</p></figcaption></figure>

## 動画チュートリアル

このチュートリアルでは、GeoPardとJohn Deere Work Plannerの連携に関する主な機能を詳しく説明します。

{% embed url="<https://youtu.be/op1o-Y3r6bg?si=cUQHzVwVvt-eFzFm>" %}
作業計画の機能概要
{% endembed %}

手順ごとの詳細は、以下の各項目で説明します。

## 最初の作業計画

### 処方マップの準備

処方マップ（散布量を割り当てたゾーンマップ）をエクスポートするには、次の条件を満たす必要があります。

1. ゾーンマップに [散布量が割り当てられていること](https://docs.geopard.tech/geopard-tutorials/jpn/tsu-webapuri/zones-maps-and-analytics/assign-variable-rates-in-zones-ag-input-rates-distribution-tool.md).
2. 圃場がJohn Deere Operations Centerと同期されていること。同期方法は、[ John Deere Operations Centerからインポートする](https://docs.geopard.tech/geopard-tutorials/jpn/tsu-webapuri/john-deere-operations-center-integration/4.-import-into-geopard-from-john-deere-operations-center.md) または [Operations Centerにエクスポートする](https://docs.geopard.tech/geopard-tutorials/jpn/tsu-webapuri/john-deere-operations-center-integration/7.-export-field-boundaries-to-john-deere-operations-center.md).

### 作業計画の作成を開始する

ドロップダウンメニューをクリックし、処方マップを作業計画としてJohn Deere Operations Centerにエクスポートします。

<figure><img src="https://1993076779-files.gitbook.io/~/files/v0/b/gitbook-x-prod.appspot.com/o/spaces%2FYICBELdyAXXebKAzfLOR%2Fuploads%2FctGSCyhsBOOfmzfRhfXc%2Fimage.png?alt=media&amp;token=6415bc85-e8a6-4461-8626-10e5381f4504" alt=""><figcaption><p>作業計画の作成を開始する</p></figcaption></figure>

次に、作業計画の設定画面が開きます。ここで、作成する作業計画の種類（1）を選び、含めるGeoPardマップ（2）を選択して、製品（3）を割り当てます。

<figure><img src="https://1993076779-files.gitbook.io/~/files/v0/b/gitbook-x-prod.appspot.com/o/spaces%2FYICBELdyAXXebKAzfLOR%2Fuploads%2FKNEkHb0ykbBJ4de80H0z%2Fimage.png?alt=media&amp;token=20a5175b-35da-45ed-85ba-7a1f2bbadd5a" alt="" width="375"><figcaption><p>作業計画の設定画面</p></figcaption></figure>

### 作業計画に複数の処方マップを追加する

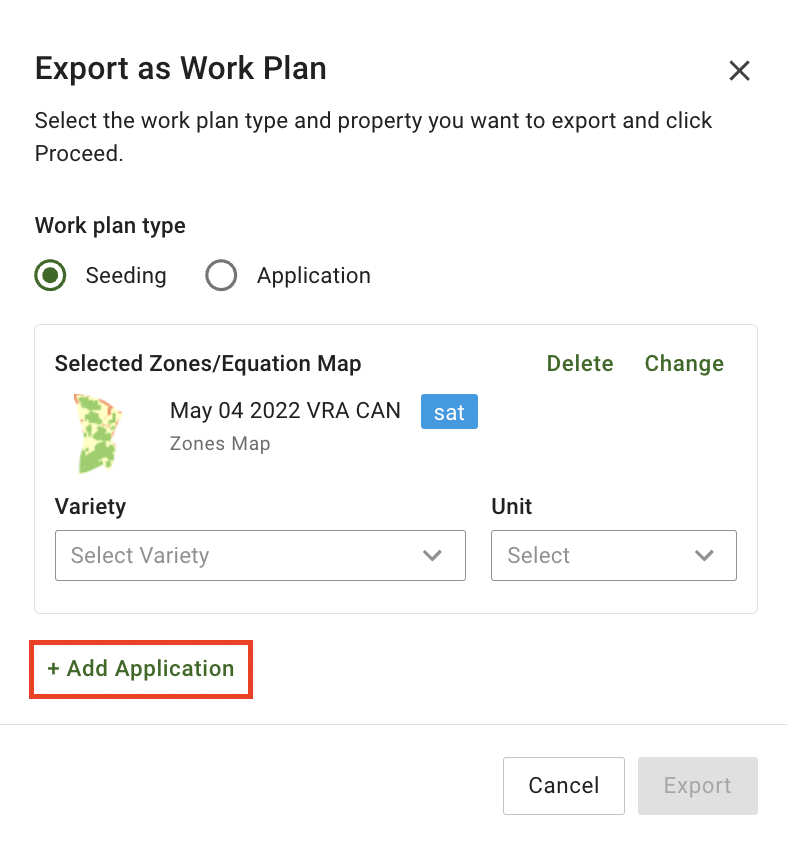
作業計画には次の2種類があります。 **播種** と **散布**。異なる処方マップを使って播種と施肥の作業を組み合わせる場合は、 **播種** の作業計画に複数のマップを追加できます。

<figure><img src="https://1993076779-files.gitbook.io/~/files/v0/b/gitbook-x-prod.appspot.com/o/spaces%2FYICBELdyAXXebKAzfLOR%2Fuploads%2Fi0f0hDobJpSWhIKhnp7S%2Fimage.png?alt=media&amp;token=332ed239-6288-4a64-b016-e41a8da7286b" alt="" width="375"><figcaption><p>2つ目の散布を追加する（ステップ1）</p></figcaption></figure>

<figure><img src="https://1993076779-files.gitbook.io/~/files/v0/b/gitbook-x-prod.appspot.com/o/spaces%2FYICBELdyAXXebKAzfLOR%2Fuploads%2FkIuo7xQ1mruga7YeA1KH%2Fimage.png?alt=media&amp;token=aa4f81b8-2762-4e79-9fa8-31fdb26b312c" alt="" width="375"><figcaption><p>2つ目の散布を追加する（ステップ2）</p></figcaption></figure>

<figure><img src="https://1993076779-files.gitbook.io/~/files/v0/b/gitbook-x-prod.appspot.com/o/spaces%2FYICBELdyAXXebKAzfLOR%2Fuploads%2FaRXQcNAWQtHmKLkcqfvy%2Fimage.png?alt=media&amp;token=cf733b58-68aa-46b2-aace-bd9f6e293ee1" alt="" width="375"><figcaption><p>2つ目の散布を追加する（ステップ3）</p></figcaption></figure>

### 製品を割り当てる

{% hint style="warning" %}
製品リストはJohn Deere Operations Centerから取得されます。そのため、作物品種、肥料、農薬（タンクミックスを含む）、ブレンドミックスを事前にOperations Centerで設定しておく必要があります。
{% endhint %}

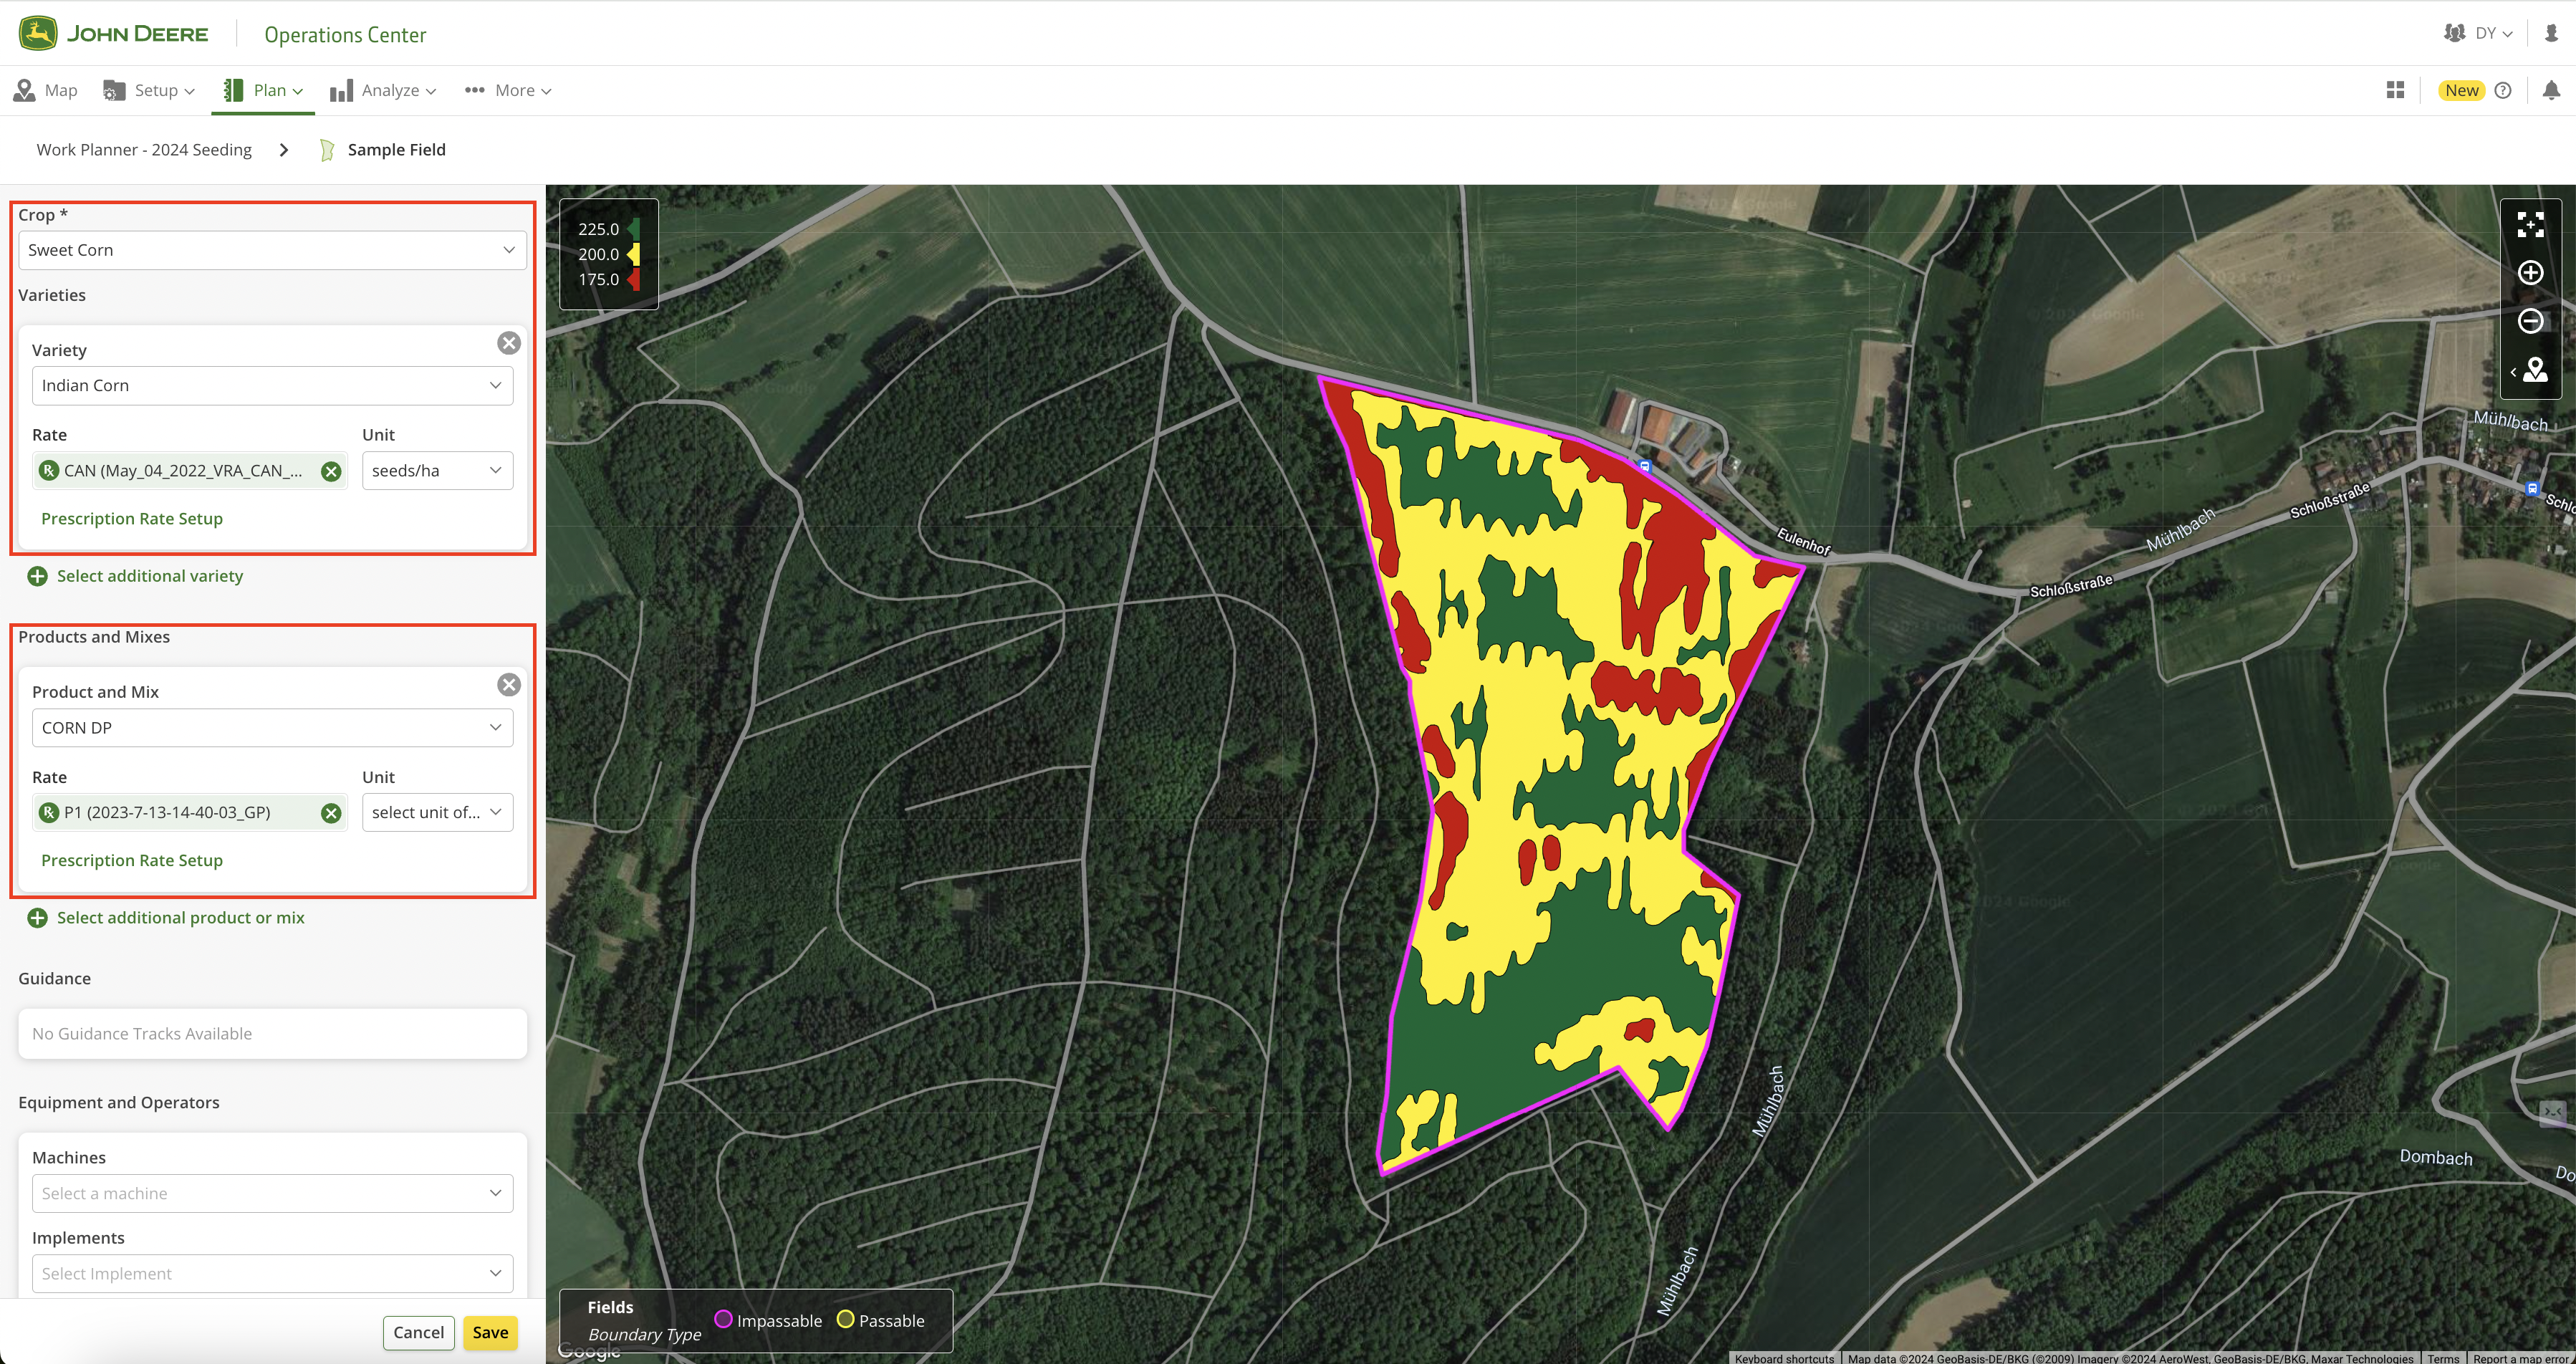
対応するドロップダウンから製品と単位を選択します。

<figure><img src="https://1993076779-files.gitbook.io/~/files/v0/b/gitbook-x-prod.appspot.com/o/spaces%2FYICBELdyAXXebKAzfLOR%2Fuploads%2FWGDa7kpcN60lNAu7zmL3%2Fimage.png?alt=media&amp;token=1596274c-d68a-41b5-b33f-4eacd59a6385" alt="" width="375"><figcaption><p>製品と単位を選択する</p></figcaption></figure>

選択した散布の種類に製品が登録されていない場合、GeoPardからJohn Deere Operations Centerに追加するよう促されます。

<figure><img src="https://1993076779-files.gitbook.io/~/files/v0/b/gitbook-x-prod.appspot.com/o/spaces%2FYICBELdyAXXebKAzfLOR%2Fuploads%2FH4vkHkc3MNvR7g3TW2Q4%2Fimage.png?alt=media&amp;token=de989efb-82fd-438e-b4cc-59ec88cd713d" alt="" width="375"><figcaption><p>製品の追加を依頼する</p></figcaption></figure>

### John Deereにエクスポートする

［Export］ボタンをクリックして、設定済みの作業計画をJohn Deere Operations Centerに送信します。

<figure><img src="https://1993076779-files.gitbook.io/~/files/v0/b/gitbook-x-prod.appspot.com/o/spaces%2FYICBELdyAXXebKAzfLOR%2Fuploads%2FhG3ZVzzY1rYBtLb2YYv6%2Fimage.png?alt=media&amp;token=aa951ae7-d62c-4862-b3ef-2f8e8443e7ed" alt="" width="375"><figcaption><p>作業計画をエクスポート</p></figcaption></figure>

「作業計画に移動」ボタンをクリックすると、John Deere Operations Centerで作成したばかりの作業計画に直接移動します。

<figure><img src="https://1993076779-files.gitbook.io/~/files/v0/b/gitbook-x-prod.appspot.com/o/spaces%2FYICBELdyAXXebKAzfLOR%2Fuploads%2Ff0TGoZkx33xkNFL2xLrh%2Fimage.png?alt=media&amp;token=deb06487-40d4-4d71-9a4b-0377347e0edb" alt="" width="252"><figcaption><p>エクスポートした作業計画を開く</p></figcaption></figure>

<figure><img src="https://1993076779-files.gitbook.io/~/files/v0/b/gitbook-x-prod.appspot.com/o/spaces%2FYICBELdyAXXebKAzfLOR%2Fuploads%2FW0kKxn2n6W8wvoTQk1MI%2Fimage.png?alt=media&amp;token=4ef3e173-d00c-4591-a595-7fe8ca69bd9a" alt=""><figcaption><p>John Deere Operations Centerでエクスポートした作業計画</p></figcaption></figure>

エクスポートした作業計画は、 [John Deere Operations Centerの「作業計画」ページでも確認できます。](https://work-planner.deere.com/).

<figure><img src="https://1993076779-files.gitbook.io/~/files/v0/b/gitbook-x-prod.appspot.com/o/spaces%2FYICBELdyAXXebKAzfLOR%2Fuploads%2F32uhEKFVQ35SIGi9WS0W%2Fimage.png?alt=media&amp;token=f60da8f7-0f71-4b65-aea9-073e8d036518" alt=""><figcaption><p>John Deere Operations Centerの作業プランナーで確認できる、エクスポートした作業計画</p></figcaption></figure>

## 複数の資材を使用する高度な作業計画

複数の作業（異なる資材の散布など）で同じZonesMapを使いたいという要望はよくあります。GeoPardとJohn Deere Operations Centerの連携では、この機能を利用できます。詳しい手順を以下に説明します。

### 処方マップの準備

Rxマップ（適用量を割り当てたZonesMap）をエクスポートするには、ZonesMapが次の条件を満たしている必要があります。

1. ZonesMapには [適用量が割り当てられており、](https://docs.geopard.tech/geopard-tutorials/jpn/tsu-webapuri/zones-maps-and-analytics/assign-variable-rates-in-zones-ag-input-rates-distribution-tool.md), <mark style="background-color:green;">この例では複数の資材が設定されている必要があります。</mark>
2. 圃場がJohn Deere Operations Centerと同期されていること。同期方法は、[ John Deere Operations Centerからインポートする](https://docs.geopard.tech/geopard-tutorials/jpn/tsu-webapuri/john-deere-operations-center-integration/4.-import-into-geopard-from-john-deere-operations-center.md) または [Operations Centerにエクスポートする](https://docs.geopard.tech/geopard-tutorials/jpn/tsu-webapuri/john-deere-operations-center-integration/7.-export-field-boundaries-to-john-deere-operations-center.md).

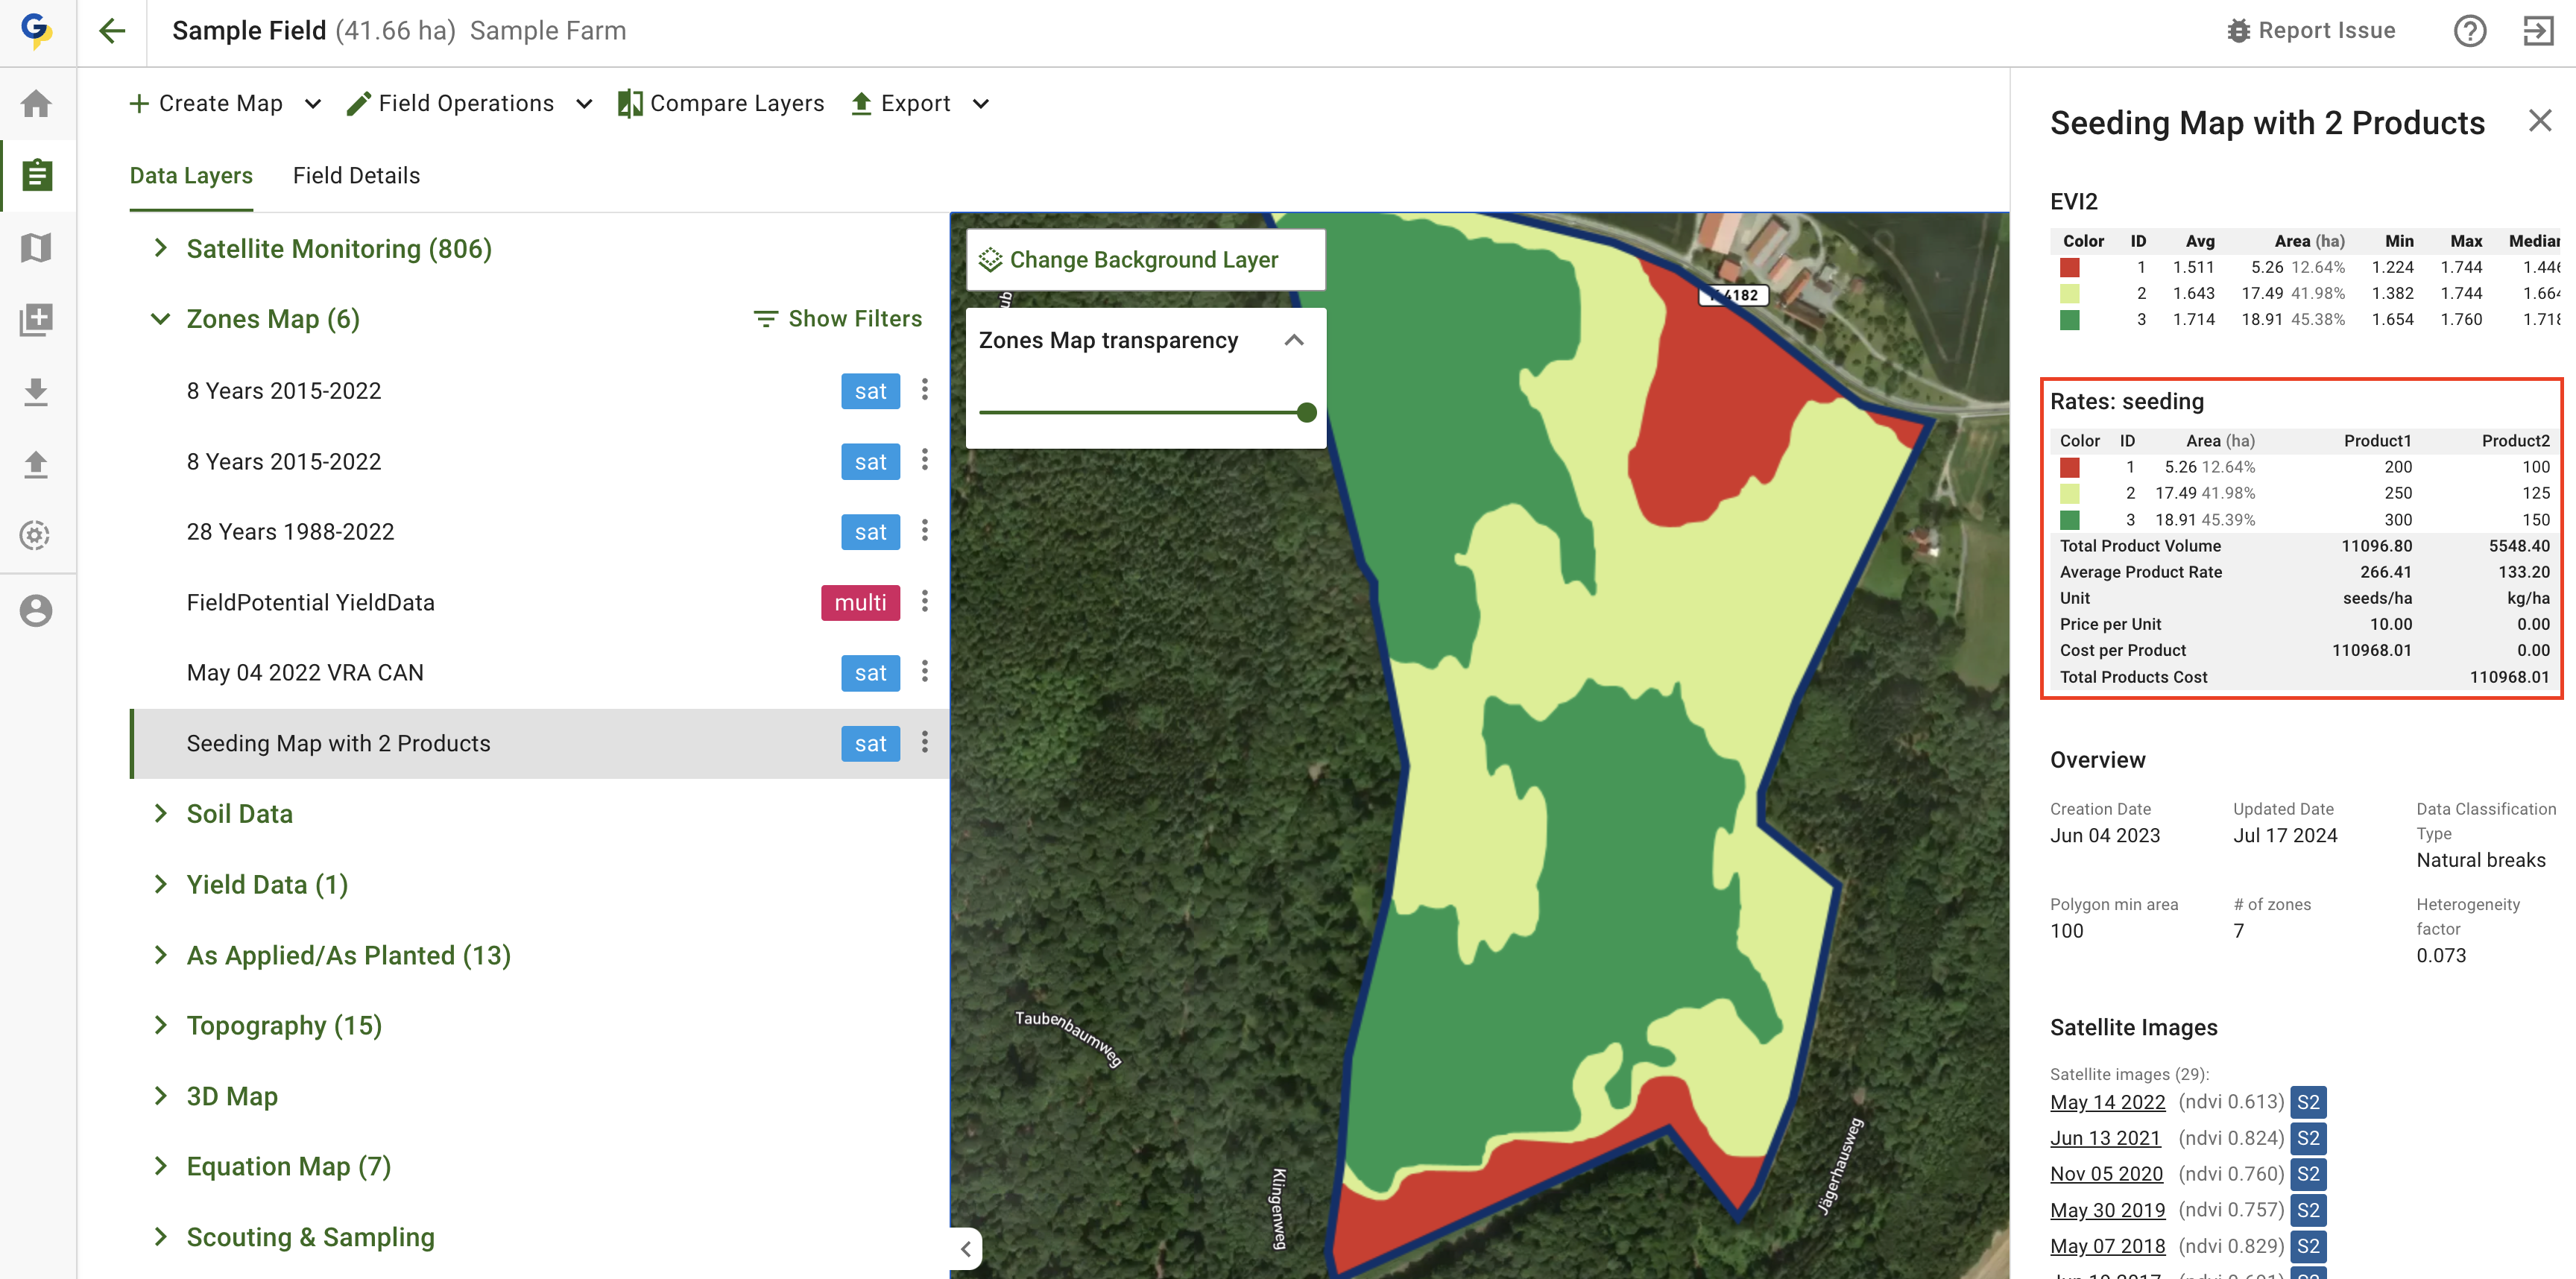
こちらはRxマップです。次の両方が割り当てられたZonesMapです。 <mark style="background-color:green;">Product1</mark> と <mark style="background-color:green;">Product2</mark> が割り当てられています。

<figure><img src="https://1993076779-files.gitbook.io/~/files/v0/b/gitbook-x-prod.appspot.com/o/spaces%2FYICBELdyAXXebKAzfLOR%2Fuploads%2FOfdPnmexx8lTPg5kHDAM%2Fimage.png?alt=media&amp;token=a7eda779-2276-4bc5-9f78-a55efe26d058" alt=""><figcaption><p>Rxマップ：2種類の資材を含むZonesMap</p></figcaption></figure>

### 作業計画を作成する

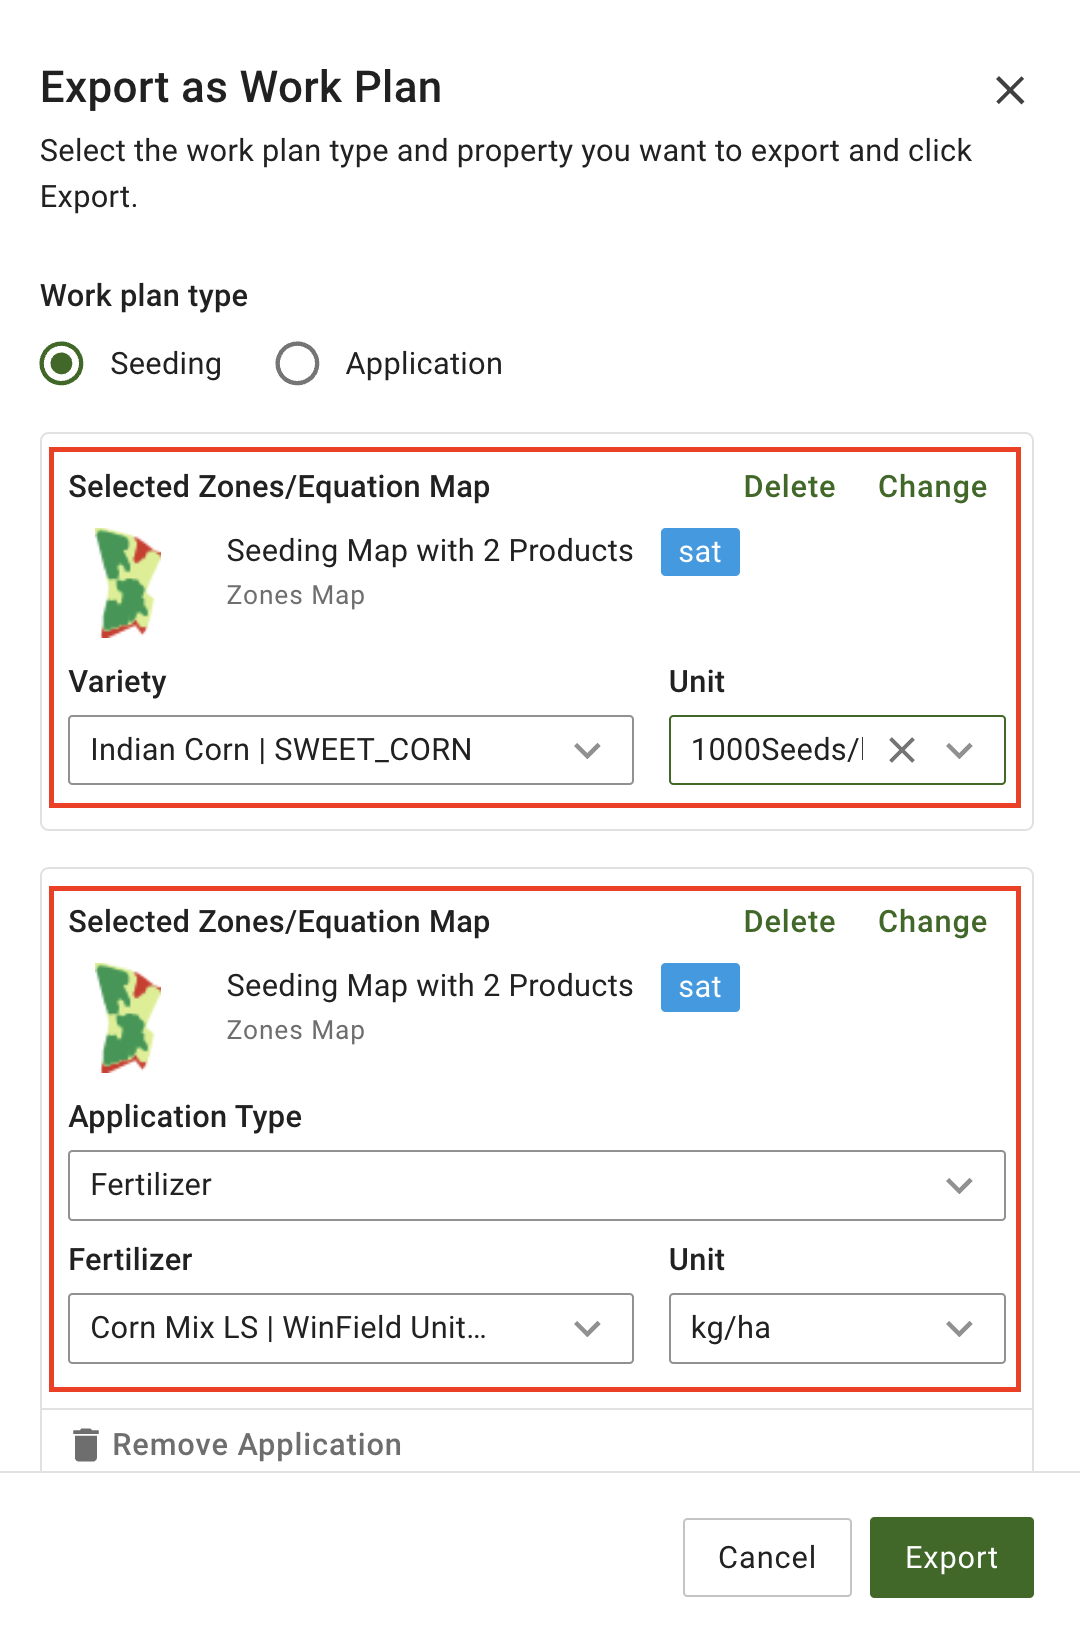
ZonesMapを作業計画としてMyJohnDeereにエクスポートしましょう。 <mark style="background-color:green;">最も重要なのは、同じZonesMapを2回選択し、それぞれに異なる資材を割り当てることです。</mark> 先ほど説明したとおり、 <mark style="background-color:green;">Product1</mark> と <mark style="background-color:green;">Product2</mark> は前の手順で割り当てています。

<figure><img src="https://1993076779-files.gitbook.io/~/files/v0/b/gitbook-x-prod.appspot.com/o/spaces%2FYICBELdyAXXebKAzfLOR%2Fuploads%2F1loYqjZ0hETaJHiIKMr1%2Fimage.png?alt=media&amp;token=0136c6c9-e3c3-4d35-a258-f3bf9e1d5f49" alt="" width="375"><figcaption></figcaption></figure>

「エクスポート」をクリックすると、作業計画が作成され、MyJohnDeereに送信されます。直接アクセスできるリンクが表示されます。 <mark style="background-color:green;">このリンクをクリックし、MyJohnDeereで資材の割り当てを完了する必要があります。</mark>

<figure><img src="https://1993076779-files.gitbook.io/~/files/v0/b/gitbook-x-prod.appspot.com/o/spaces%2FYICBELdyAXXebKAzfLOR%2Fuploads%2FQY0kTrVqGDGkp86xEkHd%2Fimage.png?alt=media&amp;token=222f83c2-4a5d-420a-89e9-a0ca88e11310" alt=""><figcaption><p>MyJohnDeereで2種類の資材を含む作業計画が作成されました</p></figcaption></figure>

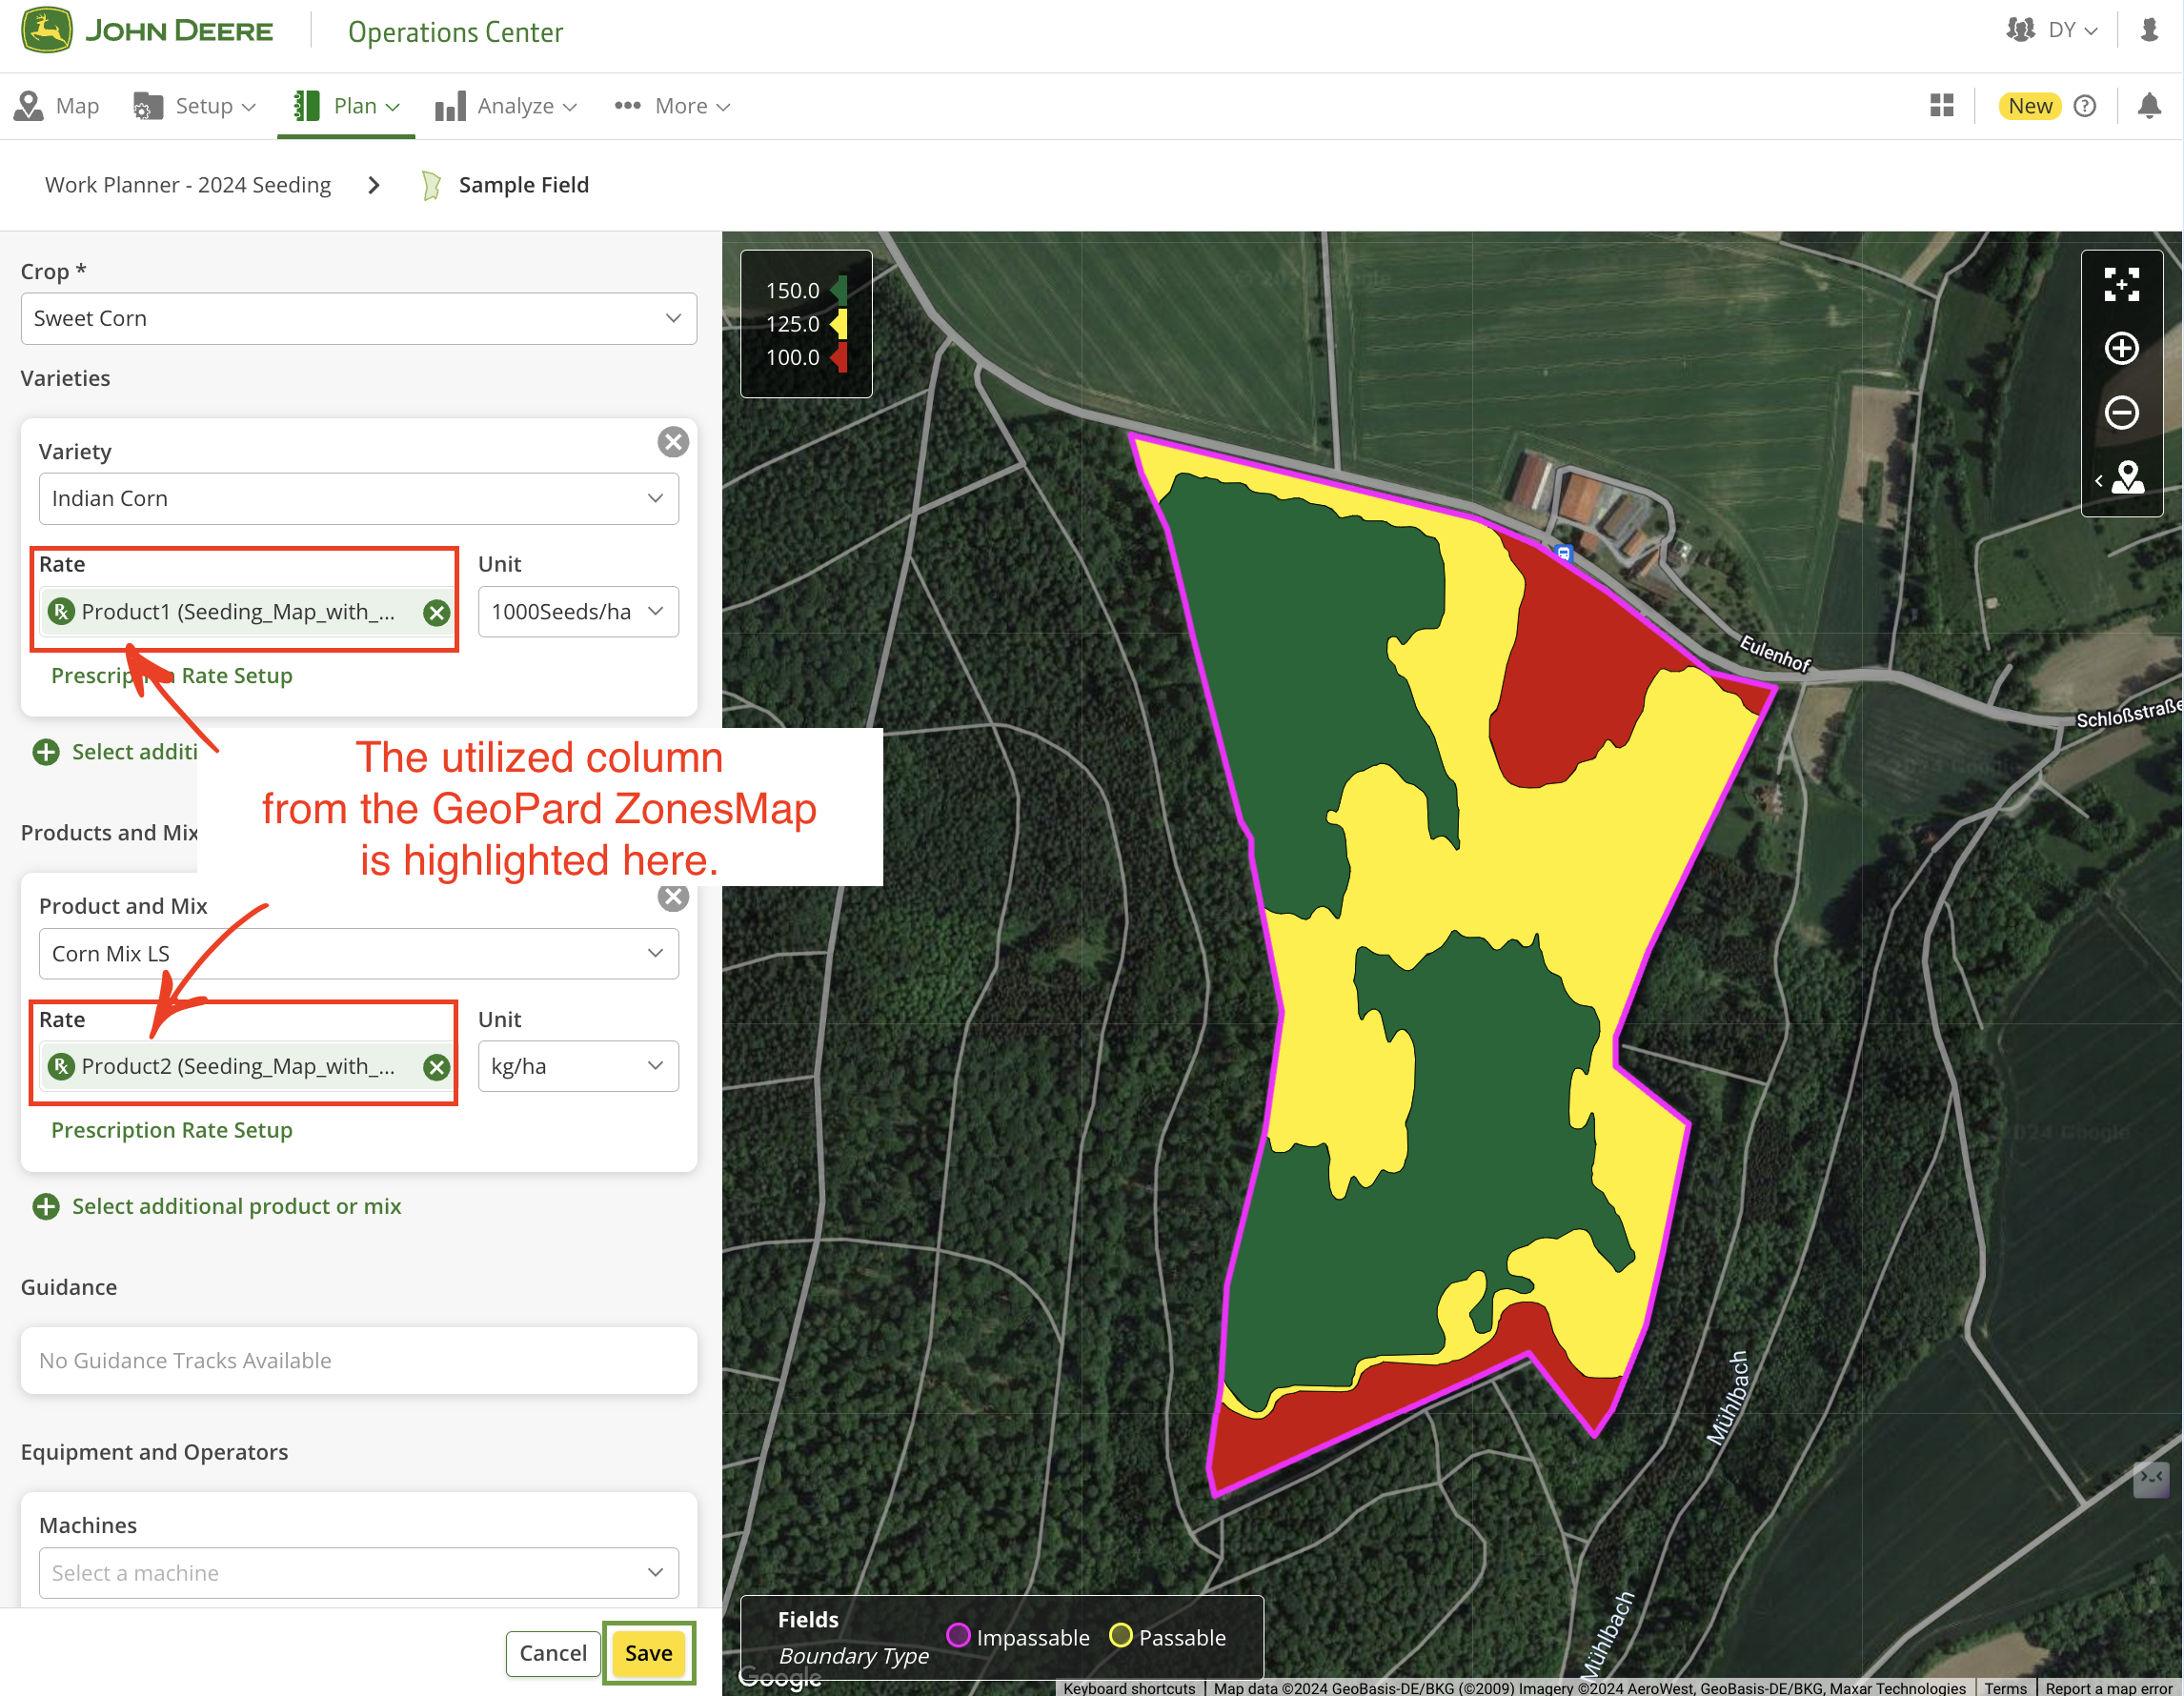
作業計画ページで、既存の選択肢から適切な属性を選び、John Deereの資材をRxマップの資材に紐付けます。以下の例では、<mark style="background-color:green;">播種量がProduct1列にあります。</mark>.

<figure><img src="https://1993076779-files.gitbook.io/~/files/v0/b/gitbook-x-prod.appspot.com/o/spaces%2FYICBELdyAXXebKAzfLOR%2Fuploads%2FMgxSuArrBvSKfY56lFzf%2Fimage.png?alt=media&amp;token=b78e609a-c75a-4aaa-a13a-3bcdd43a2d81" alt=""><figcaption></figcaption></figure>

次に、 <mark style="background-color:green;">Product2についても同じ選択手順を実行します。</mark>.

最終結果は以下のようになります。その後、 <mark style="background-color:green;">忘れずに「保存」ボタンをクリックしてください。</mark>.

<figure><img src="https://1993076779-files.gitbook.io/~/files/v0/b/gitbook-x-prod.appspot.com/o/spaces%2FYICBELdyAXXebKAzfLOR%2Fuploads%2FiiMPea869VGShvPKqUeo%2Fimage.png?alt=media&amp;token=5bf306eb-555c-479c-8a86-06ab2860c1ca" alt=""><figcaption><p>MyJohnDeereで作業計画を確認する</p></figcaption></figure>

{% hint style="success" %}
自分の圃場で処方を作成し、Operations Centerに送信しましょう。 [無料で始める](https://app.geopard.tech/auth/sign-up?utm_source=docs\&utm_medium=cta\&utm_campaign=8.-export-rx-maps-to-john-deere-operations-center-as-work-plans)
{% endhint %}


---

# Agent Instructions
This documentation is published with GitBook. GitBook is the documentation platform designed so that both humans and AI agents can read, navigate, and reason over technical content effectively. Learn more at gitbook.com.

## Querying This Documentation
If you need additional information that is not directly available in this page, you can query the documentation by asking a question.

Perform an HTTP GET request on the following URL with the `ask` and `goal` query parameters:

```
GET https://docs.geopard.tech/geopard-tutorials/jpn/tsu-webapuri/john-deere-operations-center-integration/8.-export-rx-maps-to-john-deere-operations-center-as-work-plans.md?ask=<question>&goal=<user_goal>
```

`ask` is the immediate question: it should be specific, self-contained, and written in natural language.
`goal` is what the user is ultimately trying to achieve, the reason they need the answer. Sharing it helps GitBook give you a better, more relevant answer. A goal is most helpful when it describes the outcome the user wants rather than restating the question. For example, with `ask=how do I create an API token`, a goal like `automate deployments from our CI pipeline` lets GitBook tailor the answer to that use case.

The response will contain a direct answer to the question and relevant excerpts and sources from the documentation.

Use this mechanism when the answer is not explicitly present in the current page, you need clarification or additional context, or you want to retrieve related documentation sections.