> For the complete documentation index, see [llms.txt](https://docs.geopard.tech/geopard-tutorials/llms.txt). Markdown versions of documentation pages are available by appending `.md` to page URLs; this page is available as [Markdown](https://docs.geopard.tech/geopard-tutorials/in/product-tour-web-app/john-deere-operations-center-integration/8.-export-rx-maps-to-john-deere-operations-center-as-work-plans.md).

# प्रिस्क्रिप्शन को Work Plan के रूप में John Deere डिस्प्ले पर भेजें

GeoPard के प्रिस्क्रिप्शन को खेत, उत्पाद और दरों सहित Operations Center Work Plan में बदलें, फिर इसे Gen 4 या G5 डिस्प्ले पर खोलें। चरण और समस्या-समाधान।

वर्क प्लान में प्रिस्क्रिप्शन के साथ खेत, कार्य और उत्पाद की जानकारी भी कैब तक पहुँचती है। इससे ऑपरेटर को फ़ाइल लोड करने के बजाय Gen 4 या G5 डिस्प्ले पर एक ही जॉब खोलना होता है। GeoPard में दरें तैयार करें, ज़ोन मैप को वर्क प्लान के रूप में Operations Center में एक्सपोर्ट करें—यह Work Planner में दिखेगा और कनेक्टेड मशीनों पर भेजने के लिए तैयार रहेगा। पहले खेत को Operations Center के साथ सिंक करना ज़रूरी है; ऐसा न होने पर एक्सपोर्ट रुक जाएगा।

{% hint style="success" %}
अपने खेत के लिए प्रिस्क्रिप्शन तैयार करें और उसे Operations Center पर भेजें: [मुफ़्त शुरू करें](https://app.geopard.tech/auth/sign-up?utm_source=docs\&utm_medium=cta\&utm_campaign=8.-export-rx-maps-to-john-deere-operations-center-as-work-plans)
{% endhint %}

## पहुँच अधिकार जाँचें

### GeoPard में सत्यापन

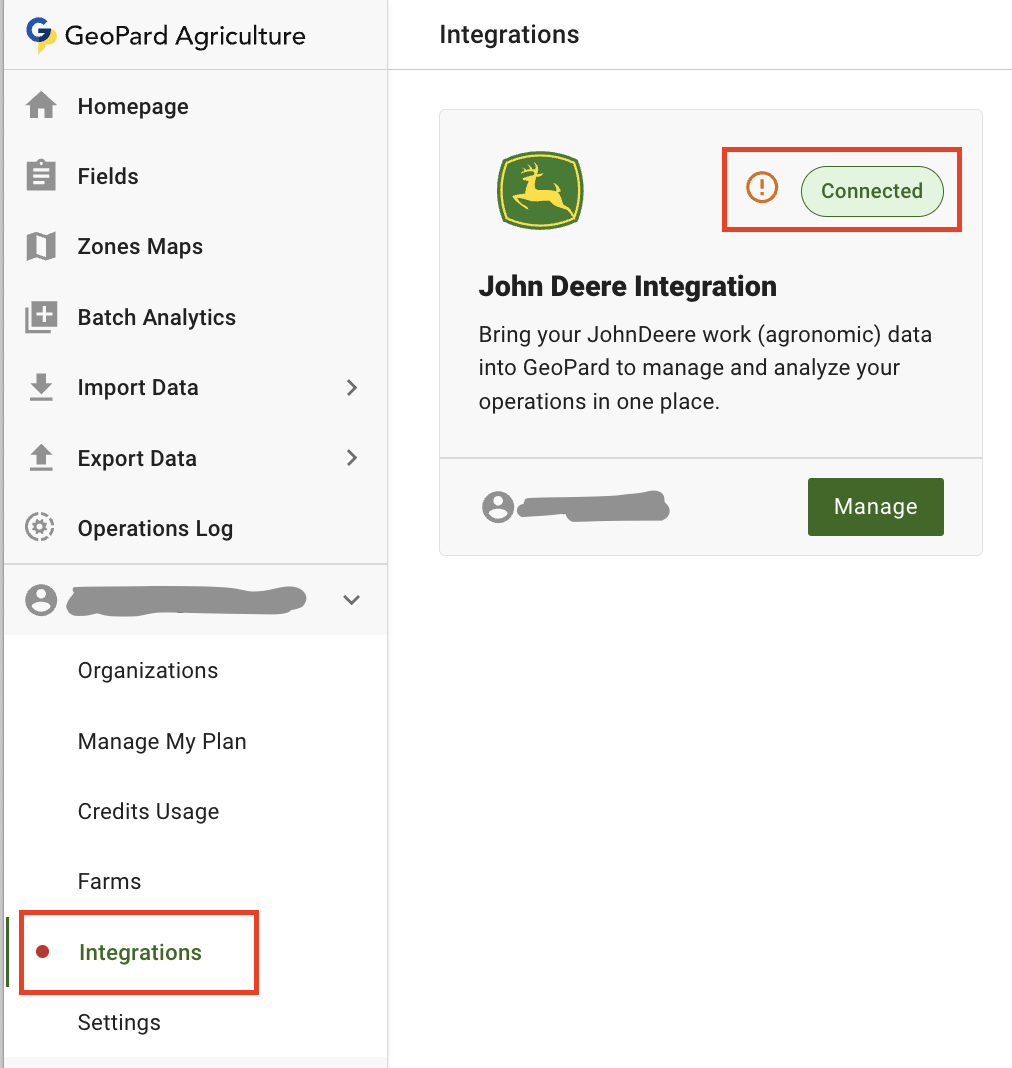
जाँचें कि GeoPard के पास John Deere Operations Center में वर्क प्लान बनाने के लिए पर्याप्त पहुँच अधिकार हैं। [साइन इन करें](https://app.geopard.tech/auth/sign-in), उपयोगकर्ता मेनू से (Integrations) John Deere इंटीग्रेशन पेज खोलें और संदेश जाँचें।\
अगर यह संदेश दिखता है, तो GeoPard <> John Deere कनेक्शन अपडेट करना होगा।

<figure><img src="https://537187778-files.gitbook.io/~/files/v0/b/gitbook-x-prod.appspot.com/o/spaces%2FYICBELdyAXXebKAzfLOR%2Fuploads%2F0Jp6Csi60DSuUjYmnqjj%2Fimage.png?alt=media&amp;token=8e346192-731e-421c-910f-00676fd864be" alt="" width="375"><figcaption><p>जाँचें: अतिरिक्त पहुँच अधिकार आवश्यक हैं</p></figcaption></figure>

<figure><img src="https://537187778-files.gitbook.io/~/files/v0/b/gitbook-x-prod.appspot.com/o/spaces%2FYICBELdyAXXebKAzfLOR%2Fuploads%2F1yU6IXMeIly8hWnXnZyn%2Fimage.png?alt=media&amp;token=38488f7c-8724-4eba-932d-b10fec2aac11" alt=""><figcaption><p>जाँचें: अतिरिक्त पहुँच अधिकार आवश्यक हैं</p></figcaption></figure>

{% hint style="warning" %}
हमने देखा है कि बदलाव केवल John Deere Operations Center में दोबारा साइन इन (1) करने और GeoPard में फिर से साइन इन (2) करने के बाद लागू होते हैं।
{% endhint %}

### John Deere Operations Center में सत्यापन

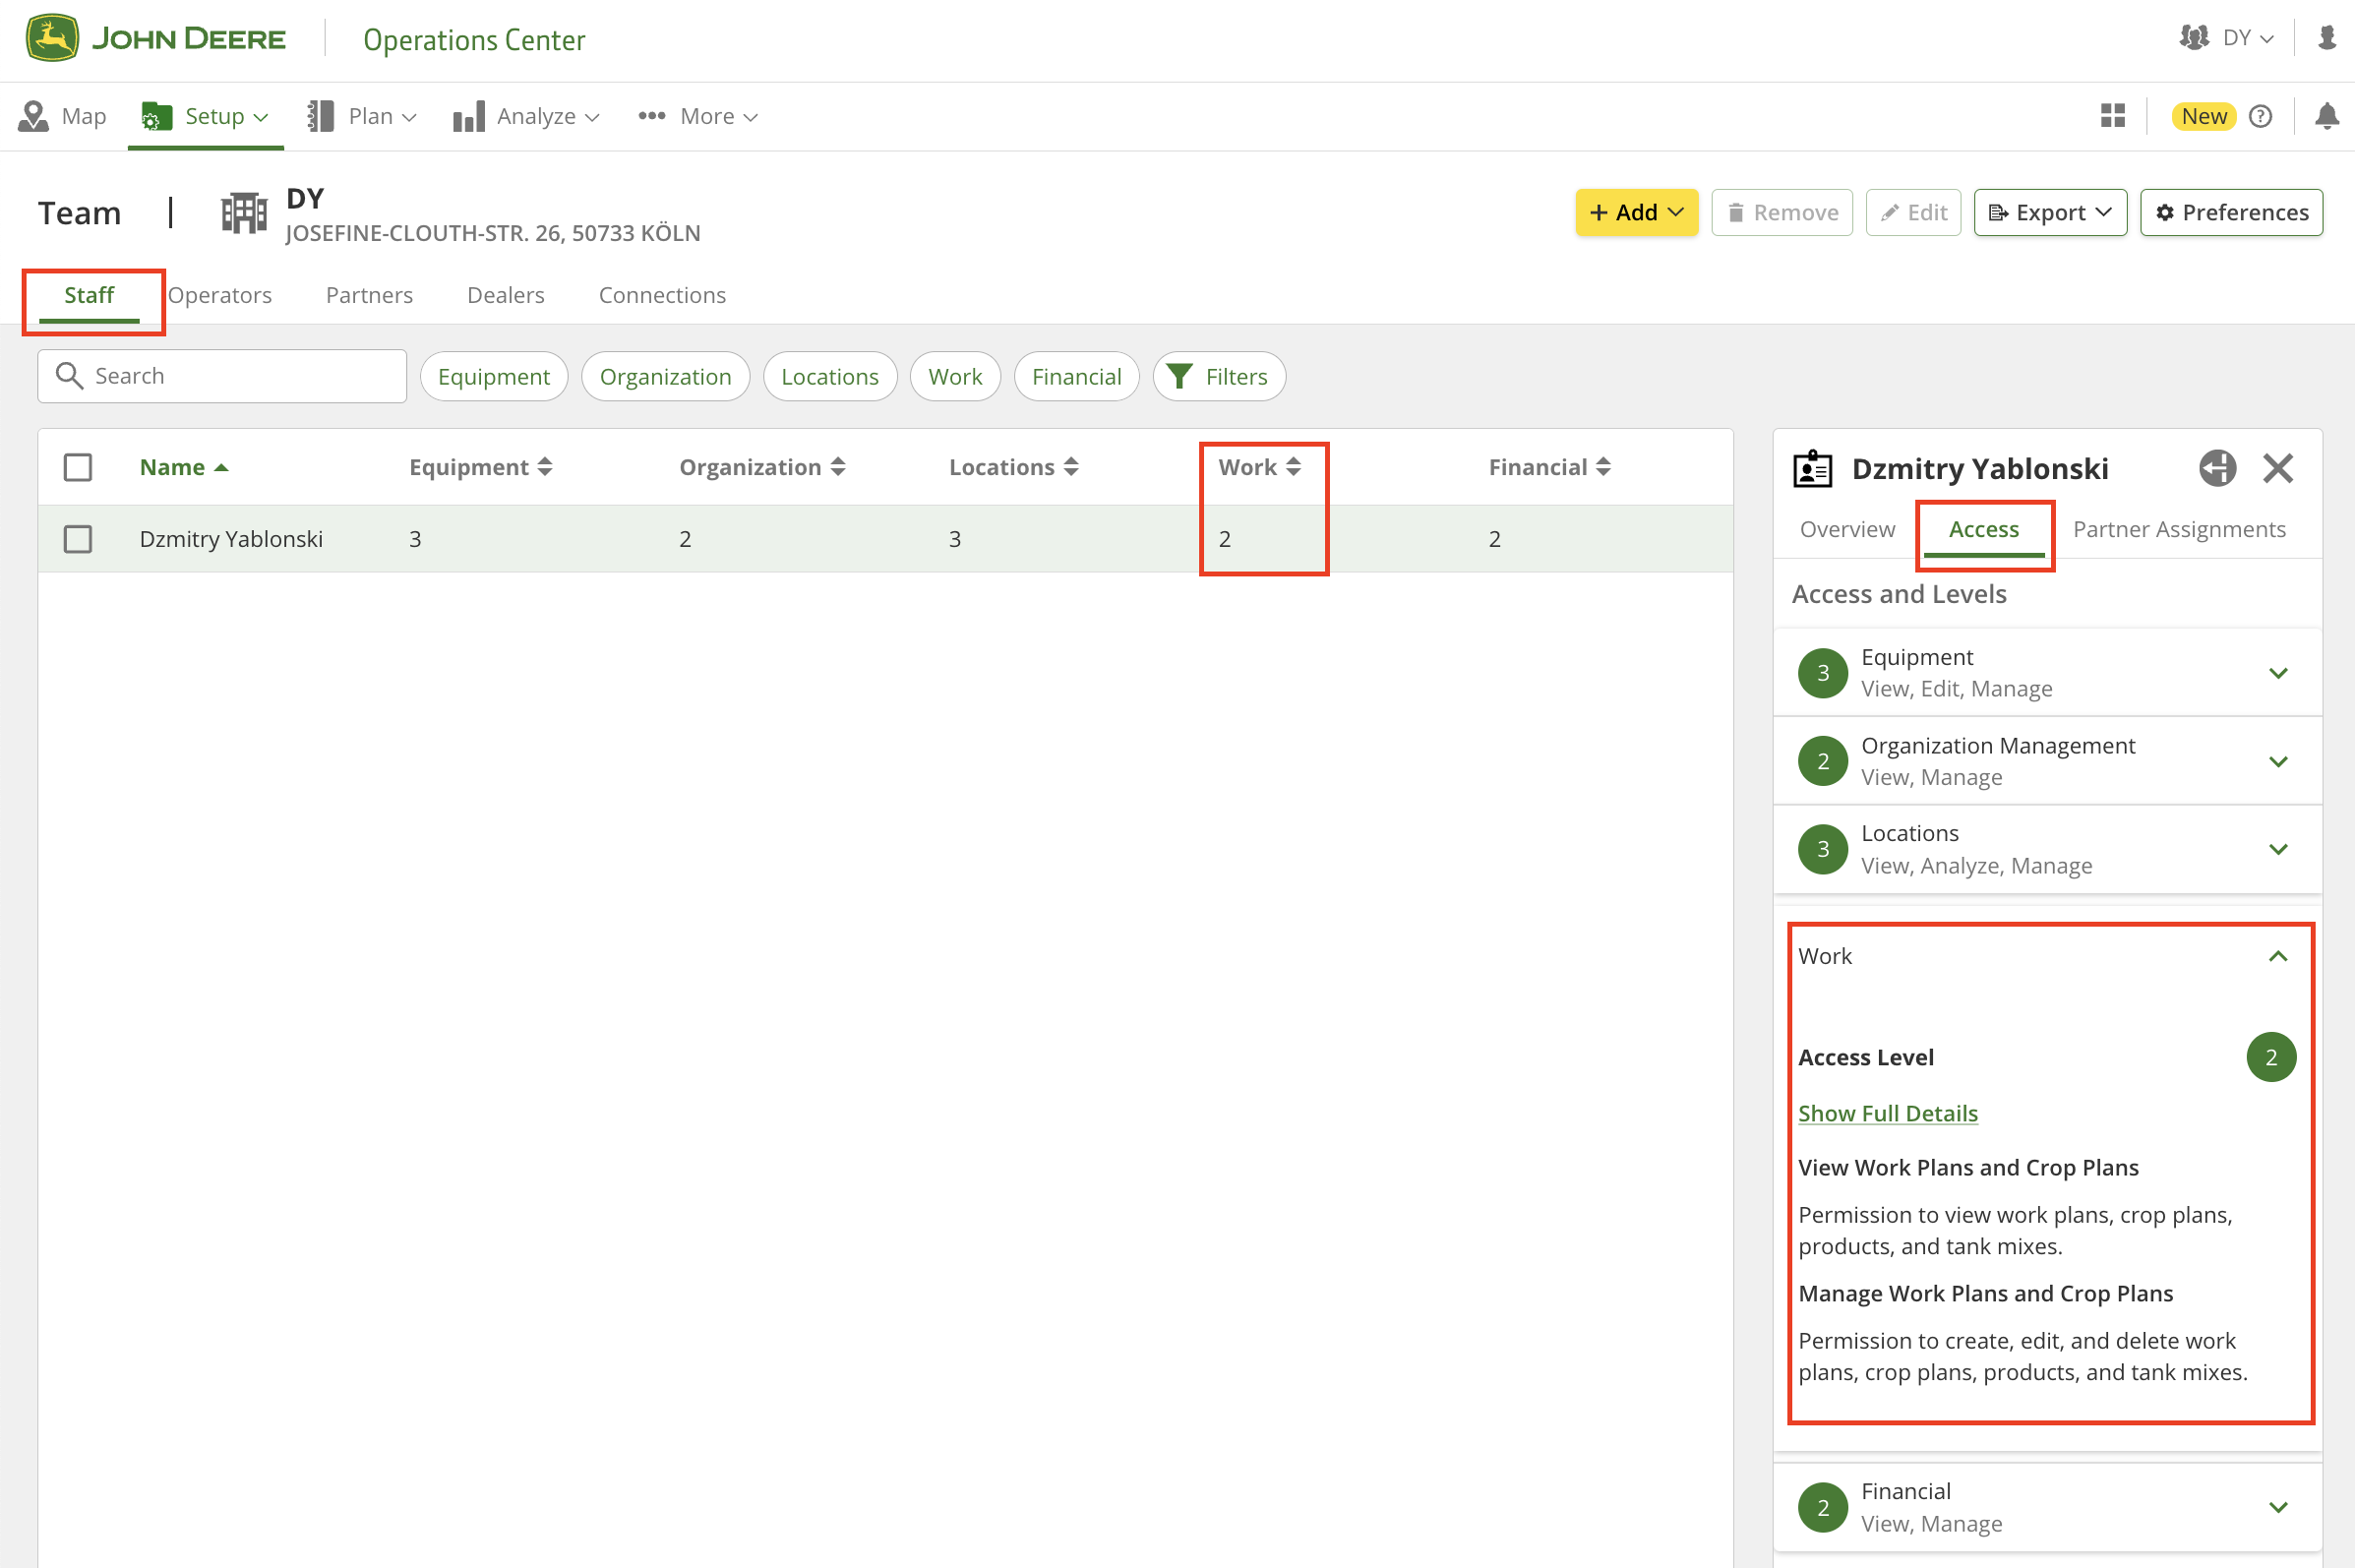
यह दोबारा जाँचने के लिए कि GeoPard के पास पर्याप्त पहुँच अधिकार हैं, कृपया "Setup" > "Team" पेज पर जाएँ (या <https://team.deere.com/>) और सुनिश्चित करें कि <mark style="background-color:green;">"Work" का पहुँच स्तर 2 पर सेट है</mark>.

<figure><img src="https://537187778-files.gitbook.io/~/files/v0/b/gitbook-x-prod.appspot.com/o/spaces%2FYICBELdyAXXebKAzfLOR%2Fuploads%2FSfssJ9D987PMbGKmgDHF%2Fimage.png?alt=media&amp;token=fbca8ca8-b688-4089-bb5d-512a951b7bfb" alt=""><figcaption><p>जाँचें: John Deere के पहुँच अधिकार</p></figcaption></figure>

<figure><img src="https://537187778-files.gitbook.io/~/files/v0/b/gitbook-x-prod.appspot.com/o/spaces%2FYICBELdyAXXebKAzfLOR%2Fuploads%2F3JdS4p7UnmDAja41XUhP%2Fimage.png?alt=media&amp;token=0a5dad44-fd46-40eb-bc44-c38edf32b320" alt=""><figcaption><p>जाँचें: John Deere के पहुँच अधिकार</p></figcaption></figure>

## वीडियो ट्यूटोरियल

इस ट्यूटोरियल में GeoPard और John Deere Work Planner के इंटीग्रेशन की मुख्य सुविधाओं को विस्तार से समझाया गया है।

{% embed url="<https://youtu.be/op1o-Y3r6bg?si=cUQHzVwVvt-eFzFm>" %}
वर्क प्लान की सुविधाओं का अवलोकन
{% endembed %}

प्रक्रिया के हर चरण का विस्तृत विवरण आगे के अनुच्छेदों में दिया गया है।

## पहला वर्क प्लान

### Rx मैप तैयार करना

Rx मैप (निर्धारित दरों वाला ZonesMap) एक्सपोर्ट करने के लिए, ZonesMap को नीचे दी गई शर्तें पूरी करनी होंगी:

1. ZonesMap में [दरें निर्धारित](https://docs.geopard.tech/geopard-tutorials/in/product-tour-web-app/zones-maps-and-analytics/assign-variable-rates-in-zones-ag-input-rates-distribution-tool.md).
2. होनी चाहिए। खेत को John Deere Operations Center के साथ सिंक किया होना चाहिए: या तो उसे[ John Deere Operations Center से इम्पोर्ट किया गया हो](https://docs.geopard.tech/geopard-tutorials/in/product-tour-web-app/john-deere-operations-center-integration/4.-import-into-geopard-from-john-deere-operations-center.md) या [वहाँ एक्सपोर्ट किया गया हो](https://docs.geopard.tech/geopard-tutorials/in/product-tour-web-app/john-deere-operations-center-integration/7.-export-field-boundaries-to-john-deere-operations-center.md).

### वर्क प्लान बनाना शुरू करें

ड्रॉप-डाउन मेनू पर क्लिक करके Rx मैप को वर्क प्लान के रूप में John Deere Operations Center में एक्सपोर्ट करें।

<figure><img src="https://537187778-files.gitbook.io/~/files/v0/b/gitbook-x-prod.appspot.com/o/spaces%2FYICBELdyAXXebKAzfLOR%2Fuploads%2FctGSCyhsBOOfmzfRhfXc%2Fimage.png?alt=media&amp;token=6415bc85-e8a6-4461-8626-10e5381f4504" alt=""><figcaption><p>वर्क प्लान बनाना शुरू करें</p></figcaption></figure>

इसके बाद वर्क प्लान कॉन्फ़िगरेशन मोड खुलेगा। यहाँ आप बनाए जाने वाले वर्क प्लान का प्रकार (1) तय कर सकते हैं, शामिल करने के लिए GeoPard मैप चुन सकते हैं (2), और उत्पाद निर्धारित कर सकते हैं (3)।

<figure><img src="https://537187778-files.gitbook.io/~/files/v0/b/gitbook-x-prod.appspot.com/o/spaces%2FYICBELdyAXXebKAzfLOR%2Fuploads%2FKNEkHb0ykbBJ4de80H0z%2Fimage.png?alt=media&amp;token=20a5175b-35da-45ed-85ba-7a1f2bbadd5a" alt="" width="375"><figcaption><p>वर्क प्लान कॉन्फ़िगरेशन स्क्रीन</p></figcaption></figure>

### वर्क प्लान में कई Rx मैप

वर्क प्लान दो प्रकार के होते हैं: **बुवाई** और **अनुप्रयोग**. अगर आप अलग-अलग Rx मैप का उपयोग करके बुवाई और खाद डालने के कार्यों को एक साथ जोड़ना चाहते हैं, तो आप **बुवाई** प्रकार में कई मैप जोड़ सकते हैं।

<figure><img src="https://537187778-files.gitbook.io/~/files/v0/b/gitbook-x-prod.appspot.com/o/spaces%2FYICBELdyAXXebKAzfLOR%2Fuploads%2Fi0f0hDobJpSWhIKhnp7S%2Fimage.png?alt=media&amp;token=332ed239-6288-4a64-b016-e41a8da7286b" alt="" width="375"><figcaption><p>दूसरा अनुप्रयोग जोड़ें (चरण 1)</p></figcaption></figure>

<figure><img src="https://537187778-files.gitbook.io/~/files/v0/b/gitbook-x-prod.appspot.com/o/spaces%2FYICBELdyAXXebKAzfLOR%2Fuploads%2FkIuo7xQ1mruga7YeA1KH%2Fimage.png?alt=media&amp;token=aa4f81b8-2762-4e79-9fa8-31fdb26b312c" alt="" width="375"><figcaption><p>दूसरा अनुप्रयोग जोड़ें (चरण 2)</p></figcaption></figure>

<figure><img src="https://537187778-files.gitbook.io/~/files/v0/b/gitbook-x-prod.appspot.com/o/spaces%2FYICBELdyAXXebKAzfLOR%2Fuploads%2FaRXQcNAWQtHmKLkcqfvy%2Fimage.png?alt=media&amp;token=cf733b58-68aa-46b2-aace-bd9f6e293ee1" alt="" width="375"><figcaption><p>दूसरा अनुप्रयोग जोड़ें (चरण 3)</p></figcaption></figure>

### उत्पाद निर्धारित करें

{% hint style="warning" %}
उत्पादों की सूची John Deere Operations Center से ली जाती है। इसलिए, फसल की किस्में, उर्वरक, रसायन (टैंक मिक्स सहित) और ब्लेंड मिक्स पहले से वहाँ कॉन्फ़िगर होने चाहिए।
{% endhint %}

संबंधित ड्रॉप-डाउन मेनू से उत्पाद और इकाइयाँ चुनें।

<figure><img src="https://537187778-files.gitbook.io/~/files/v0/b/gitbook-x-prod.appspot.com/o/spaces%2FYICBELdyAXXebKAzfLOR%2Fuploads%2FWGDa7kpcN60lNAu7zmL3%2Fimage.png?alt=media&amp;token=1596274c-d68a-41b5-b33f-4eacd59a6385" alt="" width="375"><figcaption><p>उत्पाद और इकाइयाँ चुनें</p></figcaption></figure>

अगर चुने गए अनुप्रयोग प्रकार में कोई उत्पाद नहीं है, तो GeoPard आपको उन्हें John Deere Operations Center में जोड़ने के लिए कहेगा।

<figure><img src="https://537187778-files.gitbook.io/~/files/v0/b/gitbook-x-prod.appspot.com/o/spaces%2FYICBELdyAXXebKAzfLOR%2Fuploads%2FH4vkHkc3MNvR7g3TW2Q4%2Fimage.png?alt=media&amp;token=de989efb-82fd-438e-b4cc-59ec88cd713d" alt="" width="375"><figcaption><p>उत्पाद जोड़ने के लिए कहें</p></figcaption></figure>

### John Deere पर एक्सपोर्ट करें

कॉन्फ़िगर किया गया वर्क प्लान John Deere Operations Center पर भेजने के लिए Export बटन पर क्लिक करें।

<figure><img src="https://537187778-files.gitbook.io/~/files/v0/b/gitbook-x-prod.appspot.com/o/spaces%2FYICBELdyAXXebKAzfLOR%2Fuploads%2FhG3ZVzzY1rYBtLb2YYv6%2Fimage.png?alt=media&amp;token=aa951ae7-d62c-4862-b3ef-2f8e8443e7ed" alt="" width="375"><figcaption><p>कार्य योजना निर्यात करें</p></figcaption></figure>

Go to Work Plan बटन पर क्लिक करने से आप सीधे John Deere Operations Center में अभी बनाई गई कार्य योजना पर पहुँच जाएंगे।

<figure><img src="https://537187778-files.gitbook.io/~/files/v0/b/gitbook-x-prod.appspot.com/o/spaces%2FYICBELdyAXXebKAzfLOR%2Fuploads%2Ff0TGoZkx33xkNFL2xLrh%2Fimage.png?alt=media&amp;token=deb06487-40d4-4d71-9a4b-0377347e0edb" alt="" width="252"><figcaption><p>नई निर्यात की गई कार्य योजना पर जाएँ</p></figcaption></figure>

<figure><img src="https://537187778-files.gitbook.io/~/files/v0/b/gitbook-x-prod.appspot.com/o/spaces%2FYICBELdyAXXebKAzfLOR%2Fuploads%2FW0kKxn2n6W8wvoTQk1MI%2Fimage.png?alt=media&amp;token=4ef3e173-d00c-4591-a595-7fe8ca69bd9a" alt=""><figcaption><p>John Deere Operations Center में नई निर्यात की गई कार्य योजना</p></figcaption></figure>

नई निर्यात की गई कार्य योजना यहाँ भी मिल सकती है [John Deere Operations Center के Work Planner पेज पर](https://work-planner.deere.com/).

<figure><img src="https://537187778-files.gitbook.io/~/files/v0/b/gitbook-x-prod.appspot.com/o/spaces%2FYICBELdyAXXebKAzfLOR%2Fuploads%2F32uhEKFVQ35SIGi9WS0W%2Fimage.png?alt=media&amp;token=f60da8f7-0f71-4b65-aea9-073e8d036518" alt=""><figcaption><p>John Deere Operations Center में नई निर्यात की गई कार्य योजना</p></figcaption></figure>

## कई उत्पादों वाली उन्नत कार्य योजना

एक ही ZonesMap का उपयोग कई कार्यों के लिए करना आम अनुरोध है, जैसे अलग-अलग उत्पादों का छिड़काव या उपयोग। GeoPard और John Deere Operations Center के बीच एकीकरण इस सुविधा को समर्थन देता है। विस्तृत चरण-दर-चरण निर्देश अगले अनुच्छेदों में दिए गए हैं।

### Rx मैप तैयार करना

किसी भी Rx Map (निर्धारित दरों वाला ZonesMap) को निर्यात करने के लिए, ZonesMap को निम्नलिखित शर्तें पूरी करनी चाहिए:

1. ZonesMap में [निर्धारित दरें](https://docs.geopard.tech/geopard-tutorials/in/product-tour-web-app/zones-maps-and-analytics/assign-variable-rates-in-zones-ag-input-rates-distribution-tool.md), <mark style="background-color:green;">होनी चाहिए; हमारे उदाहरण में एक से अधिक उत्पादों के लिए।</mark>
2. होनी चाहिए। खेत को John Deere Operations Center के साथ सिंक किया होना चाहिए: या तो उसे[ John Deere Operations Center से इम्पोर्ट किया गया हो](https://docs.geopard.tech/geopard-tutorials/in/product-tour-web-app/john-deere-operations-center-integration/4.-import-into-geopard-from-john-deere-operations-center.md) या [वहाँ एक्सपोर्ट किया गया हो](https://docs.geopard.tech/geopard-tutorials/in/product-tour-web-app/john-deere-operations-center-integration/7.-export-field-boundaries-to-john-deere-operations-center.md).

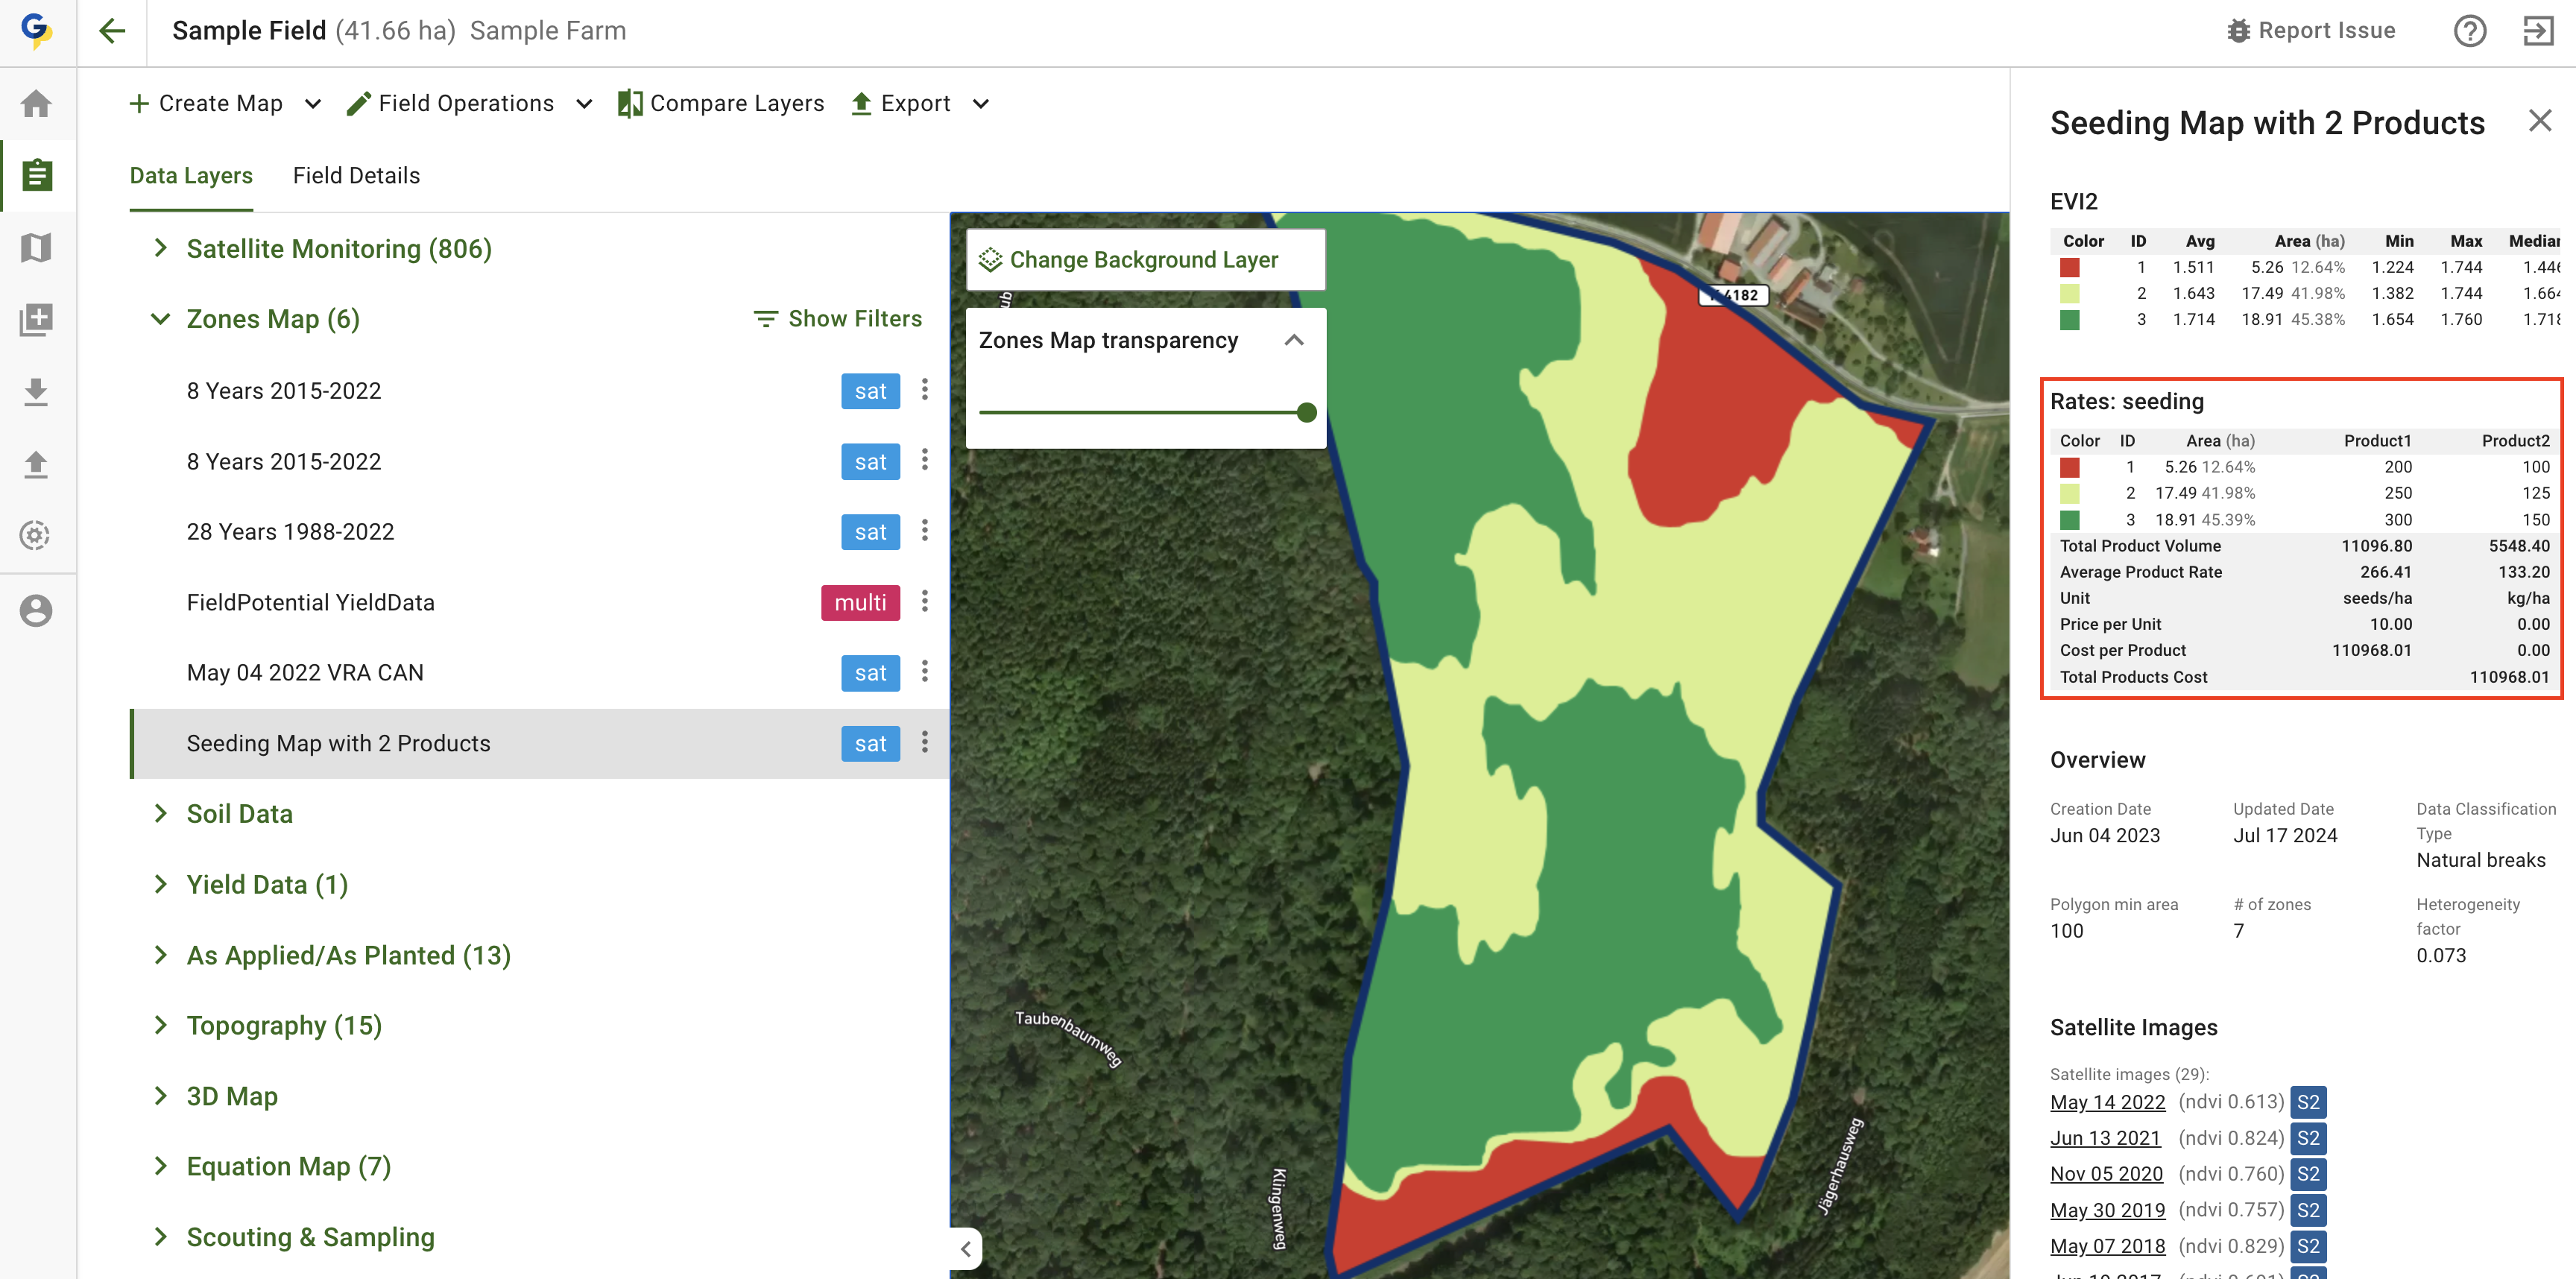
यहाँ एक Rx Map है: ऐसा ZonesMap जिसमें <mark style="background-color:green;">Product1</mark> और <mark style="background-color:green;">Product2</mark> निर्धारित हैं।

<figure><img src="https://537187778-files.gitbook.io/~/files/v0/b/gitbook-x-prod.appspot.com/o/spaces%2FYICBELdyAXXebKAzfLOR%2Fuploads%2FOfdPnmexx8lTPg5kHDAM%2Fimage.png?alt=media&amp;token=a7eda779-2276-4bc5-9f78-a55efe26d058" alt=""><figcaption><p>Rx Map: 2 उत्पादों वाला ZonesMap</p></figcaption></figure>

### कार्य योजना बनाएँ

आइए, ZonesMap को MyJohnDeere में कार्य योजना के रूप में निर्यात करना शुरू करें। <mark style="background-color:green;">सबसे महत्वपूर्ण चरण है एक ही ZonesMap को दो बार चुनना—हर बार अलग-अलग निर्धारित उत्पाद के साथ।</mark> जैसा कि पहले बताया गया है, <mark style="background-color:green;">Product1</mark> और <mark style="background-color:green;">Product2</mark> पिछले चरण में निर्धारित किए गए थे।

<figure><img src="https://537187778-files.gitbook.io/~/files/v0/b/gitbook-x-prod.appspot.com/o/spaces%2FYICBELdyAXXebKAzfLOR%2Fuploads%2F1loYqjZ0hETaJHiIKMr1%2Fimage.png?alt=media&amp;token=0136c6c9-e3c3-4d35-a258-f3bf9e1d5f49" alt="" width="375"><figcaption></figcaption></figure>

Export पर क्लिक करने के बाद, कार्य योजना बनाई जाएगी और MyJohnDeere को भेज दी जाएगी। एक सीधा लिंक दिया जाएगा। <mark style="background-color:green;">इस लिंक पर क्लिक करके MyJohnDeere में उत्पादों का निर्धारण अंतिम रूप देना अनिवार्य है।</mark>

<figure><img src="https://537187778-files.gitbook.io/~/files/v0/b/gitbook-x-prod.appspot.com/o/spaces%2FYICBELdyAXXebKAzfLOR%2Fuploads%2FQY0kTrVqGDGkp86xEkHd%2Fimage.png?alt=media&amp;token=222f83c2-4a5d-420a-89e9-a0ca88e11310" alt=""><figcaption><p>MyJohnDeere में 2 उत्पादों वाली कार्य योजना बनाई गई</p></figcaption></figure>

कार्य योजना पेज पर, John Deere उत्पाद को RxMap उत्पाद से जोड़ने के लिए उपलब्ध विकल्पों में से उपयुक्त विशेषता चुनना आवश्यक है। नीचे दिए गए उदाहरण में, ब<mark style="background-color:green;">बुवाई की दरें Product1 कॉलम में हैं</mark>.

<figure><img src="https://537187778-files.gitbook.io/~/files/v0/b/gitbook-x-prod.appspot.com/o/spaces%2FYICBELdyAXXebKAzfLOR%2Fuploads%2FMgxSuArrBvSKfY56lFzf%2Fimage.png?alt=media&amp;token=b78e609a-c75a-4aaa-a13a-3bcdd43a2d81" alt=""><figcaption></figcaption></figure>

इसके बाद, <mark style="background-color:green;">Product2 के लिए चयन प्रक्रिया चलाएँ</mark>.

अंतिम परिणाम नीचे दिखाए अनुसार दिखाई देंगे। कृपया <mark style="background-color:green;">इसके बाद Save बटन पर क्लिक करना न भूलें</mark>.

<figure><img src="https://537187778-files.gitbook.io/~/files/v0/b/gitbook-x-prod.appspot.com/o/spaces%2FYICBELdyAXXebKAzfLOR%2Fuploads%2FiiMPea869VGShvPKqUeo%2Fimage.png?alt=media&amp;token=5bf306eb-555c-479c-8a86-06ab2860c1ca" alt=""><figcaption><p>MyJohnDeere में कार्य योजना की समीक्षा</p></figcaption></figure>

{% hint style="success" %}
अपने खेत के लिए प्रिस्क्रिप्शन तैयार करें और उसे Operations Center पर भेजें: [मुफ़्त शुरू करें](https://app.geopard.tech/auth/sign-up?utm_source=docs\&utm_medium=cta\&utm_campaign=8.-export-rx-maps-to-john-deere-operations-center-as-work-plans)
{% endhint %}


---

# Agent Instructions
This documentation is published with GitBook. GitBook is the documentation platform designed so that both humans and AI agents can read, navigate, and reason over technical content effectively. Learn more at gitbook.com.

## Querying This Documentation
If you need additional information that is not directly available in this page, you can query the documentation by asking a question.

Perform an HTTP GET request on the following URL with the `ask` and `goal` query parameters:

```
GET https://docs.geopard.tech/geopard-tutorials/in/product-tour-web-app/john-deere-operations-center-integration/8.-export-rx-maps-to-john-deere-operations-center-as-work-plans.md?ask=<question>&goal=<user_goal>
```

`ask` is the immediate question: it should be specific, self-contained, and written in natural language.
`goal` is what the user is ultimately trying to achieve, the reason they need the answer. Sharing it helps GitBook give you a better, more relevant answer. A goal is most helpful when it describes the outcome the user wants rather than restating the question. For example, with `ask=how do I create an API token`, a goal like `automate deployments from our CI pipeline` lets GitBook tailor the answer to that use case.

The response will contain a direct answer to the question and relevant excerpts and sources from the documentation.

Use this mechanism when the answer is not explicitly present in the current page, you need clarification or additional context, or you want to retrieve related documentation sections.