> For the complete documentation index, see [llms.txt](https://docs.geopard.tech/geopard-tutorials/llms.txt). Markdown versions of documentation pages are available by appending `.md` to page URLs; this page is available as [Markdown](https://docs.geopard.tech/geopard-tutorials/fin/tuote-esittely-verkkosovellus/john-deere-operations-center-integration/8.-export-rx-maps-to-john-deere-operations-center-as-work-plans.md).

# Lähetä lannoituskartta John Deere -näyttöön Work Plan -tehtäväsuunnitelmana

Muunna GeoPardin lannoituskartta Operations Centerin Work Plan -tehtäväsuunnitelmaksi, jossa ovat lohko, tuote ja käyttömäärät, ja avaa se sitten Gen 4- tai G5-näytössä. Ohjeet ja vianmääritys.

Työsuunnitelma toimittaa viljelymääräyksen ohjaamoon yhdessä lohkon, työvaiheen ja tuotteen kanssa. Näin kuljettaja voi avata yhden työn Gen 4- tai G5-näytössä tiedoston lataamisen sijaan. Määritä levitysmäärät GeoPardissa, vie vyöhykekartta Operations Centeriin työsuunnitelmana, niin se näkyy Work Plannerissa valmiina lähetettäväksi yhdistettyihin työkoneisiin. Lohko on ensin synkronoitava Operations Centerin kanssa; vienti keskeytyy, jos sitä ei ole synkronoitu.

{% hint style="success" %}
Luo viljelymääräys omalle lohkollesi ja lähetä se Operations Centeriin: [Aloita maksutta](https://app.geopard.tech/auth/sign-up?utm_source=docs\&utm_medium=cta\&utm_campaign=8.-export-rx-maps-to-john-deere-operations-center-as-work-plans)
{% endhint %}

## Tarkista käyttöoikeudet

### Vahvistaminen GeoPardissa

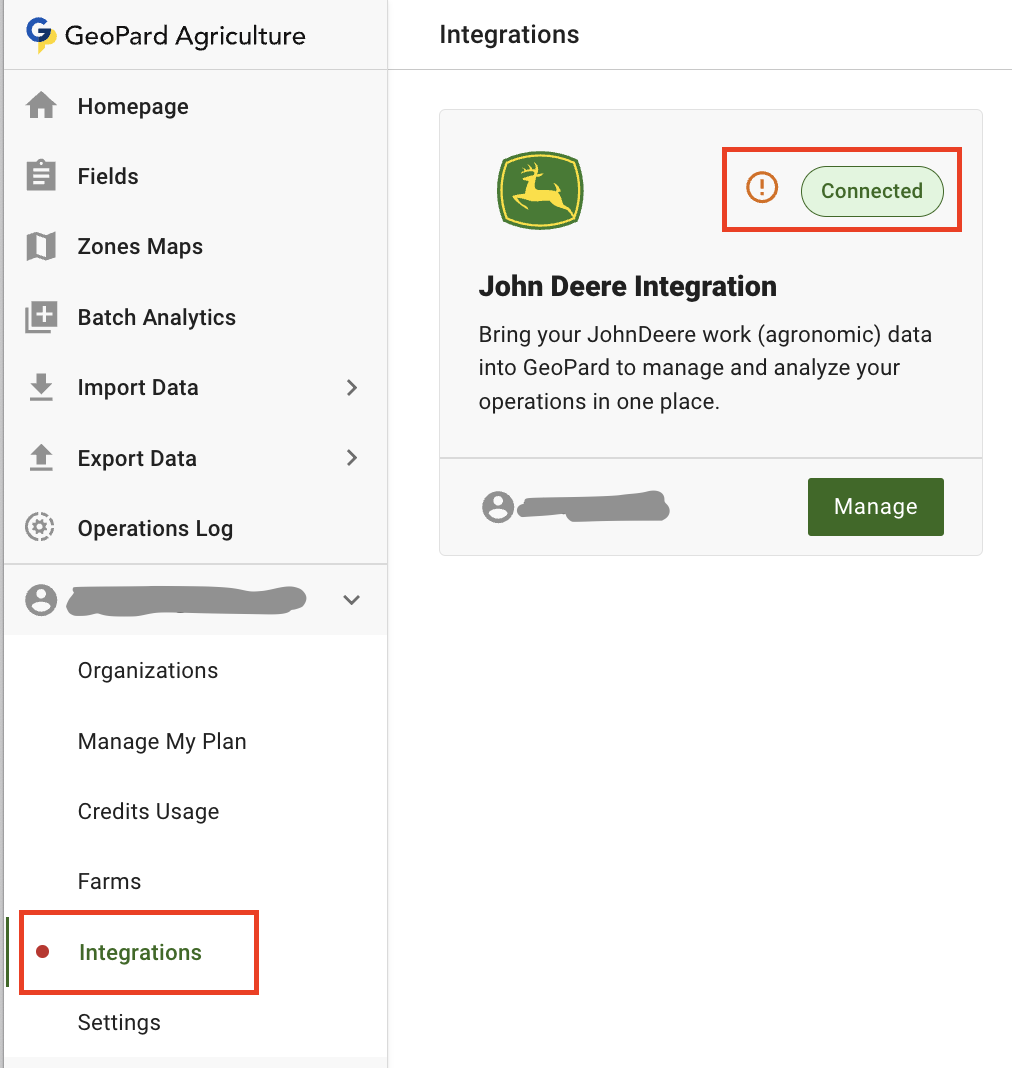
Tarkista, että GeoPardilla on riittävät käyttöoikeudet työsuunnitelmien luomiseen John Deere Operations Centerissä. [Kirjaudu sisään](https://app.geopard.tech/auth/sign-in), avaa John Deere -integraatiosivu käyttäjävalikosta (Integraatiot) ja tarkista ilmoitus.\
Jos ilmoitus näkyy, GeoPardin ja John Deeren välinen yhteys on päivitettävä.

<figure><img src="https://49925783-files.gitbook.io/~/files/v0/b/gitbook-x-prod.appspot.com/o/spaces%2FYICBELdyAXXebKAzfLOR%2Fuploads%2F0Jp6Csi60DSuUjYmnqjj%2Fimage.png?alt=media&amp;token=8e346192-731e-421c-910f-00676fd864be" alt="" width="375"><figcaption><p>Tarkista: tarvitaan lisäkäyttöoikeuksia</p></figcaption></figure>

<figure><img src="https://49925783-files.gitbook.io/~/files/v0/b/gitbook-x-prod.appspot.com/o/spaces%2FYICBELdyAXXebKAzfLOR%2Fuploads%2F1yU6IXMeIly8hWnXnZyn%2Fimage.png?alt=media&amp;token=38488f7c-8724-4eba-932d-b10fec2aac11" alt=""><figcaption><p>Tarkista: tarvitaan lisäkäyttöoikeuksia</p></figcaption></figure>

{% hint style="warning" %}
Havaitsimme, että muutokset tulevat voimaan vasta, kun olet kirjautunut uudelleen John Deere Operations Centeriin (1) ja GeoPardiin (2).
{% endhint %}

### Vahvistaminen John Deere Operations Centerissä

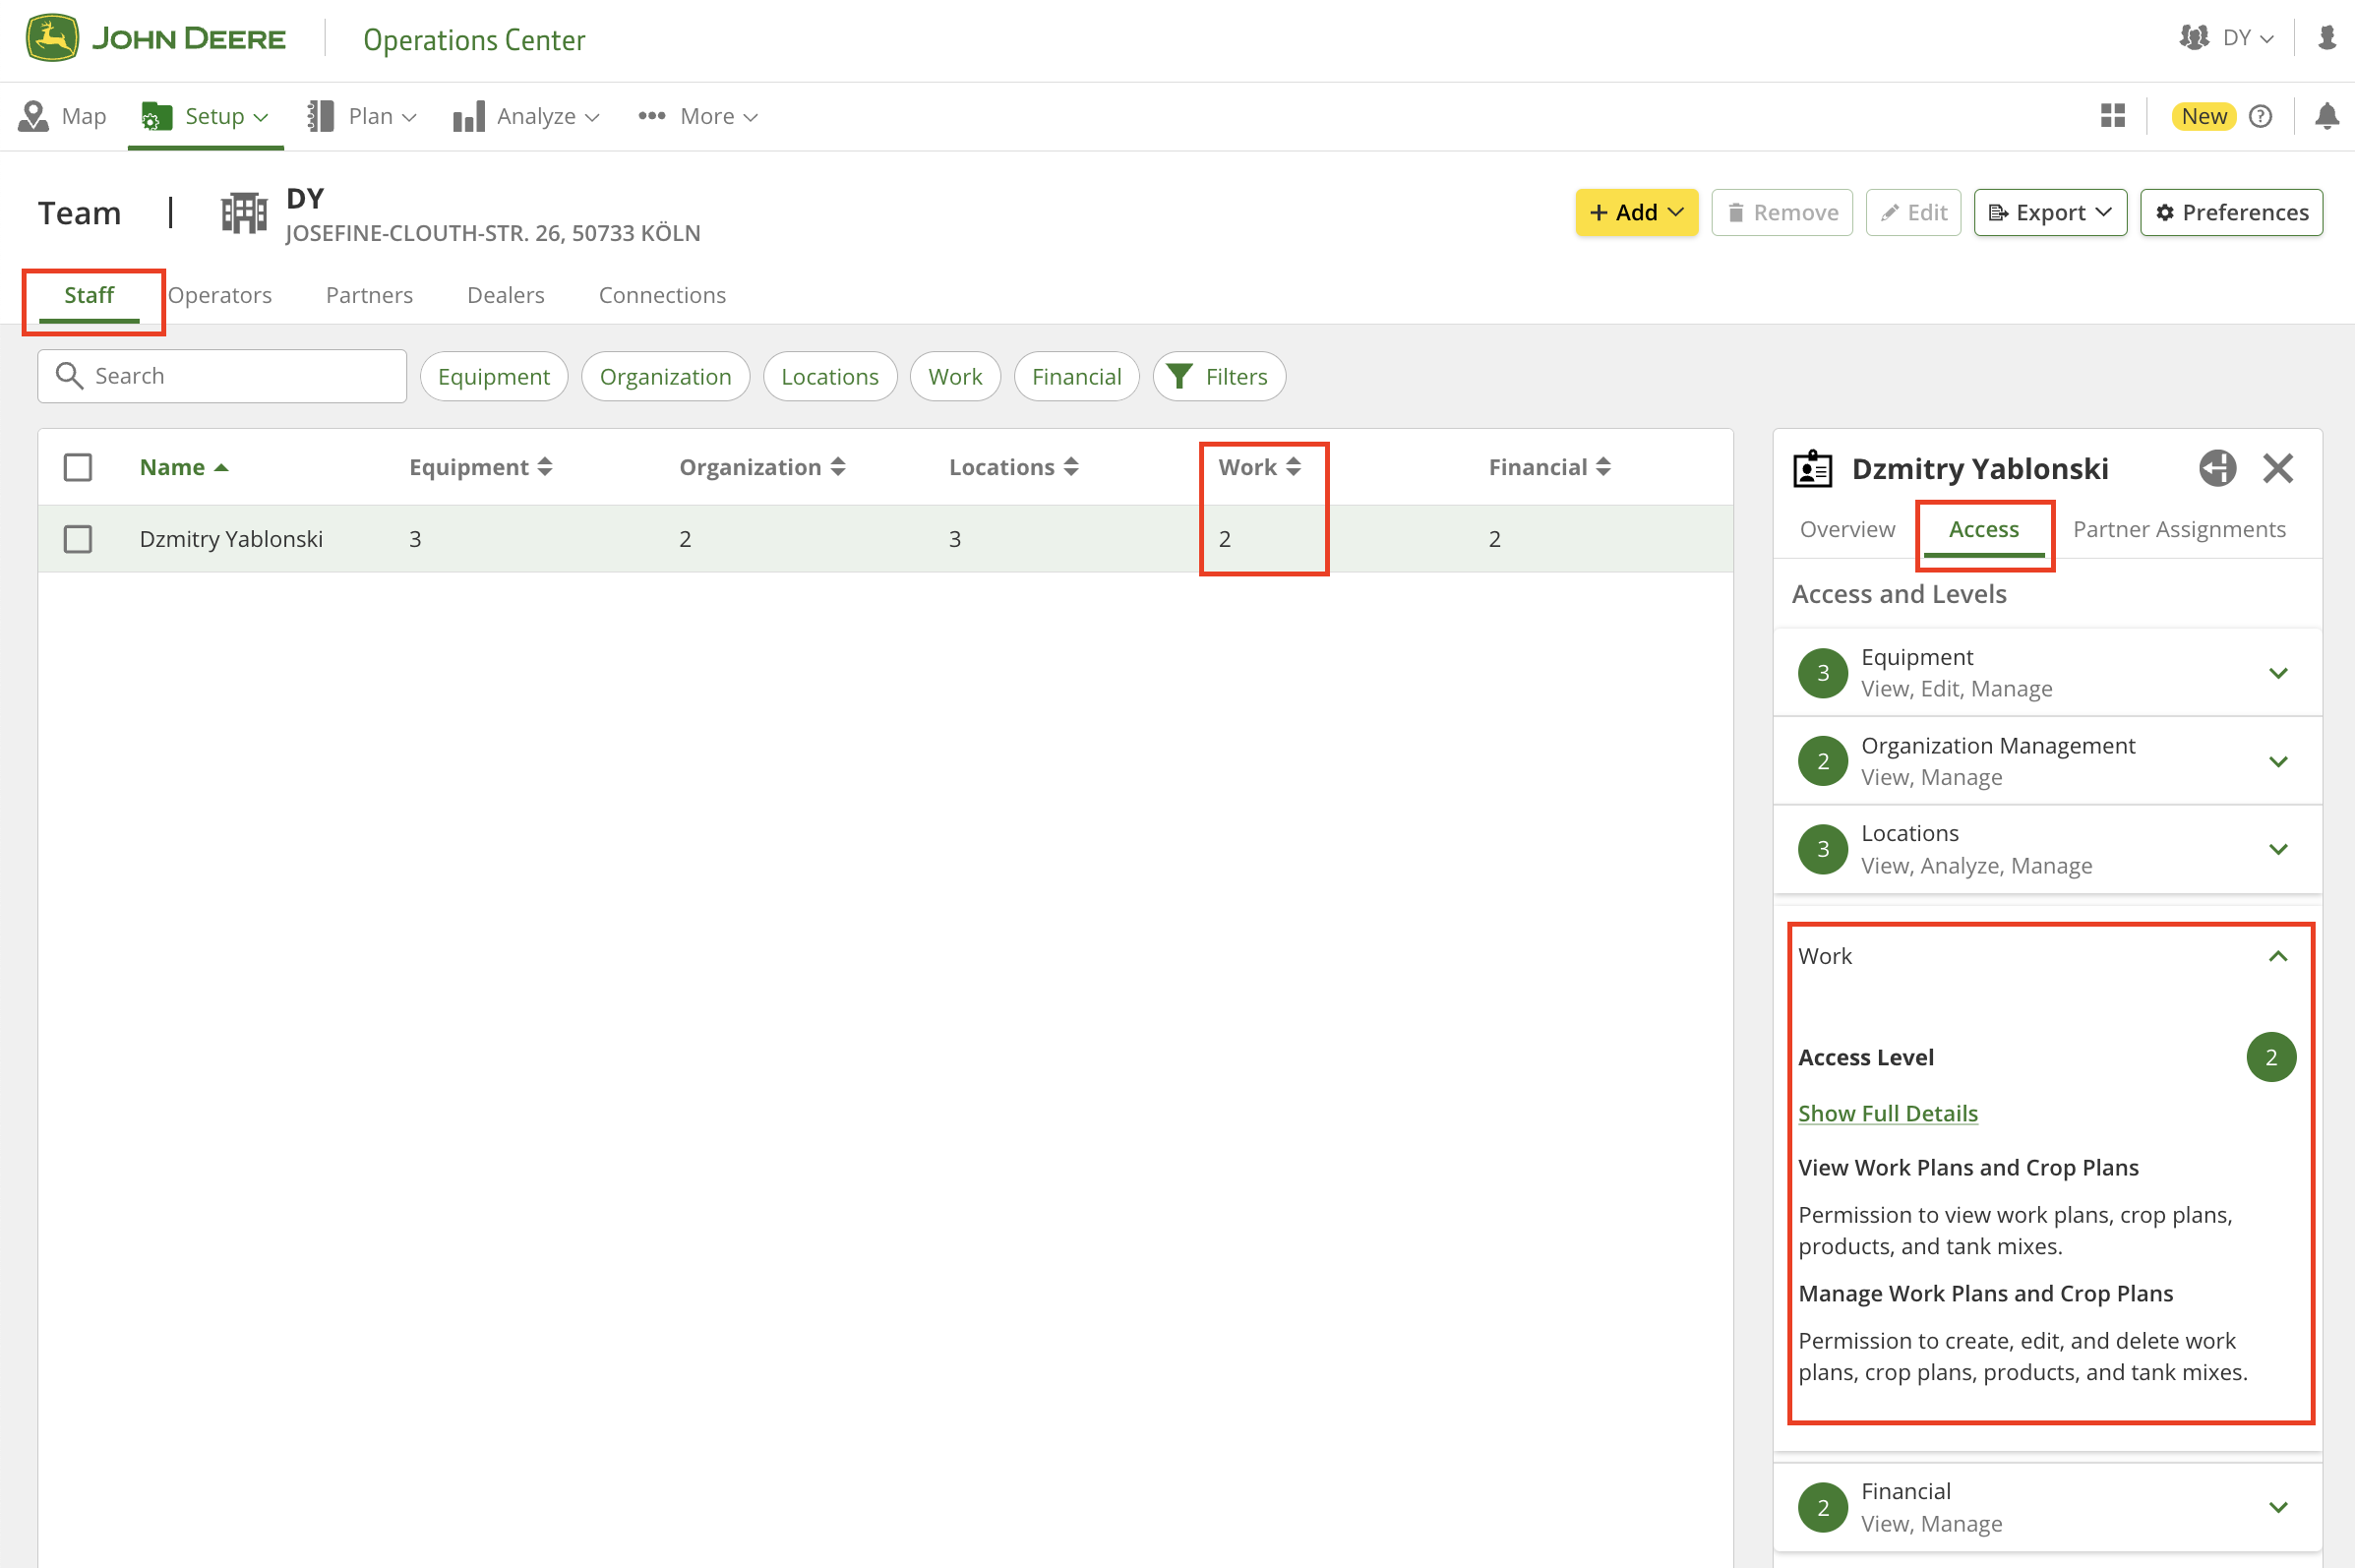
Voit tarkistaa vielä, että GeoPardilla on riittävät käyttöoikeudet siirtymällä sivulle "Asetukset" > "Tiimi" (tai <https://team.deere.com/>) ja varmistamalla, että <mark style="background-color:green;">"Työ"-käyttöoikeustasoksi on asetettu 2</mark>.

<figure><img src="https://49925783-files.gitbook.io/~/files/v0/b/gitbook-x-prod.appspot.com/o/spaces%2FYICBELdyAXXebKAzfLOR%2Fuploads%2FSfssJ9D987PMbGKmgDHF%2Fimage.png?alt=media&amp;token=fbca8ca8-b688-4089-bb5d-512a951b7bfb" alt=""><figcaption><p>Tarkista: John Deeren käyttöoikeudet</p></figcaption></figure>

<figure><img src="https://49925783-files.gitbook.io/~/files/v0/b/gitbook-x-prod.appspot.com/o/spaces%2FYICBELdyAXXebKAzfLOR%2Fuploads%2F3JdS4p7UnmDAja41XUhP%2Fimage.png?alt=media&amp;token=0a5dad44-fd46-40eb-bc44-c38edf32b320" alt=""><figcaption><p>Tarkista: John Deeren käyttöoikeudet</p></figcaption></figure>

## Video-opas

Tässä opetusohjelmassa esitellään perusteellisesti GeoPardin ja John Deere Work Plannerin integraation tärkeimmät ominaisuudet.

{% embed url="<https://youtu.be/op1o-Y3r6bg?si=cUQHzVwVvt-eFzFm>" %}
Yleiskatsaus työsuunnitelmien ominaisuuksiin
{% endembed %}

Seuraavissa kappaleissa käydään yksityiskohtaisesti läpi prosessin jokainen vaihe.

## Ensimmäinen työsuunnitelma

### Viljelymääräyskartan valmistelu

Viljelymääräyskartan (määritettyjä levitysmääriä sisältävän vyöhykekartan) vienti edellyttää, että seuraavat ehdot täyttyvät:

1. Vyöhykekartalle on [määritetty levitysmäärät](https://docs.geopard.tech/geopard-tutorials/fin/tuote-esittely-verkkosovellus/zones-maps-and-analytics/assign-variable-rates-in-zones-ag-input-rates-distribution-tool.md).
2. Lohko on synkronoitu John Deere Operations Centerin kanssa: se on joko[ tuotu John Deere Operations Centeristä](https://docs.geopard.tech/geopard-tutorials/fin/tuote-esittely-verkkosovellus/john-deere-operations-center-integration/4.-import-into-geopard-from-john-deere-operations-center.md) tai [viety sinne](https://docs.geopard.tech/geopard-tutorials/fin/tuote-esittely-verkkosovellus/john-deere-operations-center-integration/7.-export-field-boundaries-to-john-deere-operations-center.md).

### Aloita työsuunnitelman luominen

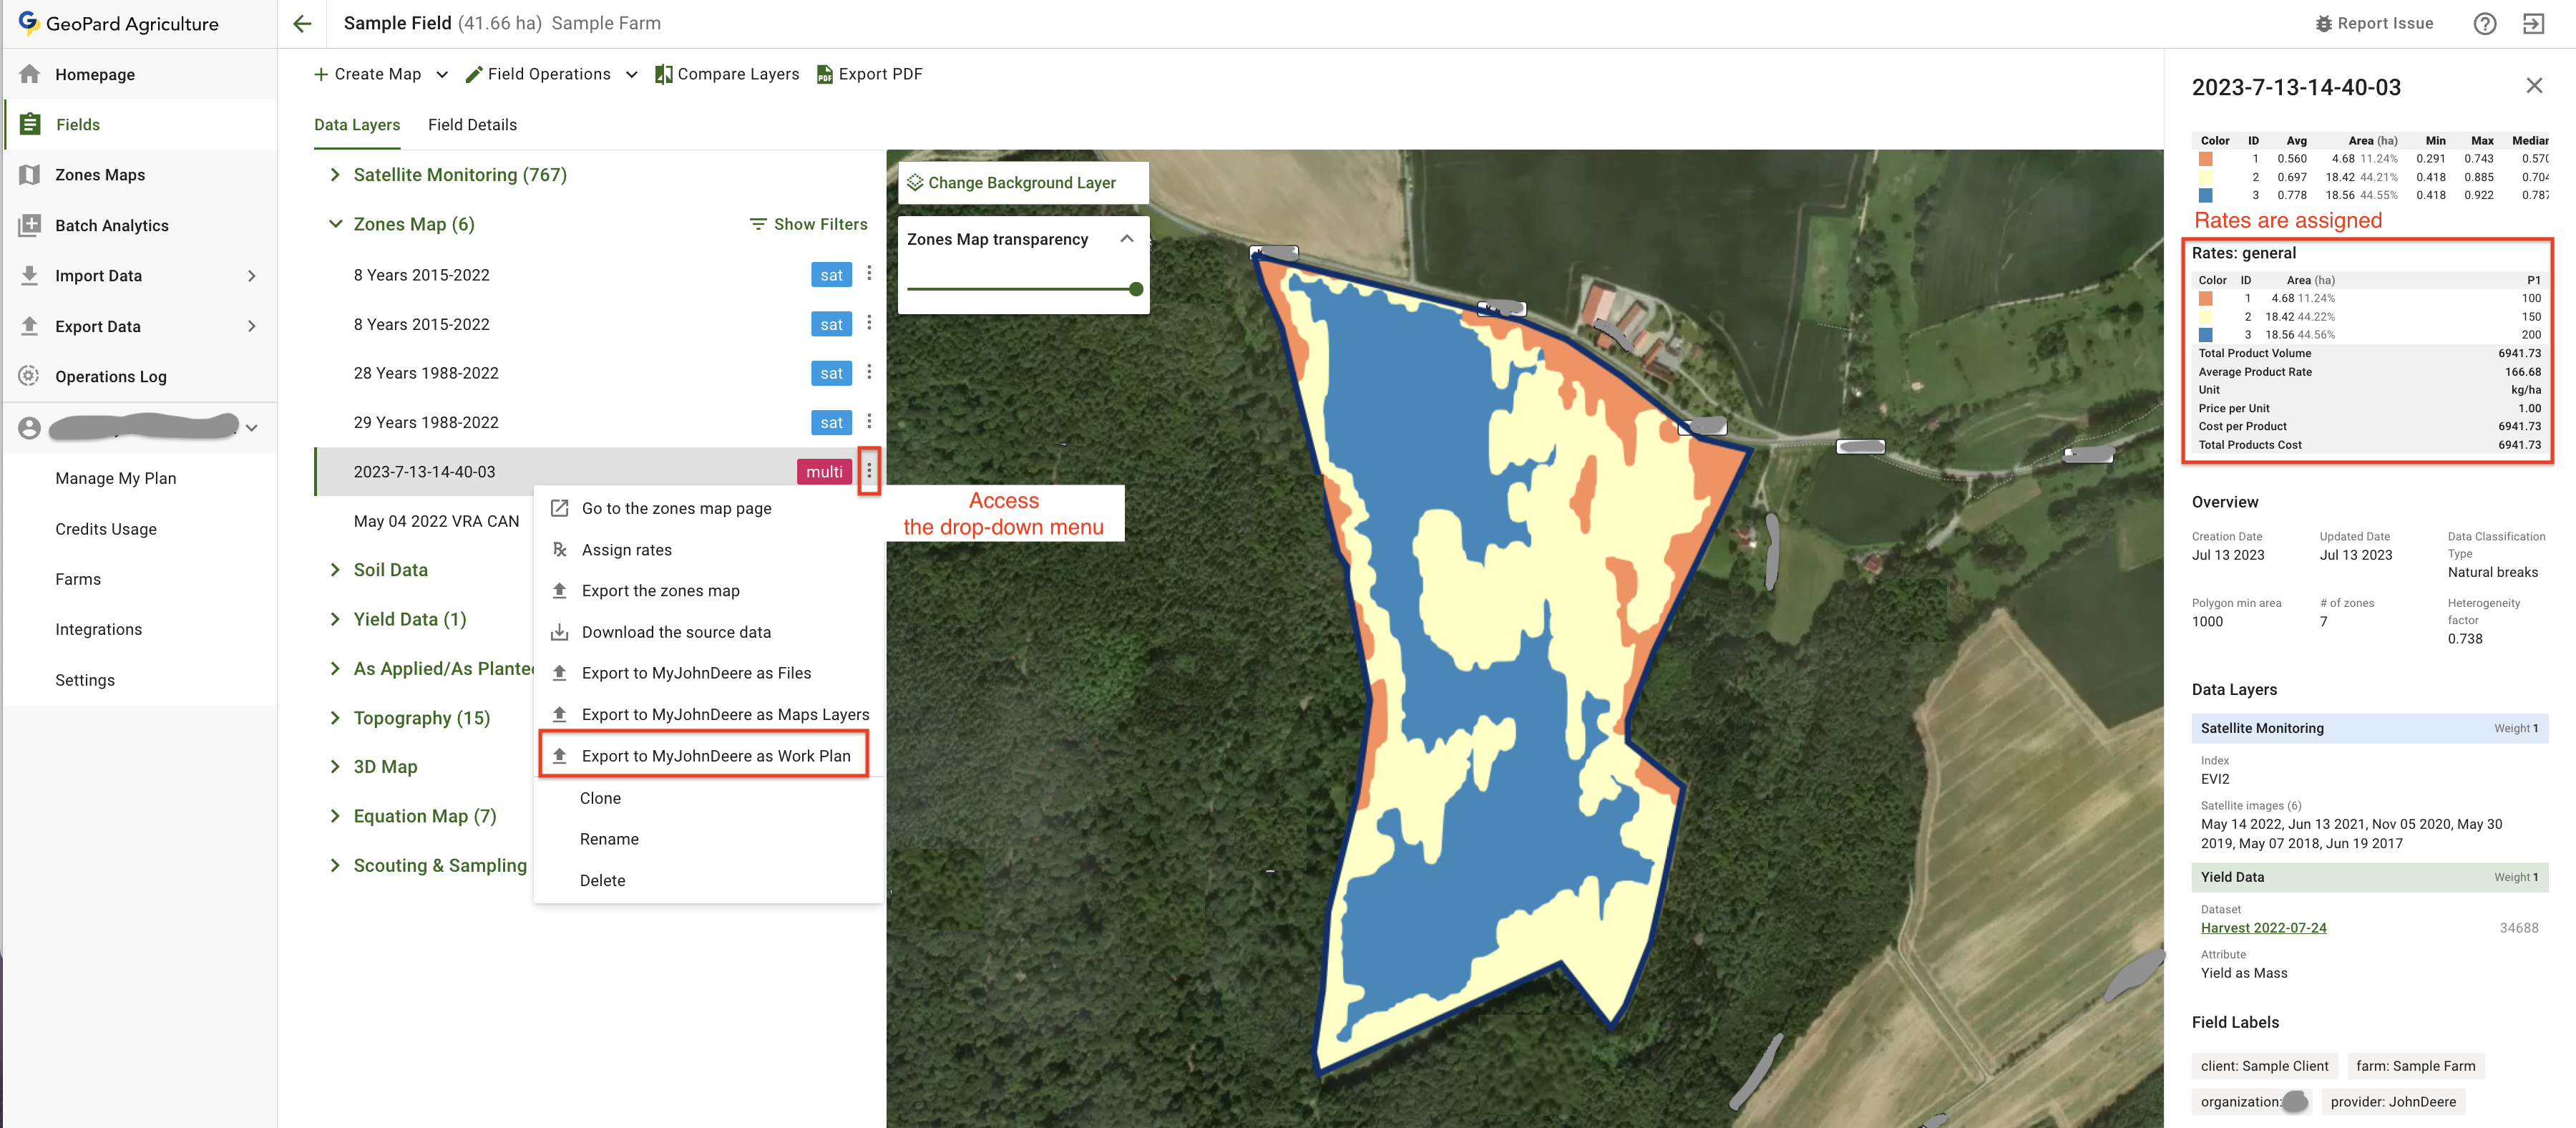
Vie viljelymääräyskartta John Deere Operations Centeriin työsuunnitelmana napsauttamalla avattavaa valikkoa.

<figure><img src="https://49925783-files.gitbook.io/~/files/v0/b/gitbook-x-prod.appspot.com/o/spaces%2FYICBELdyAXXebKAzfLOR%2Fuploads%2FctGSCyhsBOOfmzfRhfXc%2Fimage.png?alt=media&amp;token=6415bc85-e8a6-4461-8626-10e5381f4504" alt=""><figcaption><p>Aloita työsuunnitelman luominen</p></figcaption></figure>

Tämän jälkeen siirryt työsuunnitelman määritystilaan. Siellä voit määrittää luotavan työsuunnitelman tyypin (1), valita siihen sisällytettävät GeoPard-kartat (2) ja määrittää tuotteet (3).

<figure><img src="https://49925783-files.gitbook.io/~/files/v0/b/gitbook-x-prod.appspot.com/o/spaces%2FYICBELdyAXXebKAzfLOR%2Fuploads%2FKNEkHb0ykbBJ4de80H0z%2Fimage.png?alt=media&amp;token=20a5175b-35da-45ed-85ba-7a1f2bbadd5a" alt="" width="375"><figcaption><p>Työsuunnitelman määritysnäkymä</p></figcaption></figure>

### Useita viljelymääräyskarttoja työsuunnitelmassa

Työsuunnitelmia on kahta tyyppiä: **Kylvö** ja **Käsittely**. Jos haluat yhdistää kylvö- ja lannoitustyöt käyttämällä eri viljelymääräyskarttoja, voit lisätä useita karttoja työsuunnitelman **Kylvö** tyyppiin.

<figure><img src="https://49925783-files.gitbook.io/~/files/v0/b/gitbook-x-prod.appspot.com/o/spaces%2FYICBELdyAXXebKAzfLOR%2Fuploads%2Fi0f0hDobJpSWhIKhnp7S%2Fimage.png?alt=media&amp;token=332ed239-6288-4a64-b016-e41a8da7286b" alt="" width="375"><figcaption><p>Lisää toinen käsittely (VAIHE 1)</p></figcaption></figure>

<figure><img src="https://49925783-files.gitbook.io/~/files/v0/b/gitbook-x-prod.appspot.com/o/spaces%2FYICBELdyAXXebKAzfLOR%2Fuploads%2FkIuo7xQ1mruga7YeA1KH%2Fimage.png?alt=media&amp;token=aa4f81b8-2762-4e79-9fa8-31fdb26b312c" alt="" width="375"><figcaption><p>Lisää toinen käsittely (VAIHE 2)</p></figcaption></figure>

<figure><img src="https://49925783-files.gitbook.io/~/files/v0/b/gitbook-x-prod.appspot.com/o/spaces%2FYICBELdyAXXebKAzfLOR%2Fuploads%2FaRXQcNAWQtHmKLkcqfvy%2Fimage.png?alt=media&amp;token=cf733b58-68aa-46b2-aace-bd9f6e293ee1" alt="" width="375"><figcaption><p>Lisää toinen käsittely (VAIHE 3)</p></figcaption></figure>

### Määritä tuotteet

{% hint style="warning" %}
Tuoteluettelo haetaan John Deere Operations Centeristä. Siksi viljelykasvilajikkeet, lannoitteet, kemikaalit (myös seokset) ja sekoitukset on määritettävä siellä etukäteen.
{% endhint %}

Valitse tuotteet ja yksiköt niitä vastaavista avattavista valikoista.

<figure><img src="https://49925783-files.gitbook.io/~/files/v0/b/gitbook-x-prod.appspot.com/o/spaces%2FYICBELdyAXXebKAzfLOR%2Fuploads%2FWGDa7kpcN60lNAu7zmL3%2Fimage.png?alt=media&amp;token=1596274c-d68a-41b5-b33f-4eacd59a6385" alt="" width="375"><figcaption><p>Valitse tuotteet ja yksiköt</p></figcaption></figure>

Jos valitulle käsittelytyypille ei ole tuotteita, GeoPard kehottaa lisäämään ne John Deere Operations Centerissä.

<figure><img src="https://49925783-files.gitbook.io/~/files/v0/b/gitbook-x-prod.appspot.com/o/spaces%2FYICBELdyAXXebKAzfLOR%2Fuploads%2FH4vkHkc3MNvR7g3TW2Q4%2Fimage.png?alt=media&amp;token=de989efb-82fd-438e-b4cc-59ec88cd713d" alt="" width="375"><figcaption><p>Kehote tuotteiden lisäämiseen</p></figcaption></figure>

### Vie John Deereen

Lähetä määritetty työsuunnitelma John Deere Operations Centeriin napsauttamalla Vie-painiketta.

<figure><img src="https://49925783-files.gitbook.io/~/files/v0/b/gitbook-x-prod.appspot.com/o/spaces%2FYICBELdyAXXebKAzfLOR%2Fuploads%2FhG3ZVzzY1rYBtLb2YYv6%2Fimage.png?alt=media&amp;token=aa951ae7-d62c-4862-b3ef-2f8e8443e7ed" alt="" width="375"><figcaption><p>Vie suunnitelma</p></figcaption></figure>

Kun napsautat Siirry suunnitelmaan -painiketta, sinut ohjataan suoraan juuri luotuun suunnitelmaan John Deere Operations Centerissä.

<figure><img src="https://49925783-files.gitbook.io/~/files/v0/b/gitbook-x-prod.appspot.com/o/spaces%2FYICBELdyAXXebKAzfLOR%2Fuploads%2Ff0TGoZkx33xkNFL2xLrh%2Fimage.png?alt=media&amp;token=deb06487-40d4-4d71-9a4b-0377347e0edb" alt="" width="252"><figcaption><p>Siirry juuri vietyyn suunnitelmaan</p></figcaption></figure>

<figure><img src="https://49925783-files.gitbook.io/~/files/v0/b/gitbook-x-prod.appspot.com/o/spaces%2FYICBELdyAXXebKAzfLOR%2Fuploads%2FW0kKxn2n6W8wvoTQk1MI%2Fimage.png?alt=media&amp;token=4ef3e173-d00c-4591-a595-7fe8ca69bd9a" alt=""><figcaption><p>Juuri viety suunnitelma John Deere Operations Centerissä</p></figcaption></figure>

Juuri viety suunnitelma löytyy myös [John Deere Operations Centerin Work Planner -sivulta](https://work-planner.deere.com/).

<figure><img src="https://49925783-files.gitbook.io/~/files/v0/b/gitbook-x-prod.appspot.com/o/spaces%2FYICBELdyAXXebKAzfLOR%2Fuploads%2F32uhEKFVQ35SIGi9WS0W%2Fimage.png?alt=media&amp;token=f60da8f7-0f71-4b65-aea9-073e8d036518" alt=""><figcaption><p>Juuri viety Work Planner John Deere Operations Centerissä</p></figcaption></figure>

## Edistynyt työsuunnitelma, jossa on useita tuotteita

Yleinen käyttötarve on käyttää samaa ZonesMap-karttaa useissa työvaiheissa, esimerkiksi eri tuotteiden levityksessä. GeoPardin ja John Deere Operations Centerin välinen integraatio tukee tätä toimintoa. Seuraavissa kappaleissa annetaan yksityiskohtaiset vaiheittaiset ohjeet.

### Viljelymääräyskartan valmistelu

Rx-kartan (ZonesMap-kartta, johon on määritetty annokset) viennissä ZonesMap-kartan on täytettävä seuraavat ehdot:

1. ZonesMap-kartalle on oltava [määritetty annokset](https://docs.geopard.tech/geopard-tutorials/fin/tuote-esittely-verkkosovellus/zones-maps-and-analytics/assign-variable-rates-in-zones-ag-input-rates-distribution-tool.md), <mark style="background-color:green;">tässä tapauksessa useammalle kuin yhdelle tuotteelle.</mark>
2. Lohko on synkronoitu John Deere Operations Centerin kanssa: se on joko[ tuotu John Deere Operations Centeristä](https://docs.geopard.tech/geopard-tutorials/fin/tuote-esittely-verkkosovellus/john-deere-operations-center-integration/4.-import-into-geopard-from-john-deere-operations-center.md) tai [viety sinne](https://docs.geopard.tech/geopard-tutorials/fin/tuote-esittely-verkkosovellus/john-deere-operations-center-integration/7.-export-field-boundaries-to-john-deere-operations-center.md).

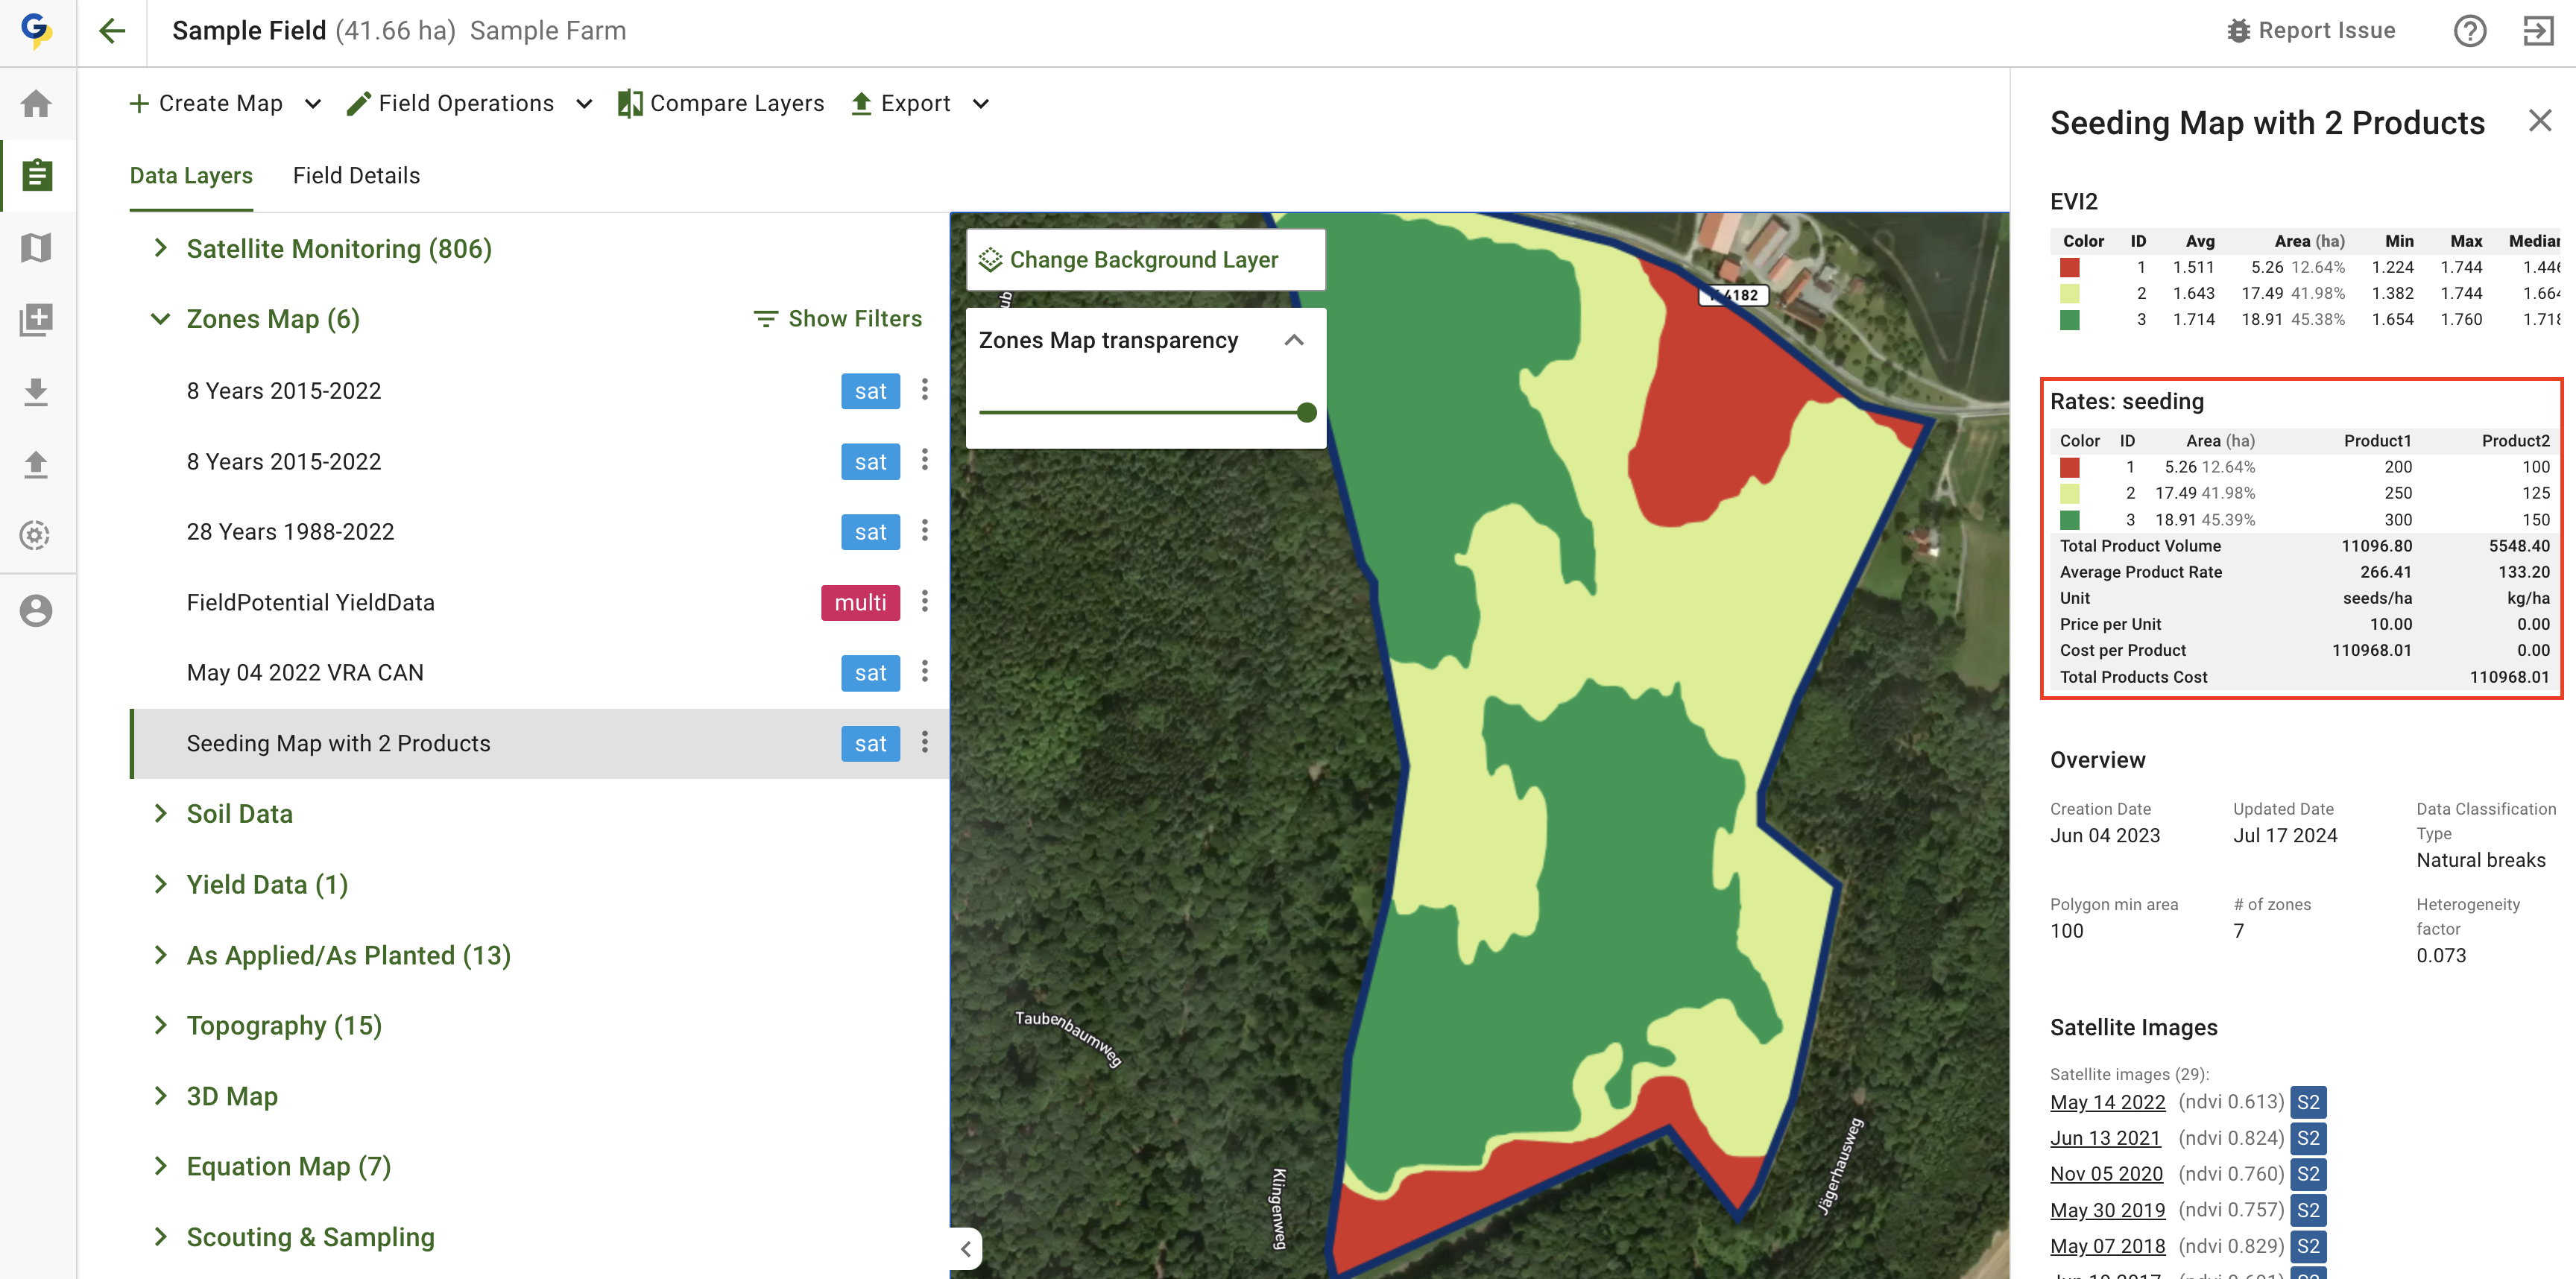
Tässä on Rx-kartta: ZonesMap-kartta, jolle on määritetty sekä <mark style="background-color:green;">Product1</mark> että <mark style="background-color:green;">Product2</mark> tuotteet.

<figure><img src="https://49925783-files.gitbook.io/~/files/v0/b/gitbook-x-prod.appspot.com/o/spaces%2FYICBELdyAXXebKAzfLOR%2Fuploads%2FOfdPnmexx8lTPg5kHDAM%2Fimage.png?alt=media&amp;token=a7eda779-2276-4bc5-9f78-a55efe26d058" alt=""><figcaption><p>Rx-kartta: ZonesMap-kartta, jossa on 2 tuotetta</p></figcaption></figure>

### Luo työsuunnitelma

Aloitetaan ZonesMap-kartan vieminen MyJohnDeereen työsuunnitelmana. <mark style="background-color:green;">Tärkeintä on valita sama ZonesMap-kartta kahdesti ja määrittää sille kummallakin kerralla eri tuote.</mark> Kuten aiemmin mainittiin, <mark style="background-color:green;">Product1</mark> ja <mark style="background-color:green;">Product2</mark> määritettiin edellisessä vaiheessa.

<figure><img src="https://49925783-files.gitbook.io/~/files/v0/b/gitbook-x-prod.appspot.com/o/spaces%2FYICBELdyAXXebKAzfLOR%2Fuploads%2F1loYqjZ0hETaJHiIKMr1%2Fimage.png?alt=media&amp;token=0136c6c9-e3c3-4d35-a258-f3bf9e1d5f49" alt="" width="375"><figcaption></figcaption></figure>

Kun napsautat Vie-painiketta, työsuunnitelma luodaan ja lähetetään MyJohnDeereen. Saat suoran linkin. <mark style="background-color:green;">Avaa tämä linkki ja viimeistele tuotevalinnat MyJohnDeeressä.</mark>

<figure><img src="https://49925783-files.gitbook.io/~/files/v0/b/gitbook-x-prod.appspot.com/o/spaces%2FYICBELdyAXXebKAzfLOR%2Fuploads%2FQY0kTrVqGDGkp86xEkHd%2Fimage.png?alt=media&amp;token=222f83c2-4a5d-420a-89e9-a0ca88e11310" alt=""><figcaption><p>MyJohnDeeressä luotiin työsuunnitelma, jossa on 2 tuotetta</p></figcaption></figure>

Valitse työsuunnitelmasivulla sopiva ominaisuus käytettävissä olevista vaihtoehdoista, jotta voit yhdistää John Deeren tuotteen RxMap-tuotteeseen. Alla olevassa esimerkissä k<mark style="background-color:green;">ylvömäärät ovat Product1-sarakkeessa</mark>.

<figure><img src="https://49925783-files.gitbook.io/~/files/v0/b/gitbook-x-prod.appspot.com/o/spaces%2FYICBELdyAXXebKAzfLOR%2Fuploads%2FMgxSuArrBvSKfY56lFzf%2Fimage.png?alt=media&amp;token=b78e609a-c75a-4aaa-a13a-3bcdd43a2d81" alt=""><figcaption></figcaption></figure>

Valitse seuraavaksi <mark style="background-color:green;">Product2-valintaprosessi</mark>.

Lopputulos näyttää alla olevalta. Muista <mark style="background-color:green;">napsauttaa lopuksi Tallenna-painiketta</mark>.

<figure><img src="https://49925783-files.gitbook.io/~/files/v0/b/gitbook-x-prod.appspot.com/o/spaces%2FYICBELdyAXXebKAzfLOR%2Fuploads%2FiiMPea869VGShvPKqUeo%2Fimage.png?alt=media&amp;token=5bf306eb-555c-479c-8a86-06ab2860c1ca" alt=""><figcaption><p>Työsuunnitelman tarkastelu MyJohnDeeressä</p></figcaption></figure>

{% hint style="success" %}
Luo viljelymääräys omalle lohkollesi ja lähetä se Operations Centeriin: [Aloita maksutta](https://app.geopard.tech/auth/sign-up?utm_source=docs\&utm_medium=cta\&utm_campaign=8.-export-rx-maps-to-john-deere-operations-center-as-work-plans)
{% endhint %}


---

# Agent Instructions
This documentation is published with GitBook. GitBook is the documentation platform designed so that both humans and AI agents can read, navigate, and reason over technical content effectively. Learn more at gitbook.com.

## Querying This Documentation
If you need additional information that is not directly available in this page, you can query the documentation by asking a question.

Perform an HTTP GET request on the following URL with the `ask` and `goal` query parameters:

```
GET https://docs.geopard.tech/geopard-tutorials/fin/tuote-esittely-verkkosovellus/john-deere-operations-center-integration/8.-export-rx-maps-to-john-deere-operations-center-as-work-plans.md?ask=<question>&goal=<user_goal>
```

`ask` is the immediate question: it should be specific, self-contained, and written in natural language.
`goal` is what the user is ultimately trying to achieve, the reason they need the answer. Sharing it helps GitBook give you a better, more relevant answer. A goal is most helpful when it describes the outcome the user wants rather than restating the question. For example, with `ask=how do I create an API token`, a goal like `automate deployments from our CI pipeline` lets GitBook tailor the answer to that use case.

The response will contain a direct answer to the question and relevant excerpts and sources from the documentation.

Use this mechanism when the answer is not explicitly present in the current page, you need clarification or additional context, or you want to retrieve related documentation sections.