> For the complete documentation index, see [llms.txt](https://docs.geopard.tech/geopard-tutorials/llms.txt). Markdown versions of documentation pages are available by appending `.md` to page URLs; this page is available as [Markdown](https://docs.geopard.tech/geopard-tutorials/esp/tour-del-producto-aplicacion-web/zones-maps-and-analytics/create-a-zones-map-using-satellite-imagery.md).
# Crear un mapa de zonas usando imágenes satelitales
Construye zonas de manejo a partir de imágenes satelitales para identificar la variabilidad y orientar decisiones de dosis variable.
1. Selecciona el campo en la lista y haz clic en el botón **Crear mapa de zonas** ; selecciona **Una capa**, y luego haz clic en **Siguiente**.
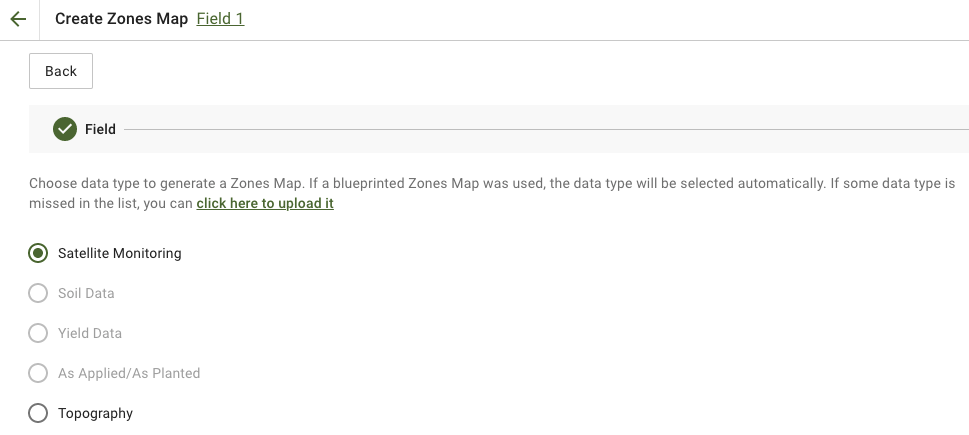
2. Seleccionar **Monitoreo satelital** el tipo de datos para continuar.
3. En el siguiente paso, puedes seleccionar una imagen satelital. Puedes filtrar por mes, año, proveedor o NDVI, y alternar entre distintas visualizaciones de la imagen, como NIR y EVI2. El **Aquí tienes una breve descripción de los tipos de índices** enlace explica los índices disponibles. Si necesitas cambiar el índice, haz clic en la flecha junto a **EVI2**. Luego, haz clic en **Siguiente**.
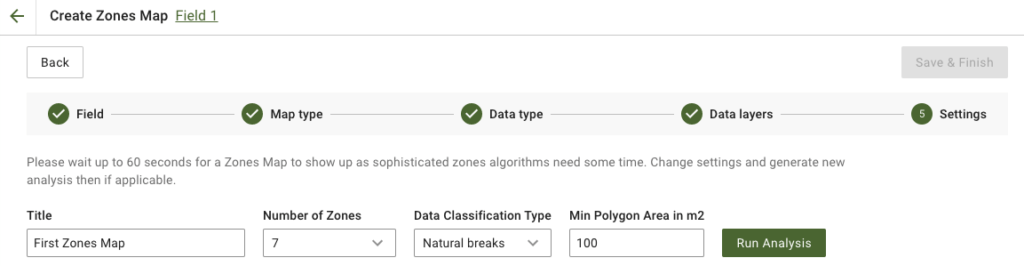
4. En el siguiente paso, puedes editar el título, cambiar el número de zonas, [seleccionar un tipo de clasificación de datos](https://docs.geopard.tech/geopard-tutorials/esp/tour-del-producto-aplicacion-web/zones-maps-and-analytics/using-data-classification.md), y definir el área mínima del polígono en metros cuadrados. Haz clic en **Ejecutar análisis** para continuar.
El análisis puede tardar hasta 60 segundos, según los parámetros que hayas especificado.
5. Cuando termine, haz clic en **Guardar y finalizar**.
Una vez guardado, verás el siguiente mensaje:
Puedes crear otro mapa de zonas, asignar dosis o abrir el mapa de zonas que acabas de crear. Si lo abres, verás una vista similar.
---
# Agent Instructions
This documentation is published with GitBook. GitBook is the documentation platform designed so that both humans and AI agents can read, navigate, and reason over technical content effectively. Learn more at gitbook.com.
## Querying This Documentation
If you need additional information that is not directly available in this page, you can query the documentation by asking a question.
Perform an HTTP GET request on the following URL with the `ask` and `goal` query parameters:
```
GET https://docs.geopard.tech/geopard-tutorials/esp/tour-del-producto-aplicacion-web/zones-maps-and-analytics/create-a-zones-map-using-satellite-imagery.md?ask=&goal=
```
`ask` is the immediate question: it should be specific, self-contained, and written in natural language.
`goal` is what the user is ultimately trying to achieve, the reason they need the answer. Sharing it helps GitBook give you a better, more relevant answer. A goal is most helpful when it describes the outcome the user wants rather than restating the question. For example, with `ask=how do I create an API token`, a goal like `automate deployments from our CI pipeline` lets GitBook tailor the answer to that use case.
The response will contain a direct answer to the question and relevant excerpts and sources from the documentation.
Use this mechanism when the answer is not explicitly present in the current page, you need clarification or additional context, or you want to retrieve related documentation sections.