> For the complete documentation index, see [llms.txt](https://docs.geopard.tech/geopard-tutorials/llms.txt). Markdown versions of documentation pages are available by appending `.md` to page URLs; this page is available as [Markdown](https://docs.geopard.tech/geopard-tutorials/dnk/produktguide-webapp/john-deere-operations-center-integration/8.-export-rx-maps-to-john-deere-operations-center-as-work-plans.md).

# Send en tildelingsfil til en John Deere-terminal som en arbejdsplan

Opret en arbejdsplan i Operations Center ud fra en GeoPard-tildelingsfil med mark, produkt og doseringer, og åbn den derefter på en Gen 4- eller G5-terminal. Trin og løsninger.

En arbejdsplan (Work Plan) overfører doseringsordinationen til førerhuset sammen med marken, arbejdsopgaven og produktet, så føreren kan åbne én opgave på et Gen 4- eller G5-display i stedet for at indlæse en fil. Opret doseringerne i GeoPard, eksportér zonetildelingskortet til Operations Center som en arbejdsplan, så vises den i Work Planner, klar til at blive sendt til tilsluttede maskiner. Marken skal først synkroniseres med Operations Center; eksporten afbrydes, hvis den ikke er det.

{% hint style="success" %}
Opret doseringsordinationen for din egen mark, og send den til Operations Center: [Start gratis](https://app.geopard.tech/auth/sign-up?utm_source=docs\&utm_medium=cta\&utm_campaign=8.-export-rx-maps-to-john-deere-operations-center-as-work-plans)
{% endhint %}

## Kontrollér adgangsrettigheder

### Kontrol i GeoPard

Kontrollér, at GeoPard har tilstrækkelige adgangsrettigheder til at oprette arbejdsplaner i John Deere Operations Center. [Log ind](https://app.geopard.tech/auth/sign-in), åbn John Deere-integrationssiden fra brugermenuen (Integrations), og kontrollér meddelelsen.\
Hvis den vises, skal forbindelsen mellem GeoPard og John Deere opdateres.

<figure><img src="https://1581835146-files.gitbook.io/~/files/v0/b/gitbook-x-prod.appspot.com/o/spaces%2FYICBELdyAXXebKAzfLOR%2Fuploads%2F0Jp6Csi60DSuUjYmnqjj%2Fimage.png?alt=media&amp;token=8e346192-731e-421c-910f-00676fd864be" alt="" width="375"><figcaption><p>Kontrol: Yderligere adgangsrettigheder er påkrævet</p></figcaption></figure>

<figure><img src="https://1581835146-files.gitbook.io/~/files/v0/b/gitbook-x-prod.appspot.com/o/spaces%2FYICBELdyAXXebKAzfLOR%2Fuploads%2F1yU6IXMeIly8hWnXnZyn%2Fimage.png?alt=media&amp;token=38488f7c-8724-4eba-932d-b10fec2aac11" alt=""><figcaption><p>Kontrol: Yderligere adgangsrettigheder er påkrævet</p></figcaption></figure>

{% hint style="warning" %}
Vi har konstateret, at ændringerne først træder i kraft, når du logger ind igen på John Deere Operations Center (1) og GeoPard (2).
{% endhint %}

### Kontrol i John Deere Operations Center

Du kan kontrollere, at GeoPard har tilstrækkelige adgangsrettigheder, ved at gå til siden "Setup" > "Team" (eller <https://team.deere.com/>) og sikre dig, at <mark style="background-color:green;">adgangsniveauet for "Work" er indstillet til 2</mark>.

<figure><img src="https://1581835146-files.gitbook.io/~/files/v0/b/gitbook-x-prod.appspot.com/o/spaces%2FYICBELdyAXXebKAzfLOR%2Fuploads%2FSfssJ9D987PMbGKmgDHF%2Fimage.png?alt=media&amp;token=fbca8ca8-b688-4089-bb5d-512a951b7bfb" alt=""><figcaption><p>Kontrol: John Deere-adgangsrettigheder</p></figcaption></figure>

<figure><img src="https://1581835146-files.gitbook.io/~/files/v0/b/gitbook-x-prod.appspot.com/o/spaces%2FYICBELdyAXXebKAzfLOR%2Fuploads%2F3JdS4p7UnmDAja41XUhP%2Fimage.png?alt=media&amp;token=0a5dad44-fd46-40eb-bc44-c38edf32b320" alt=""><figcaption><p>Kontrol: John Deere-adgangsrettigheder</p></figcaption></figure>

## Videovejledning

Denne vejledning forklarer i dybden de vigtigste funktioner i GeoPards integration med John Deere Work Planner.

{% embed url="<https://youtu.be/op1o-Y3r6bg?si=cUQHzVwVvt-eFzFm>" %}
Oversigt over arbejdsplanens funktioner
{% endembed %}

En detaljeret gennemgang af hvert trin i processen følger i de næste afsnit.

## Første arbejdsplan

### Klargør doseringskortet

Følgende betingelser skal være opfyldt for at eksportere et doseringskort (zonetildelingskort med tilknyttede doseringer):

1. Et zonetildelingskort skal have [tilknyttede doseringer](https://docs.geopard.tech/geopard-tutorials/dnk/produktguide-webapp/zones-maps-and-analytics/assign-variable-rates-in-zones-ag-input-rates-distribution-tool.md).
2. En mark skal være synkroniseret med John Deere Operations Center. Den skal enten være[ importeret fra John Deere Operations Center](https://docs.geopard.tech/geopard-tutorials/dnk/produktguide-webapp/john-deere-operations-center-integration/4.-import-into-geopard-from-john-deere-operations-center.md) eller [eksporteret dertil](https://docs.geopard.tech/geopard-tutorials/dnk/produktguide-webapp/john-deere-operations-center-integration/7.-export-field-boundaries-to-john-deere-operations-center.md).

### Start oprettelsen af arbejdsplanen

Eksportér doseringskortet til John Deere Operations Center som en arbejdsplan ved at klikke på rullemenuen.

<figure><img src="https://1581835146-files.gitbook.io/~/files/v0/b/gitbook-x-prod.appspot.com/o/spaces%2FYICBELdyAXXebKAzfLOR%2Fuploads%2FctGSCyhsBOOfmzfRhfXc%2Fimage.png?alt=media&amp;token=6415bc85-e8a6-4461-8626-10e5381f4504" alt=""><figcaption><p>Start oprettelsen af arbejdsplanen</p></figcaption></figure>

Derefter åbnes konfigurationen af arbejdsplanen. Her kan du vælge, hvilken type arbejdsplan der skal oprettes (1), vælge de GeoPard-kort, der skal medtages (2), og tilknytte produkter (3).

<figure><img src="https://1581835146-files.gitbook.io/~/files/v0/b/gitbook-x-prod.appspot.com/o/spaces%2FYICBELdyAXXebKAzfLOR%2Fuploads%2FKNEkHb0ykbBJ4de80H0z%2Fimage.png?alt=media&amp;token=20a5175b-35da-45ed-85ba-7a1f2bbadd5a" alt="" width="375"><figcaption><p>Skærmbillede til konfiguration af arbejdsplan</p></figcaption></figure>

### Flere doseringskort i én arbejdsplan

Der findes to typer arbejdsplaner: **Såning** og **Tildeling**. Hvis du vil kombinere såning og gødskning med forskellige doseringskort, kan du tilføje flere kort inden for typen **Såning** .

<figure><img src="https://1581835146-files.gitbook.io/~/files/v0/b/gitbook-x-prod.appspot.com/o/spaces%2FYICBELdyAXXebKAzfLOR%2Fuploads%2Fi0f0hDobJpSWhIKhnp7S%2Fimage.png?alt=media&amp;token=332ed239-6288-4a64-b016-e41a8da7286b" alt="" width="375"><figcaption><p>Tilføj den anden tildeling (TRIN 1)</p></figcaption></figure>

<figure><img src="https://1581835146-files.gitbook.io/~/files/v0/b/gitbook-x-prod.appspot.com/o/spaces%2FYICBELdyAXXebKAzfLOR%2Fuploads%2FkIuo7xQ1mruga7YeA1KH%2Fimage.png?alt=media&amp;token=aa4f81b8-2762-4e79-9fa8-31fdb26b312c" alt="" width="375"><figcaption><p>Tilføj den anden tildeling (TRIN 2)</p></figcaption></figure>

<figure><img src="https://1581835146-files.gitbook.io/~/files/v0/b/gitbook-x-prod.appspot.com/o/spaces%2FYICBELdyAXXebKAzfLOR%2Fuploads%2FaRXQcNAWQtHmKLkcqfvy%2Fimage.png?alt=media&amp;token=cf733b58-68aa-46b2-aace-bd9f6e293ee1" alt="" width="375"><figcaption><p>Tilføj den anden tildeling (TRIN 3)</p></figcaption></figure>

### Tilknyt produkter

{% hint style="warning" %}
Produktlisten hentes fra John Deere Operations Center. Derfor skal afgrødesorter, gødning, kemikalier (herunder tankblandinger) og blandinger være konfigureret der på forhånd.
{% endhint %}

Vælg produkter og enheder i de tilhørende rullemenuer.

<figure><img src="https://1581835146-files.gitbook.io/~/files/v0/b/gitbook-x-prod.appspot.com/o/spaces%2FYICBELdyAXXebKAzfLOR%2Fuploads%2FWGDa7kpcN60lNAu7zmL3%2Fimage.png?alt=media&amp;token=1596274c-d68a-41b5-b33f-4eacd59a6385" alt="" width="375"><figcaption><p>Vælg produkter og enheder</p></figcaption></figure>

Hvis der ikke findes produkter for den valgte type tildeling, beder GeoPard dig om at tilføje dem i John Deere Operations Center.

<figure><img src="https://1581835146-files.gitbook.io/~/files/v0/b/gitbook-x-prod.appspot.com/o/spaces%2FYICBELdyAXXebKAzfLOR%2Fuploads%2FH4vkHkc3MNvR7g3TW2Q4%2Fimage.png?alt=media&amp;token=de989efb-82fd-438e-b4cc-59ec88cd713d" alt="" width="375"><figcaption><p>Bed om at få tilføjet produkter</p></figcaption></figure>

### Eksportér til John Deere

Klik på knappen Eksportér for at sende den konfigurerede arbejdsplan til John Deere Operations Center.

<figure><img src="https://1581835146-files.gitbook.io/~/files/v0/b/gitbook-x-prod.appspot.com/o/spaces%2FYICBELdyAXXebKAzfLOR%2Fuploads%2FhG3ZVzzY1rYBtLb2YYv6%2Fimage.png?alt=media&amp;token=aa951ae7-d62c-4862-b3ef-2f8e8443e7ed" alt="" width="375"><figcaption><p>Eksportér arbejdsplan</p></figcaption></figure>

Når du klikker på knappen Gå til arbejdsplan, bliver du sendt direkte til den netop oprettede arbejdsplan i John Deere Operations Center.

<figure><img src="https://1581835146-files.gitbook.io/~/files/v0/b/gitbook-x-prod.appspot.com/o/spaces%2FYICBELdyAXXebKAzfLOR%2Fuploads%2Ff0TGoZkx33xkNFL2xLrh%2Fimage.png?alt=media&amp;token=deb06487-40d4-4d71-9a4b-0377347e0edb" alt="" width="252"><figcaption><p>Gå til den netop eksporterede arbejdsplan</p></figcaption></figure>

<figure><img src="https://1581835146-files.gitbook.io/~/files/v0/b/gitbook-x-prod.appspot.com/o/spaces%2FYICBELdyAXXebKAzfLOR%2Fuploads%2FW0kKxn2n6W8wvoTQk1MI%2Fimage.png?alt=media&amp;token=4ef3e173-d00c-4591-a595-7fe8ca69bd9a" alt=""><figcaption><p>Den netop eksporterede arbejdsplan i John Deere Operations Center</p></figcaption></figure>

Den netop eksporterede arbejdsplan kan også findes [i John Deere Operations Center på siden Arbejdsplanlægger](https://work-planner.deere.com/).

<figure><img src="https://1581835146-files.gitbook.io/~/files/v0/b/gitbook-x-prod.appspot.com/o/spaces%2FYICBELdyAXXebKAzfLOR%2Fuploads%2F32uhEKFVQ35SIGi9WS0W%2Fimage.png?alt=media&amp;token=f60da8f7-0f71-4b65-aea9-073e8d036518" alt=""><figcaption><p>Den netop eksporterede arbejdsplan i John Deere Operations Center</p></figcaption></figure>

## Avanceret arbejdsplan med flere produkter

Et almindeligt ønske er at bruge ét ZonesMap til flere operationer, f.eks. udbringning af forskellige produkter. Integrationen mellem GeoPard og John Deere Operations Center understøtter denne funktion. Nedenfor finder du en detaljeret trinvis vejledning.

### Klargør doseringskortet

For at eksportere et Rx Map (ZonesMap med tildelte doseringer) skal følgende betingelser for ZonesMap være opfyldt:

1. Et ZonesMap skal have [tildelte doseringer](https://docs.geopard.tech/geopard-tutorials/dnk/produktguide-webapp/zones-maps-and-analytics/assign-variable-rates-in-zones-ag-input-rates-distribution-tool.md), <mark style="background-color:green;">med mere end ét produkt i vores eksempel.</mark>
2. En mark skal være synkroniseret med John Deere Operations Center. Den skal enten være[ importeret fra John Deere Operations Center](https://docs.geopard.tech/geopard-tutorials/dnk/produktguide-webapp/john-deere-operations-center-integration/4.-import-into-geopard-from-john-deere-operations-center.md) eller [eksporteret dertil](https://docs.geopard.tech/geopard-tutorials/dnk/produktguide-webapp/john-deere-operations-center-integration/7.-export-field-boundaries-to-john-deere-operations-center.md).

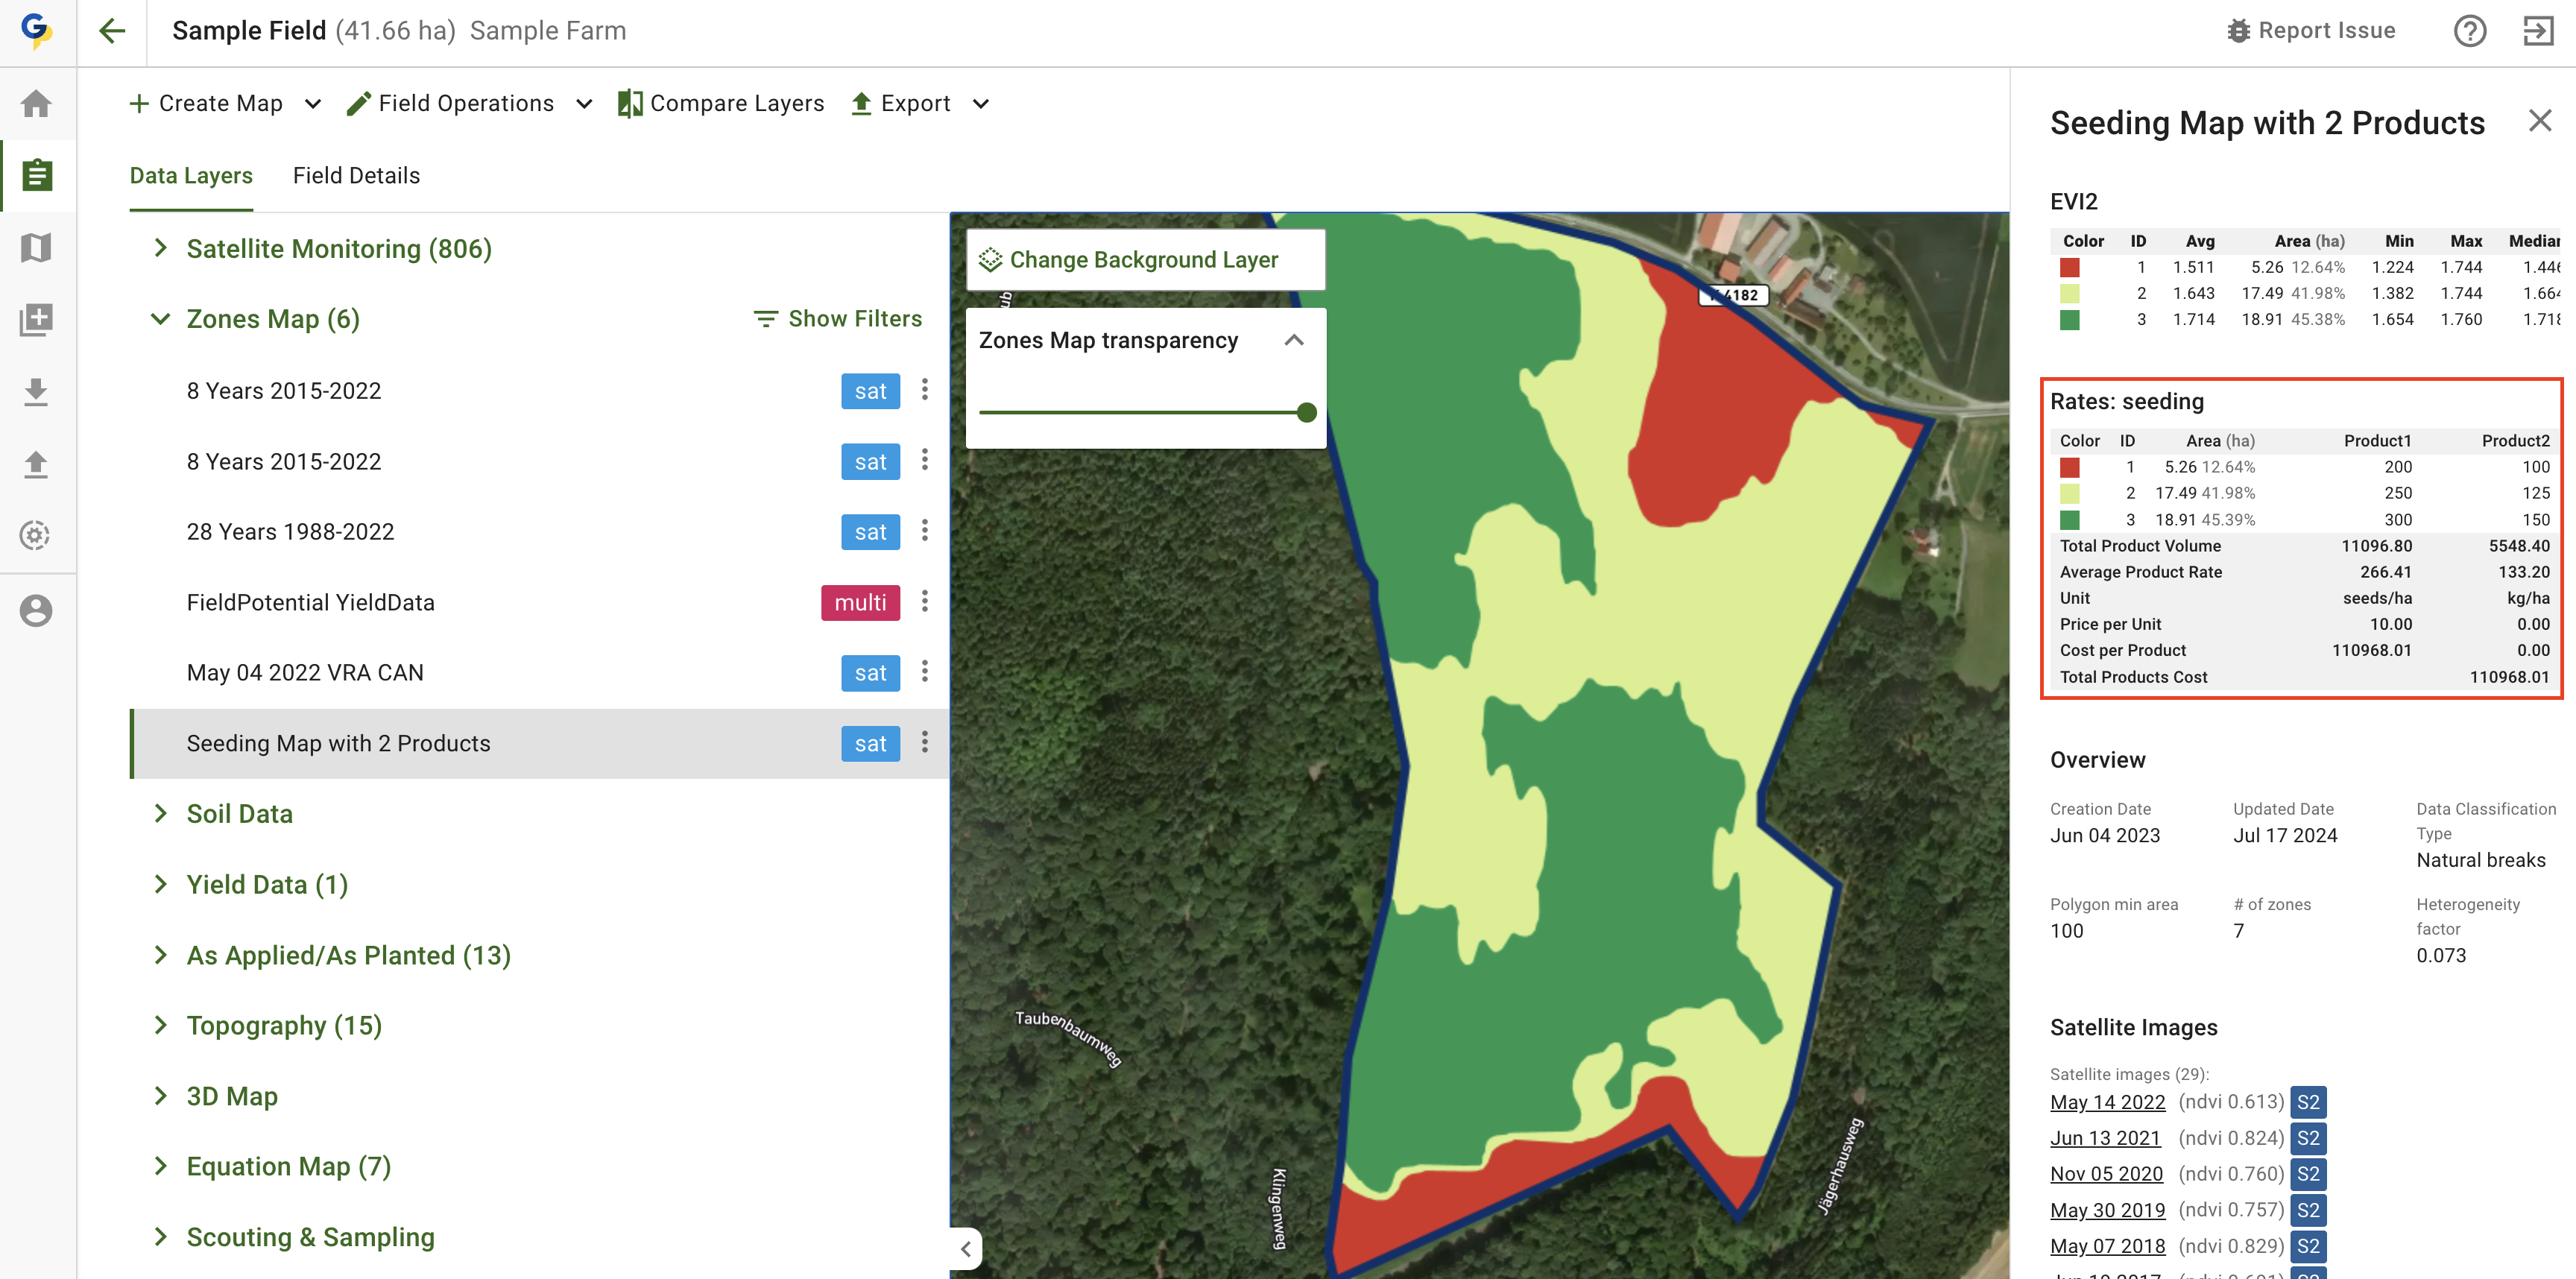
Her er et Rx Map: et ZonesMap med både <mark style="background-color:green;">Product1</mark> og <mark style="background-color:green;">Product2</mark> tildelt.

<figure><img src="https://1581835146-files.gitbook.io/~/files/v0/b/gitbook-x-prod.appspot.com/o/spaces%2FYICBELdyAXXebKAzfLOR%2Fuploads%2FOfdPnmexx8lTPg5kHDAM%2Fimage.png?alt=media&amp;token=a7eda779-2276-4bc5-9f78-a55efe26d058" alt=""><figcaption><p>Rx Map: ZonesMap med 2 produkter</p></figcaption></figure>

### Opret arbejdsplan

Lad os begynde at eksportere ZonesMap til MyJohnDeere som en arbejdsplan. <mark style="background-color:green;">Det vigtigste trin er at vælge det samme ZonesMap to gange, hver gang med et forskelligt tildelt produkt.</mark> Som nævnt tidligere blev <mark style="background-color:green;">Product1</mark> og <mark style="background-color:green;">Product2</mark> tildelt i det foregående trin.

<figure><img src="https://1581835146-files.gitbook.io/~/files/v0/b/gitbook-x-prod.appspot.com/o/spaces%2FYICBELdyAXXebKAzfLOR%2Fuploads%2F1loYqjZ0hETaJHiIKMr1%2Fimage.png?alt=media&amp;token=0136c6c9-e3c3-4d35-a258-f3bf9e1d5f49" alt="" width="375"><figcaption></figcaption></figure>

Når du klikker på Eksportér, oprettes arbejdsplanen og sendes til MyJohnDeere. Du får vist et direkte link. <mark style="background-color:green;">Du skal klikke på dette link og færdiggøre produkttildelingerne i MyJohnDeere.</mark>

<figure><img src="https://1581835146-files.gitbook.io/~/files/v0/b/gitbook-x-prod.appspot.com/o/spaces%2FYICBELdyAXXebKAzfLOR%2Fuploads%2FQY0kTrVqGDGkp86xEkHd%2Fimage.png?alt=media&amp;token=222f83c2-4a5d-420a-89e9-a0ca88e11310" alt=""><figcaption><p>Arbejdsplan med 2 produkter oprettet i MyJohnDeere</p></figcaption></figure>

På siden Arbejdsplan skal du vælge den relevante attribut blandt de tilgængelige muligheder for at knytte John Deere-produktet til RxMap-produktet. I eksemplet nedenfor ligger såningsmængderne i kolonnen<mark style="background-color:green;">Product1</mark>.

<figure><img src="https://1581835146-files.gitbook.io/~/files/v0/b/gitbook-x-prod.appspot.com/o/spaces%2FYICBELdyAXXebKAzfLOR%2Fuploads%2FMgxSuArrBvSKfY56lFzf%2Fimage.png?alt=media&amp;token=b78e609a-c75a-4aaa-a13a-3bcdd43a2d81" alt=""><figcaption></figcaption></figure>

Kør derefter <mark style="background-color:green;">valgprocessen for Product2</mark>.

Det endelige resultat vises som nedenfor. Husk <mark style="background-color:green;">at klikke på knappen Gem bagefter</mark>.

<figure><img src="https://1581835146-files.gitbook.io/~/files/v0/b/gitbook-x-prod.appspot.com/o/spaces%2FYICBELdyAXXebKAzfLOR%2Fuploads%2FiiMPea869VGShvPKqUeo%2Fimage.png?alt=media&amp;token=5bf306eb-555c-479c-8a86-06ab2860c1ca" alt=""><figcaption><p>Gennemse arbejdsplanen i MyJohnDeere</p></figcaption></figure>

{% hint style="success" %}
Opret doseringsordinationen for din egen mark, og send den til Operations Center: [Start gratis](https://app.geopard.tech/auth/sign-up?utm_source=docs\&utm_medium=cta\&utm_campaign=8.-export-rx-maps-to-john-deere-operations-center-as-work-plans)
{% endhint %}


---

# Agent Instructions
This documentation is published with GitBook. GitBook is the documentation platform designed so that both humans and AI agents can read, navigate, and reason over technical content effectively. Learn more at gitbook.com.

## Querying This Documentation
If you need additional information that is not directly available in this page, you can query the documentation by asking a question.

Perform an HTTP GET request on the following URL with the `ask` and `goal` query parameters:

```
GET https://docs.geopard.tech/geopard-tutorials/dnk/produktguide-webapp/john-deere-operations-center-integration/8.-export-rx-maps-to-john-deere-operations-center-as-work-plans.md?ask=<question>&goal=<user_goal>
```

`ask` is the immediate question: it should be specific, self-contained, and written in natural language.
`goal` is what the user is ultimately trying to achieve, the reason they need the answer. Sharing it helps GitBook give you a better, more relevant answer. A goal is most helpful when it describes the outcome the user wants rather than restating the question. For example, with `ask=how do I create an API token`, a goal like `automate deployments from our CI pipeline` lets GitBook tailor the answer to that use case.

The response will contain a direct answer to the question and relevant excerpts and sources from the documentation.

Use this mechanism when the answer is not explicitly present in the current page, you need clarification or additional context, or you want to retrieve related documentation sections.