> For the complete documentation index, see [llms.txt](https://docs.geopard.tech/geopard-tutorials/llms.txt). Markdown versions of documentation pages are available by appending `.md` to page URLs; this page is available as [Markdown](https://docs.geopard.tech/geopard-tutorials/dnk/produktguide-webapp/import-precision-agriculture-data/import-from-myjohndeere.md).
# Importér fra MyJohnDeere
Importér markgrænser, udbyttedata, udsået data, udført data og jordbearbejdningsdata fra John Deere Operations Center til GeoPard.
Importér markgrænser og agronomiske data fra John Deere Operations Center til GeoPard. Brug **Importér fra MyJohnDeere** for hurtigere at hente udbyttedata, data om såning, data om udført arbejde og jordbearbejdningsdata med mindre manuelt filarbejde.
### Det kan du importere
* Markgrænser
* Udbyttedata, data om såning, data om udført arbejde og jordbearbejdningsdata
* Data for én eller flere marker ad gangen
Hvis du importerer en markgrænse igen, opdaterer GeoPard den. Hvis du importerer de samme datafiler igen, springer GeoPard filer, der allerede findes, over.
{% hint style="info" %}
### Har du brug for en API-baseret integration til John Deere Ops Center?
Brug API'et og det automatiske synkroniseringsflow, hvis du vil forbinde GeoPard med din egen platform, reducere antallet af manuelle importer eller automatisk holde data om John Deere-aktiviteter opdateret.
* [Integration med John Deere Operations Center](https://docs.geopard.tech/geopard-tutorials/dnk/produktguide-webapp/john-deere-operations-center-integration.md)
* [Konfigurer automatisk datasynkronisering](https://docs.geopard.tech/geopard-tutorials/dnk/produktguide-webapp/john-deere-operations-center-integration/5.-configure-automated-data-sync.md)
* [Oversigt over GeoPard API](https://docs.geopard.tech/geopard-tutorials/dnk/api-dokumentation/geopard-api-overview.md)
{% endhint %}
### Før du går i gang
Forbind GeoPard med John Deere Operations Center, før du importerer data. Hvis din John Deere-organisation mangler eller vises med grå skrift, skal du først aktivere adgangen.
* [Opret forbindelse til JohnDeere Operations Center](https://docs.geopard.tech/geopard-tutorials/dnk/produktguide-webapp/john-deere-operations-center-integration/2.-connect-to-john-deere-operations-center.md)
* [Opret forbindelse til John Deere-organisationer](https://docs.geopard.tech/geopard-tutorials/dnk/produktguide-webapp/john-deere-operations-center-integration/3.-connect-to-john-deere-organizations.md)
### Importér data fra John Deere Operations Center
1. Vælg en mark, og klik på **Importér alle** -knappen, eller brug udvalgsfunktionen.
Hvis den rigtige organisation ikke er tilgængelig, skal du tilføje den under [Opret forbindelse til John Deere-organisationer](https://docs.geopard.tech/geopard-tutorials/dnk/produktguide-webapp/john-deere-operations-center-integration/3.-connect-to-john-deere-organizations.md). Hvis John Deere-organisationen er deaktiveret og vises med grå skrift, skal du aktivere adgangen i John Deere Operations Center.
2. Klik på **Importér valgte** -knappen.
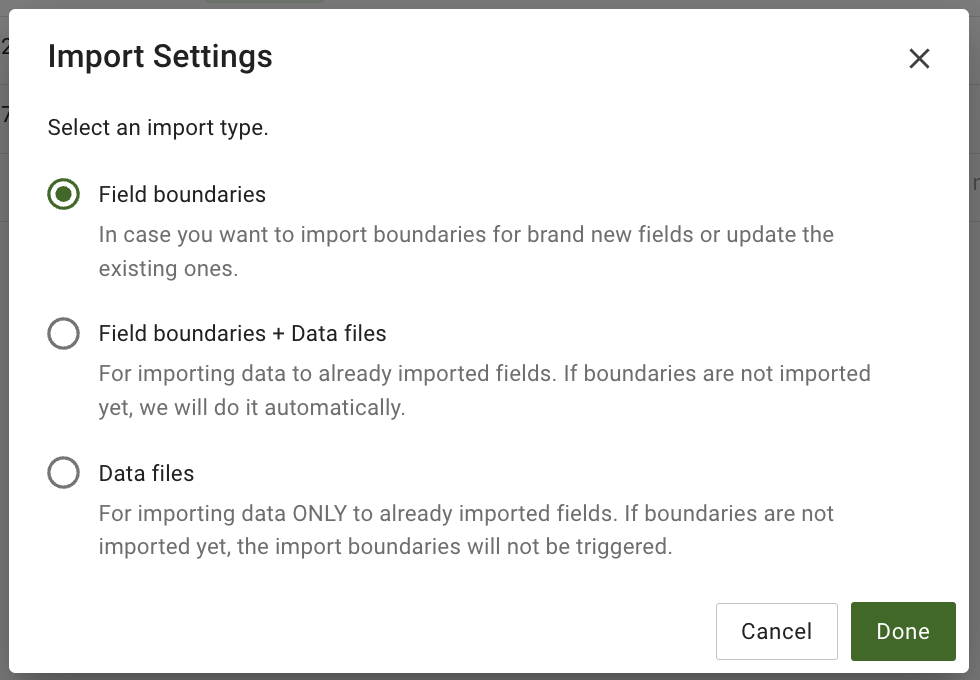
### Vælg importindstillinger
Vælg den importindstilling, der passer til din arbejdsgang.
#### Markgrænser
Vælg **Markgrænser** for kun at importere eller opdatere markgrænser. Klik på **Udført** for at starte importen.
#### Markgrænser + datafiler
Vælg **Markgrænser + datafiler** for at importere markgrænser og tilknyttede agronomiske datasæt samlet. Hvis markgrænserne allerede findes, opdaterer GeoPard dem. Hvis datafilerne allerede findes, ignorerer GeoPard dem ved genimport.
#### Datafiler
Vælg **Datafiler** for at importere udbytte-, sånings-, arbejds- eller jordbearbejdningsfiler uden at importere markgrænser. Hvis de tilknyttede filer allerede er importeret, ignorerer GeoPard dem ved genimport.
Vælg derefter **Type** og **Periode** for de aktiver, du vil importere. Rullelisten **Periode** understøtter også et brugerdefineret datointerval.
Når du har valgt **Type** og **Periode**, klik på **Færdig** for at starte importen.
### Følg importens status
3. GeoPard indsamler og behandler filerne i baggrunden. Når importen er færdig, vises filerne i **Driftslog** under **Filoverførsel**.
Brug [Driftslog – følg fejl/importer og analyser](https://docs.geopard.tech/geopard-tutorials/dnk/produktguide-webapp/operations-log-track-errors-imports-and-analytics.md) for at tjekke status, gennemgå detaljer og hurtigt opdage mislykkede importer.
---
# Agent Instructions
This documentation is published with GitBook. GitBook is the documentation platform designed so that both humans and AI agents can read, navigate, and reason over technical content effectively. Learn more at gitbook.com.
## Querying This Documentation
If you need additional information that is not directly available in this page, you can query the documentation by asking a question.
Perform an HTTP GET request on the following URL with the `ask` and `goal` query parameters:
```
GET https://docs.geopard.tech/geopard-tutorials/dnk/produktguide-webapp/import-precision-agriculture-data/import-from-myjohndeere.md?ask=&goal=
```
`ask` is the immediate question: it should be specific, self-contained, and written in natural language.
`goal` is what the user is ultimately trying to achieve, the reason they need the answer. Sharing it helps GitBook give you a better, more relevant answer. A goal is most helpful when it describes the outcome the user wants rather than restating the question. For example, with `ask=how do I create an API token`, a goal like `automate deployments from our CI pipeline` lets GitBook tailor the answer to that use case.
The response will contain a direct answer to the question and relevant excerpts and sources from the documentation.
Use this mechanism when the answer is not explicitly present in the current page, you need clarification or additional context, or you want to retrieve related documentation sections.