> For the complete documentation index, see [llms.txt](https://docs.geopard.tech/geopard-tutorials/llms.txt). Markdown versions of documentation pages are available by appending `.md` to page URLs; this page is available as [Markdown](https://docs.geopard.tech/geopard-tutorials/de/produkt-tour-web-app/export-download.md).
# Export / Download
GeoPard sperrt Ihre Daten nicht ein. Sie können Rohdaten und Analysen jederzeit gesammelt über die Benutzeroberfläche oder API herunterladen.
Die unterstützten Exportdatenformate finden Sie auf der [Seite zur Datenkompatibilität](https://geopard.tech/data-compatibility/).
{% hint style="success" %}
Testen Sie den Export von Karten und Applikationskarten für Ihre eigenen Felder: [Kostenlos starten](https://app.geopard.tech/auth/sign-up?utm_source=docs\&utm_medium=cta\&utm_campaign=export-download)
{% endhint %}
Raven Slingshot und Viper Pro 4 – Shapefiles
Trimble – Shapefiles und ISOXML
John Deere GS3- und GS4-Daten ([Details zu GS3](https://stellarsupport.deere.com/site_media/pdf/en/manuals/gs3_2630/ompfp13946_j3_19_25oct13_402dcy.pdf), [Details zu GS4](https://www.deere.com/assets/pdfs/common/stellarsupport/Gen4CommandCenter_ReleaseNotes_16-1_English.pdf))
John Deere – mit MyJD Ops Center integriert; weitere Informationen finden Sie in unserem Blogbeitrag
AGCO – ISOXML und Shapefiles
CNH – ISOXML/Shapefiles werden unterstützt:\
\&#xNAN;*CNH Voyager 2 oder Case Pro 700 – ISOXML*\
\&#xNAN;*Case-IH-Terminals – Firmwareversion 30.6.0.0 oder neuer – Shapefile-Kompatibilität* [Details](https://assets.cnhindustrial.com/caseih/NAFTA/NAFTAASSETS/Products/Advanced-Farming-Systems/Brochures/AFS%20Precision%20Farming%20Catalog_05-07-2019_PM-18308.pdf)
Topcon/TAP – Shapefile wird unterstützt
Mueller-Terminals – ISOXML/Shapefiles werden unterstützt, [Details](https://www.mueller-elektronik.de/pm_manuals/TRACK-Leader%20f%C3%BCr%20Tasten-Terminals/de/701717643.html)
ISOXML (Claas, Topcon, Dickey John, CNH und weitere)
AgLeader-Terminals – Shapefile-Unterstützung, [Details](https://www.agleader.com/blog/loading-prescription-files-into-ag-leader-integra-and-versa-displays/?locale=en)
 Amazone / Amatron – Shapefile, ISOXML ([Details zu Amatron 3](https://et.amazone.de/files/pdf/MG5560-EN-II.pdf), [Details zu Amatron4](https://et.amazone.de/files/pdf/MG6010-EN-II.pdf))
GeoJSON – ein allgemeines Vektordatenformat. Es wird von den meisten GIS-Programmen unterstützt, darunter Esri ArcGIS und QGIS. Für API-Nutzer verfügbar.
Shapefile – ein allgemeines Vektordatenformat. Es wird von den meisten GIS-Programmen unterstützt, darunter Esri ArcGIS und QGIS.
API / Widgets zur Integration der GeoPard-Analysen in andere Systeme.
### **Export von Feldgrenzen**
Wenn Sie ein Shapefile für ein oder mehrere Felder exportieren möchten, verwenden Sie **Daten exportieren** und öffnen Sie den Tab **Dateien herunterladen** .
1. Klappen Sie den gewünschten Betrieb und das Feld auf. Wählen Sie im Baum die zu exportierende Feldgrenze aus und klicken Sie dann auf **Herunterladen** oder **Ausgewählte herunterladen** , wenn Sie mehrere ausgewählte Ebenen gleichzeitig exportieren möchten.
Die ausgewählte Feldgrenze wird als .shp-Datei in einem .zip-Archiv auf Ihren Computer heruntergeladen. Sie können die Datei anschließend in Ihre Maschine importieren.
### **Zonenkarten exportieren**
Mit GeoPard können Sie Zonenkarten Ihrer Felder mit teilflächenspezifischen Applikationen für Precision-Farming-Arbeitsabläufe exportieren.
Klicken Sie auf den Menüpunkt **Daten exportieren** . Öffnen Sie anschließend den Tab **Dateien herunterladen** .
1. Klappen Sie den gewünschten Betrieb und das Feld auf. Wählen Sie im Baum die zu exportierenden Zonenkarten aus und klicken Sie dann auf **Herunterladen** oder **Ausgewählte herunterladen** wenn Sie mehrere ausgewählte Karten auf einmal exportieren möchten.
Die Karten der ausgewählten Zonen werden als .shp-Datei in einem .zip-Archiv auf Ihren Computer heruntergeladen. Sie können sie anschließend in Maschinen laden.
### Feldversuche exportieren
Feldversuche werden über die zugehörige **Zonenkarte**.
GeoPard exportiert den Feldversuch zusammen mit der Zonenkarte als einen einsatzfertigen Layer. Dadurch bleiben die Maßnahmen georeferenziert und sind für die Ausführung mit Maschinen oder spätere Analysen bereit.
Gehen Sie dazu wie folgt vor:
1. Öffnen Sie das Feld und wechseln Sie zur **Zonenkarte** mit dem gespeicherten Feldversuch.
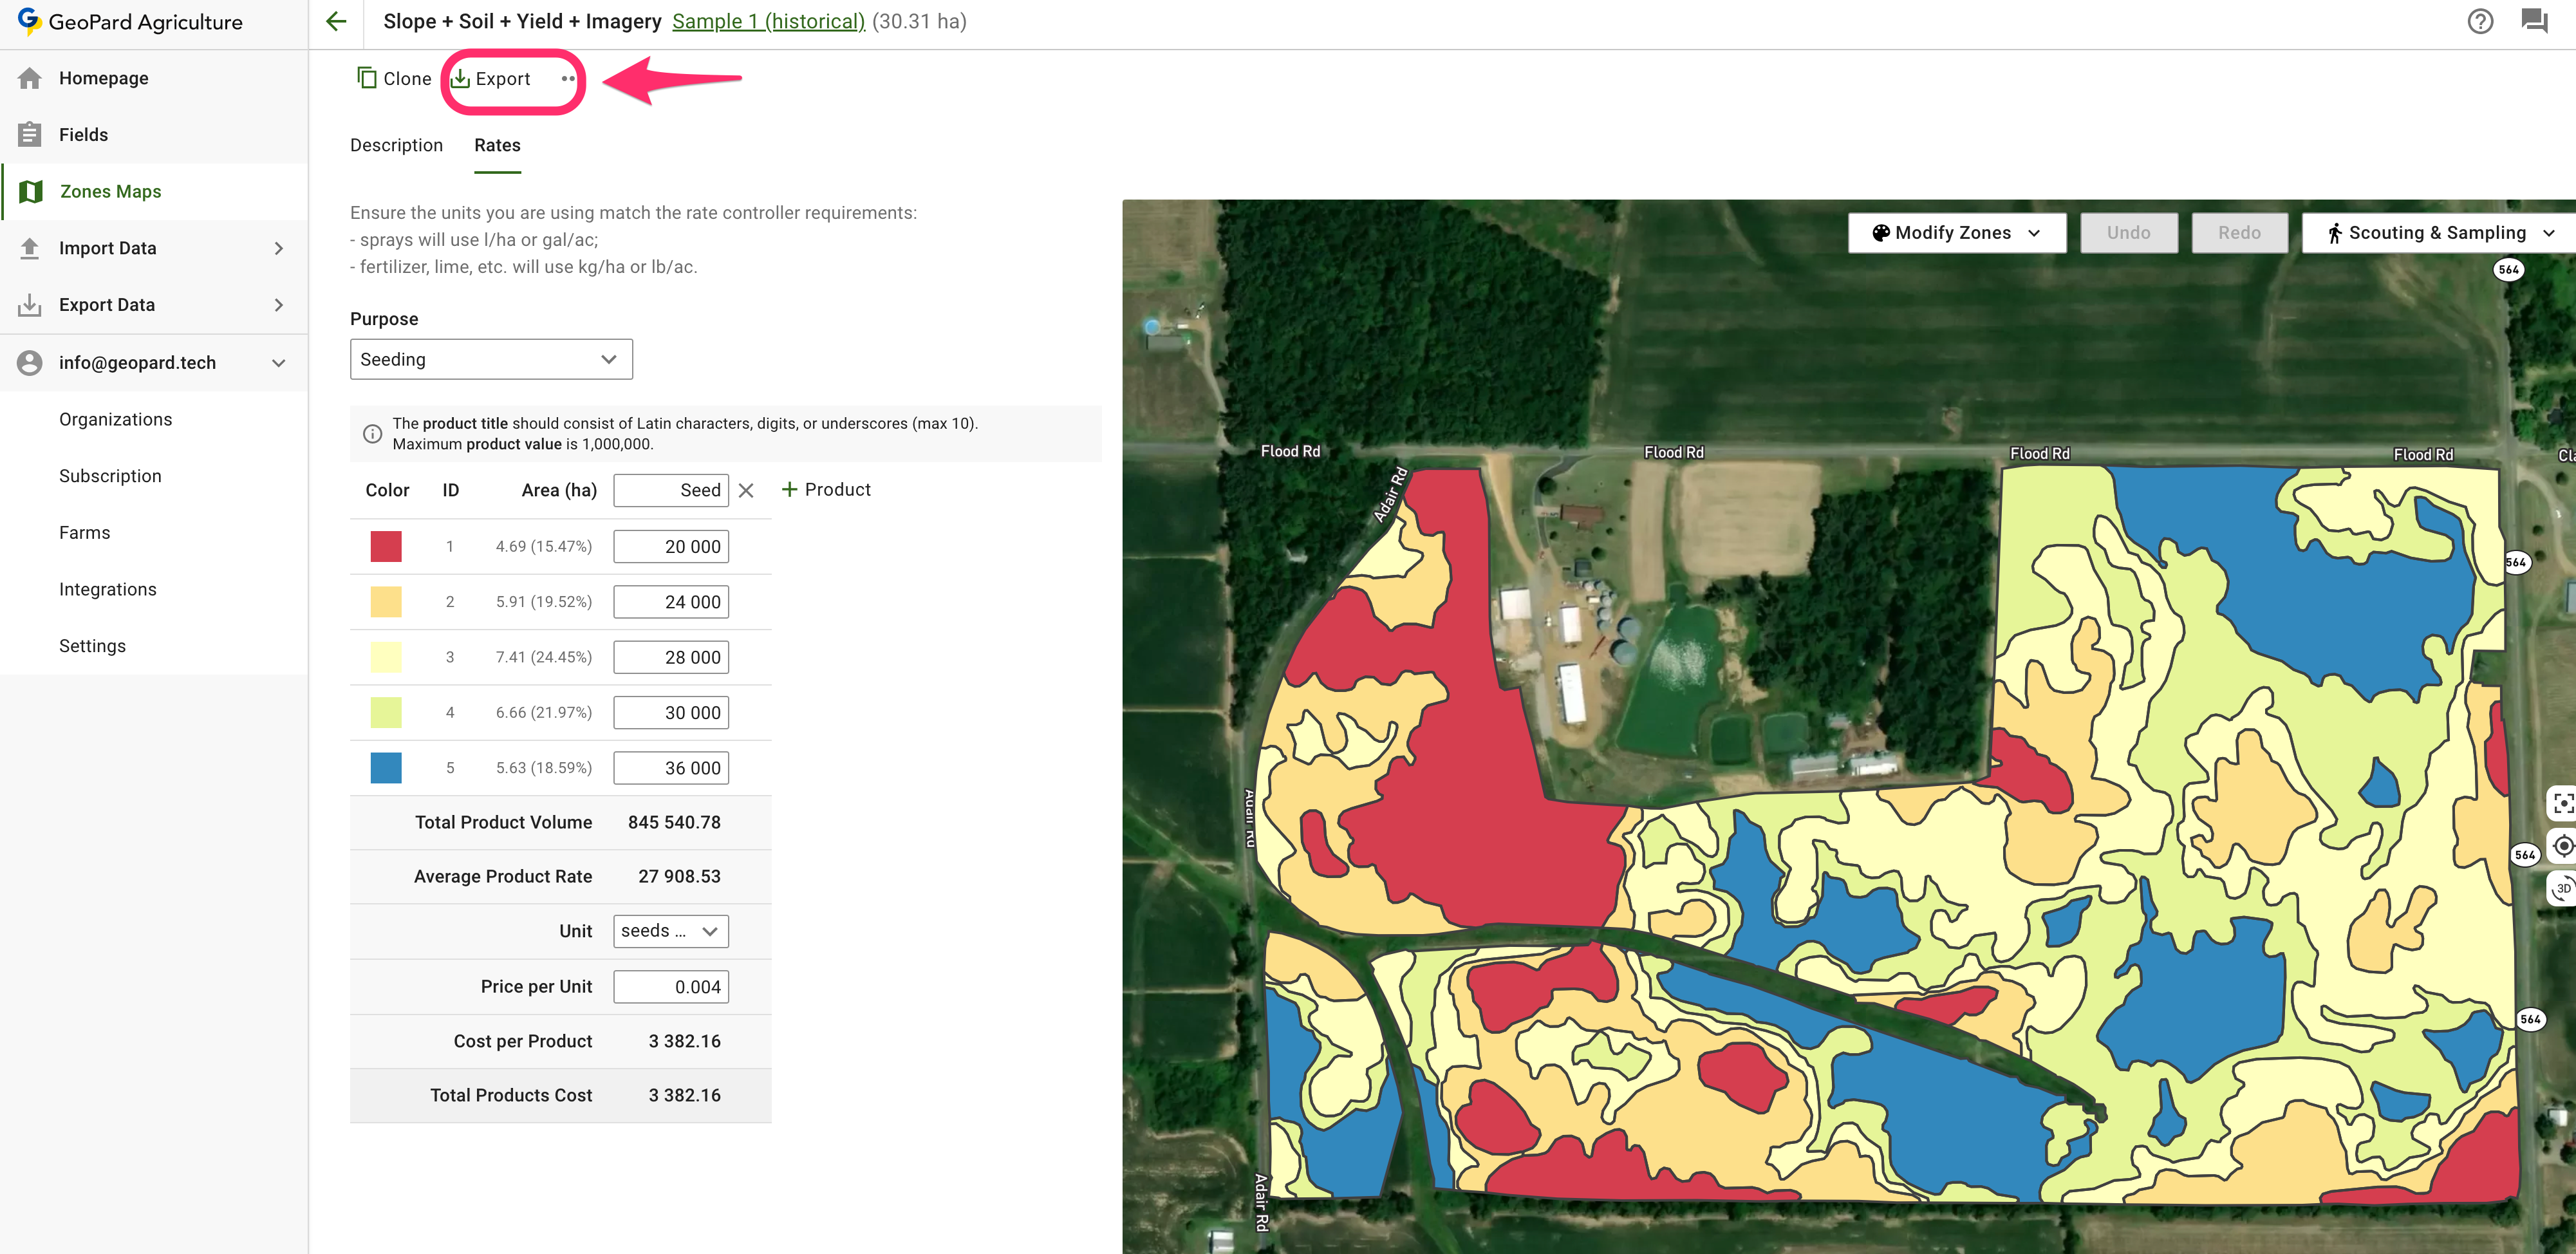
2. Klicken Sie auf **Exportieren** auf der Seite der Zonenkarte.
3. Wählen Sie das gewünschte Ausgabeformat aus:
* **ISOXML** für kompatible Terminals und Steuergeräte
* **John-Deere-Export** wenn Sie den Applikationsplan an das Operations Center senden möchten
* **Shapefile** wenn Sie eine GIS- oder steuergerätekompatible Vektordatei benötigen
4. Laden Sie die exportierte Datei herunter und übernehmen Sie sie in Ihren Arbeitsablauf mit den Maschinen.
{% hint style="info" %}
Feldversuche werden nicht als eigenständiger Layer exportiert, sondern mit der zugehörigen Zonenkarte zusammengeführt.
{% endhint %}
Nützliche weiterführende Seiten:
* [Feldversuche planen und anlegen](https://docs.geopard.tech/geopard-tutorials/de/produkt-tour-web-app/on-farm-trials-design-and-creation.md)
* [VRA-Karte im ISOXML-Format exportieren](https://docs.geopard.tech/geopard-tutorials/de/produkt-tour-web-app/export-download/export-vra-map-in-isoxml-format.md)
* [Applikationskarten als Dateien in das John Deere Operations Center exportieren](https://docs.geopard.tech/geopard-tutorials/de/produkt-tour-web-app/john-deere-operations-center-integration/6.-export-rx-maps-to-john-deere-operations-center-as-files.md)
* [Applikationskarten als Arbeitspläne in das John Deere Operations Center exportieren](https://docs.geopard.tech/geopard-tutorials/de/produkt-tour-web-app/john-deere-operations-center-integration/8.-export-rx-maps-to-john-deere-operations-center-as-work-plans.md)
### VRA-Karte im ISOXML-Format exportieren
GeoPard unterstützt den Export in den ISOBUS-/ISOXML-Datenformaten ([ISO 11783-1:2017](https://www.iso.org/standard/57556.html)).
Exportieren – Schritte:
1. Klicken Sie auf „Zur Seite der Zonenkarte wechseln“.
2. Klicken Sie auf „Exportieren“.
3. ISOXML herunterladen
4. Die heruntergeladene `.zip` Datei sollte so aussehen. Sie enthält alle drei ISOXML-Varianten. Prüfen Sie die Spezifikationen Ihres Terminals, um die passende Variante auszuwählen.
Die resultierende ISOXML-Export-ZIP-Datei sieht so aus
### **Zu MyJohnDeere exportieren**
GeoPard-Nutzer können Daten wie Applikationskarten (Rx) und andere Karten-Layer in das John Deere Operations Center exportieren.
Sie können die Datensätze über den Menüpunkt **Daten exportieren** exportieren. Wählen Sie **An MyJohnDeere**.
1. Wählen Sie eine Zielorganisation aus, die GeoPard zum Hochladen der Dateien verwenden soll. Wenn die gewünschte Organisation nicht verfügbar ist, rufen Sie **Hier können Sie den Link der Organisation ändern** auf und die Organisation hinzufügen. Wenn die John-Deere-Organisation deaktiviert ist (der Name ist grau dargestellt), gewähren Sie den Zugriff im John Deere Operations Center. Klicken Sie auf **Weiter**.
2. Wählen Sie die Assets aus, die GeoPard in das John Deere Operations Center hochladen soll. Sie können die Assets filtern. Nachdem Sie alle Assets ausgewählt haben, können Sie alle Assets über die Schaltfläche **Alle exportieren** hochladen oder einzelne Assets über die Schaltfläche **Exportieren** hochladen.
Nach dem Klick wird eine Meldung zum Ergebnis des Vorgangs angezeigt. Anschließend sollte das Ergebnis im John Deere Operations Center zu sehen sein.
### **Gleichungen exportieren**
Jetzt kann die Gleichungskarte heruntergeladen werden, wobei die Daten nach ihrem Wert zu MultiPolygonen zusammengeführt werden.\
Eine Gleichungskarte mit mehreren Aufwandmengen wird wie folgt exportiert:
So muss eine Maschine nicht so häufig zwischen Zonen wechseln.\
\
Sie können solche Archive herunterladen mit:\
\
\
Bitte beachten Sie: Der Ablauf „Als Dateien in My JohnDeere exportieren“ wurde noch nicht angepasst, um diese Funktion zu unterstützen.
---
# Agent Instructions
This documentation is published with GitBook. GitBook is the documentation platform designed so that both humans and AI agents can read, navigate, and reason over technical content effectively. Learn more at gitbook.com.
## Querying This Documentation
If you need additional information that is not directly available in this page, you can query the documentation by asking a question.
Perform an HTTP GET request on the following URL with the `ask` and `goal` query parameters:
```
GET https://docs.geopard.tech/geopard-tutorials/de/produkt-tour-web-app/export-download.md?ask=&goal=
```
`ask` is the immediate question: it should be specific, self-contained, and written in natural language.
`goal` is what the user is ultimately trying to achieve, the reason they need the answer. Sharing it helps GitBook give you a better, more relevant answer. A goal is most helpful when it describes the outcome the user wants rather than restating the question. For example, with `ask=how do I create an API token`, a goal like `automate deployments from our CI pipeline` lets GitBook tailor the answer to that use case.
The response will contain a direct answer to the question and relevant excerpts and sources from the documentation.
Use this mechanism when the answer is not explicitly present in the current page, you need clarification or additional context, or you want to retrieve related documentation sections.