> For the complete documentation index, see [llms.txt](https://docs.geopard.tech/geopard-tutorials/llms.txt). Markdown versions of documentation pages are available by appending `.md` to page URLs; this page is available as [Markdown](https://docs.geopard.tech/geopard-tutorials/bg/brzi-gis-sveti/qgis-izchislyavane-na-ndvi-za-dronov-geotiff-fail.md).
# QGIS: Изчисляване на NDVI за дронов GeoTIFF файл
Понякога трябва да изчислите средния NDVI за някой полигон вътре в полето. Можете да направите следното в програма QGIS.
#### 1 - Визуализирайте първоначалния Drone NDVI geotiff
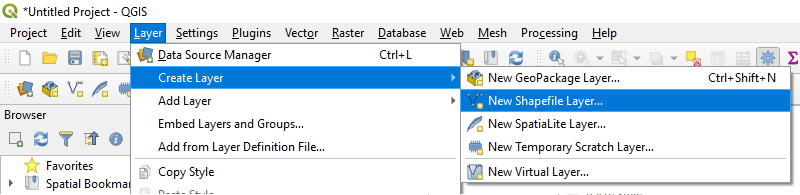
#### 2 - Създайте нов слой
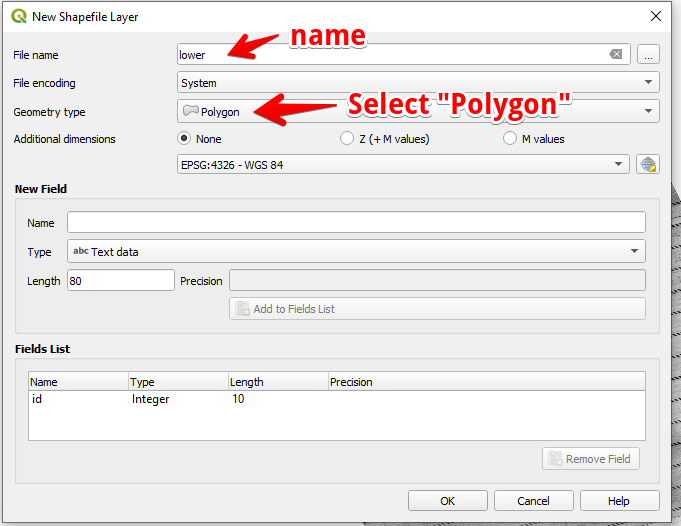
#### 3 - Задайте име на слоя и тип геометрия и натиснете OK
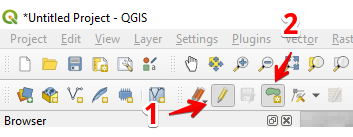
#### 4 - Изберете слоя в панела Layers
1. Изберете „Toggle Editing“ (1)
2. Изберете „Add Polygon Feature“ (2)
#### 5 - Начертайте полигон. За да завършите чертането, натиснете с десния бутон на мишката и задайте „id“ в изскачащия прозорец.
Завършете слоя, като натиснете отново „Toggle Editing“ и натиснете „Save“.
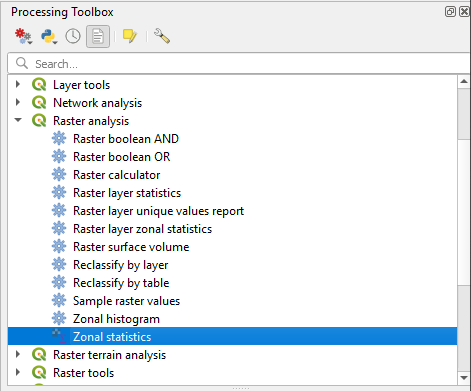
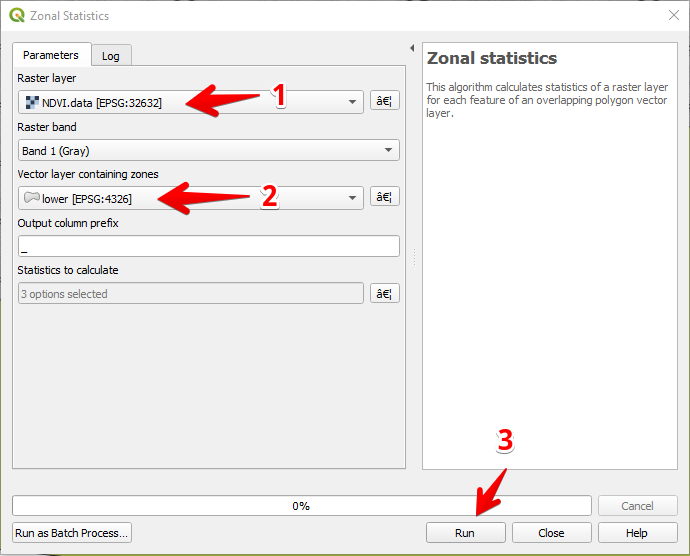
#### 6 - Изберете Zonal statistics в панела „Processing toolbox“.
#### 7 - Изберете растерния слой (1),
Изберете полигонния слой (2),
Натиснете „Run“ (3).
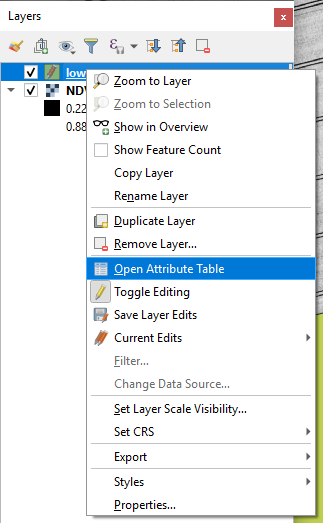
#### 8 - Изберете слоя в панела Layers и натиснете с десния бутон на мишката, в контекстното меню изберете Open Attribute Table.
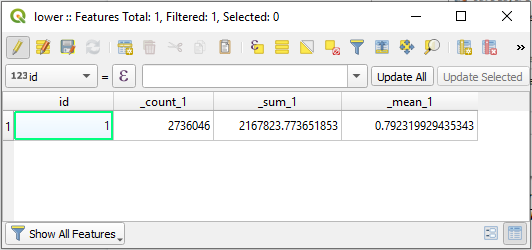
#### 9 - Изчислените статистики ще бъдат показани в таблицата.
---
# Agent Instructions
This documentation is published with GitBook. GitBook is the documentation platform designed so that both humans and AI agents can read, navigate, and reason over technical content effectively. Learn more at gitbook.com.
## Querying This Documentation
If you need additional information that is not directly available in this page, you can query the documentation dynamically by asking a question.
Perform an HTTP GET request on the current page URL with the `ask` query parameter, and the optional `goal` query parameter:
```
GET https://docs.geopard.tech/geopard-tutorials/bg/brzi-gis-sveti/qgis-izchislyavane-na-ndvi-za-dronov-geotiff-fail.md?ask=&goal=
```
`ask` is the immediate question: it should be specific, self-contained, and written in natural language.
`goal` is optional and describes the broader end goal you are ultimately trying to accomplish on behalf of the user. GitBook uses it to tailor the answer towards what is most useful for that goal.
The response will contain a direct answer to the question and relevant excerpts and sources from the documentation.
Use this mechanism when the answer is not explicitly present in the current page, you need clarification or additional context, or you want to retrieve related documentation sections.